Genshin Impact Sacrificial Offering guide
How to complete the lengthy and complex new world quest.

Keep up to date with the most important stories and the best deals, as picked by the PC Gamer team.
You are now subscribed
Your newsletter sign-up was successful
Want to add more newsletters?
Genshin Impact Sacrificial Offering is a new world quest in the Inazuma region, and there are a lot of steps—as well as a puzzle—you need to overcome to complete it. When you first get to Inazuma, you'll find that there's a lot to do, thanks to the Genshin Impact 2.0 update. Of course, you may have your heart set on adding the new five-star character, Ayaka to your team, or farming Sakura Bloom, one of her Ascension Materials.
But when you're ready to start exploring and you come across the new quests offered with the update, you may wonder how to proceed. As mentioned above, this quest is quite tricky, so if you're stuck trying to figure out how to complete the Sacrificial Offering quest with help from the Genshin Impact Memento Lens, this guide will help you out.
Mysterious Shadows
Genshin Impact Sacrificial Offering guide: Locate the Mysterious Shadows
You'll get the Sacrificial Offering in Konda once you've completed the Strange Story quest in the area. You're tasked with finding a Genshin Impact abandoned shrine, northeast of Konda Village. This may sound simple enough but you'll have a bit of work to do when you get there.
Article continues belowOnce you get there, you'll find a large fox statue which Paimon will comment on. Now you need to find Mysterious Shadows around the area. These are quite easy to find, though one is hidden on a roof, partly obscured by a tree.
When you interact with them, they'll teleport to another nearby location and you need to find them again and repeat the process until all are gathered near the fox statues in the centre of the area. You'll know when you've got it right as chests will spawn for you to loot.
Memento Lens
Genshin Impact Memento Lens: Where to use it

Genshin Impact guide: 9 beginner tips
Genshin Impact characters: Full tier list
Genshin Impact map: All Anemoculus locations
Genshin Impact code: Rewards and how to redeem
Genshin Impact build: The best overall setups
Next, head to the Grand Narukami Shrine near Mt. Yougou. You need to locate the shrine maiden and speak to her and she'll hand over the Memento Lens. Now, head back to the Genshin Impact abandoned shrine northeast of Konda Village and use the device on the Earth Kitsune statuettes—these have glowing purple eyes and markings, so they're pretty easy to spot.
Use the Genshin Impact Memento Lens by equipping it (it's found under 'Gadgets' in the menu) and aim it at one of the statuettes. If you've done this correctly, you should see the message "Through the Memento Lens, you see something that wasn't there…". You'll see mysterious figures talking but pay attention to what Paimon says as she'll tell you what you need to know for the next step. Keep using the lens on different statuettes dotted around the area this step of the quest finally completes.
Keep up to date with the most important stories and the best deals, as picked by the PC Gamer team.
Now, head back to the Sky Kitsune Statue—this is the fox statue where Paimon instructed you when you first arrived here. You'll be prompted to enter the lines in the right order. Paimon has already told you this but if you weren't paying attention or you're unsure, you can find them below:
- First line: In the name of Narukami’s envoy.
- Second line: And of the Haukshin bloodline.
- Third line: Bring forth the fried tofu!
Once you've entered these lines correctly, the statue will start glowing purple and you'll be prompted to take the ward. Now it's time to destroy the barrier.
Sacred Sakura Cleansing Ritual
Genshin Impact destroy the barrier: How to complete the Sacred Sakura cleansing ritual
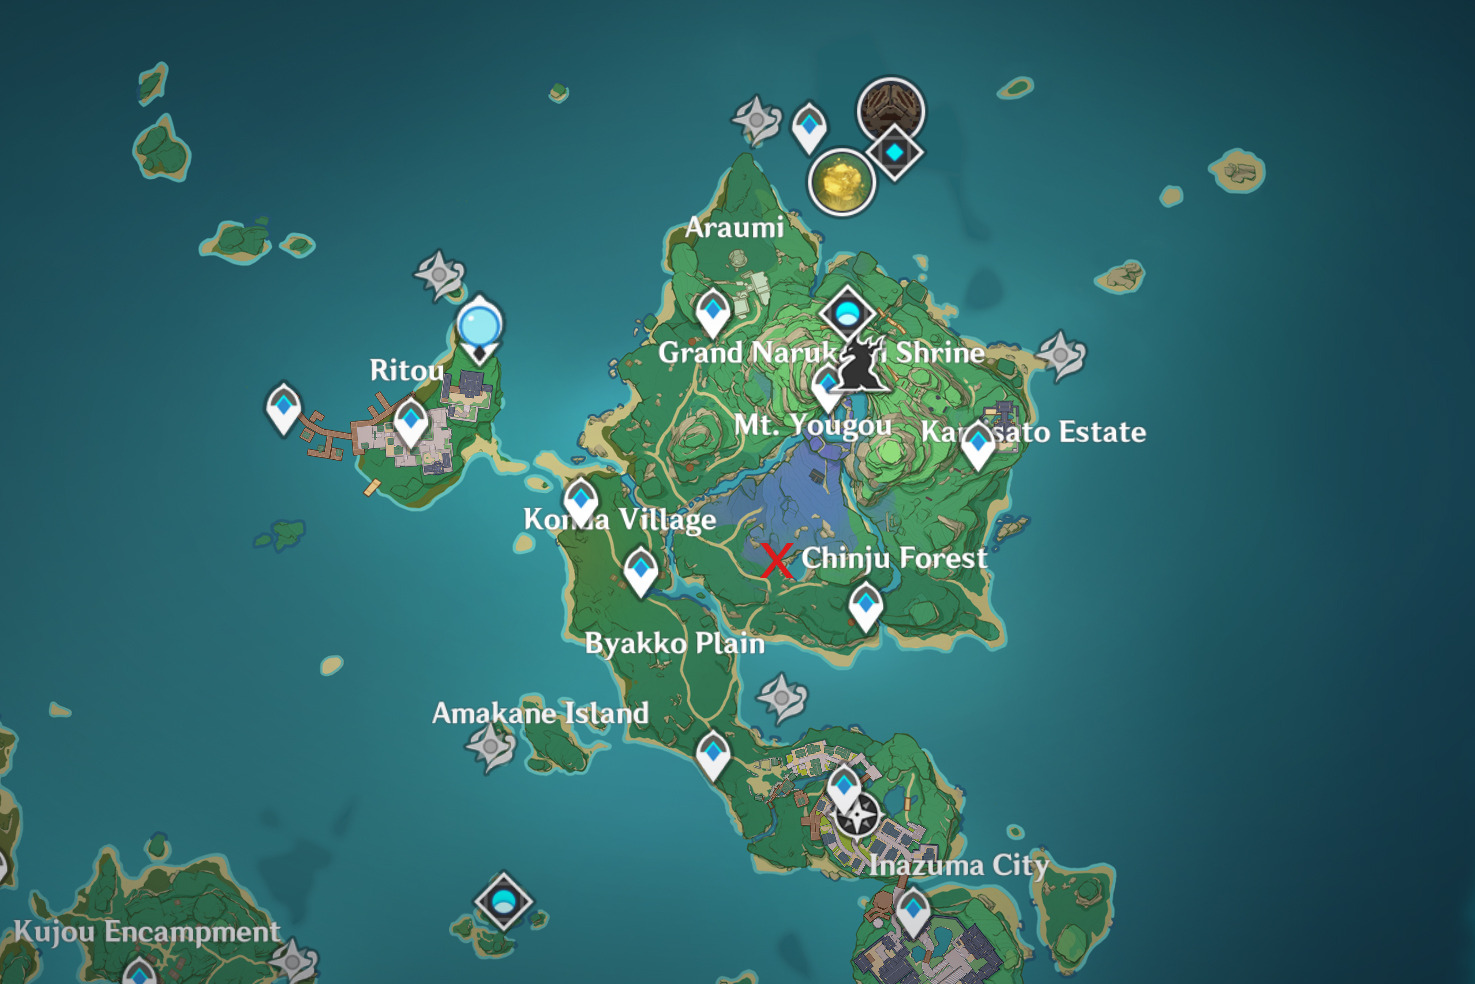
For this next part, head to the southern area of the big lake to locate a tunnel—the map above should help if you're stuck.
Once you're inside the cave, you'll see several shrines. You'll be prompted to 'purify' one of them and this is what triggers the puzzle, and where things can get a little tricky to explain. If you'd prefer a visual prompt, the video above should help you out (the puzzle section starts at 4:00).
Genshin Impact Venti build
Genshin Impact Diluc build
Genshin Impact Fischl build
Genshin Impact Klee build
Genshin Impact Razor build
Genshin Impact Diona build
Genshin Impact Childe build
Genshin Impact Zhongli build
Genshin Impact Xinyan build
Genshin Impact Albedo build
Genshin Impact Ganyu build
Genshin Impact Xiao build
Genshin Impact Rosaria build
Genshin Impact Hu Tao build
Genshin Impact Yanfei build
Genshin Impact Eula build
Genshin Impact Kazuha build
Each of the shrines will now have a glowing purple symbol floating above them which signifies a number. The symbols can be changed by interacting with them So number one should have one 'teardrop' shaped symbol, number two should have two of them, and so on. Now you need to look at the structure in the middle of the cave and take a good look at the glowing flower symbol located there.
Each of the glowing white dots on the flower symbol represents each of the shrines located in the cave. The shrine you activated is number one, so make sure it only has one glowy symbol floating above it.
To figure out the numbers of the others, look for the white glowing line that links the dots on the flower pattern. You already know which the first is, so there should be a line going from the dot at the bottom of the flower to another dot—this will be the second shrine so locate it by its position in the cave and interact with it until it has two symbols floating above it. Next, look at the main flower symbol again and follow the line from the second shrine to the third, and so on. Repeat this until you've assigned a 'number' to each shrine.
Also, bear in mind that it is possible for more than one shrine to be the same number, as it is in this case. In the video above, you'll see that three of the shrines are actually number three because the line travels from the second shrine to all of them. The solution to this particular puzzle is:
- One symbol: The shrine you purified.
- Two symbols: The shrine directly ahead of the first one.
- Three symbols: The three remaining shrines.
Once you've activated all five of the shrines with the correct number, a Mysterious Samurai will spawn which you'll need to defeat. But after that puzzle, he should seem like a breeze. Once you've taken care of him, the quest is complete. Phew!

Sarah started as a freelance writer in 2018, writing for PCGamesN, TechRadar, GamingBible, Red Bull Gaming and more. In 2021, she was offered a full-time position on the PC Gamer team where she takes every possible opportunity to talk about World of Warcraft and Elden Ring. When not writing guides, most of her spare time is spent in Azeroth—though she's quite partial to JRPGs too. One of her fondest hopes is to one day play through the ending of Final Fantasy X without breaking down into a sobbing heap. She probably has more wolves in Valheim than you.


