Build Your Own Home Server
8. Install Plugins
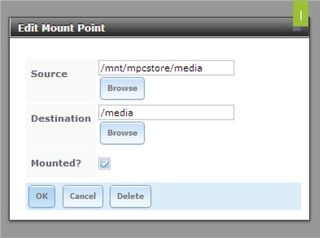
Now you should be able to slide the Plugins slider to On and click the Plugins menu at the top. Go back to SourceForge and download the PBI files for the plugins you want to install. Right now the ones available are Transmission (a BitTorrent client), MiniDLNA (a, yes, DLNA client), and Firefly, a no-longer-maintained iTunes-library service. Once you’ve downloaded them, hit the Install Plugin button and browse to the PBI file and upload it. You’ll see it appear in the Plugins list, with service status set to Off. Create a mount point within the jail pointing to a folder outside the jail ( image I ). I directed it to the same dataset I’m using for my Windows share, so I can drag-and-drop media that can then be broadcast over MiniDLNA and Firefly. Easy, right?
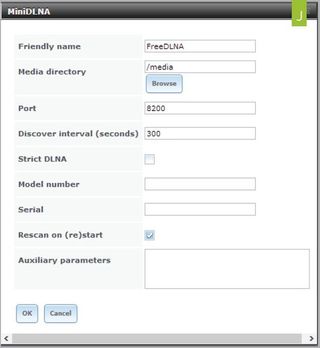
Now go to the left-side navigation tree and go to Services > Plugins, and select the plugin you just installed. I’ll use MiniDLNA as an example. Give it a friendly name and a media directory. Note that your media directory should use a relative path within your software jail, so it’s best to just type it in manually. I used /media again ( image J ). Save your changes and turn the plugin on. Make sure the IP address you picked for your software jail is working and you should see the DLNA server show up in your list of UPnP devices (I used VLC to check).


Paddling in the Shallow End
So now you know how to set up users, groups, datasets, and sharing, and you’ve got your plugins ready to go. We’ve only scratched the surface of what FreeNAS has to offer. Fortunately, there’s a robust community that loves documentation and has its own forum with discussions and FAQs for every part of the FreeNAS experience, from hardware to software to plugins to fine-tuning, and more ( bit.ly/OosjiB ).
One note: Be sure to back up your NAS data to an external drive. Even with two-disk loss tolerance, you never know when disaster will strike. You can use FreeNAS’s built‑in rsync to make sure you have all your data synched to an external drive.
As for the specific hardware I used, it’s probably overkill for most home users. It did enable large-file read and write speeds of over 90MB/s, which is quite nice.
FreeNAS’s greatest strength is also its greatest weakness: It’s incredibly complex and granular, with myriad configuration options, plugins, services, and so forth. The average home user may be better off buying an off-the-shelf NAS from Qnap or Synology, which are easier to configure and often include mobile access apps. But if you have the patience and the inclination, there’s nothing like building your own.
NOTE: This article was taken from the Novembe issue of the magazine .
The biggest gaming news, reviews and hardware deals
Keep up to date with the most important stories and the best deals, as picked by the PC Gamer team.
Most Popular


