Genshin Impact: Where to find all the Electroculi in Inazuma
Power up the Statue of the Seven by scavenging for these floating purple orbs.
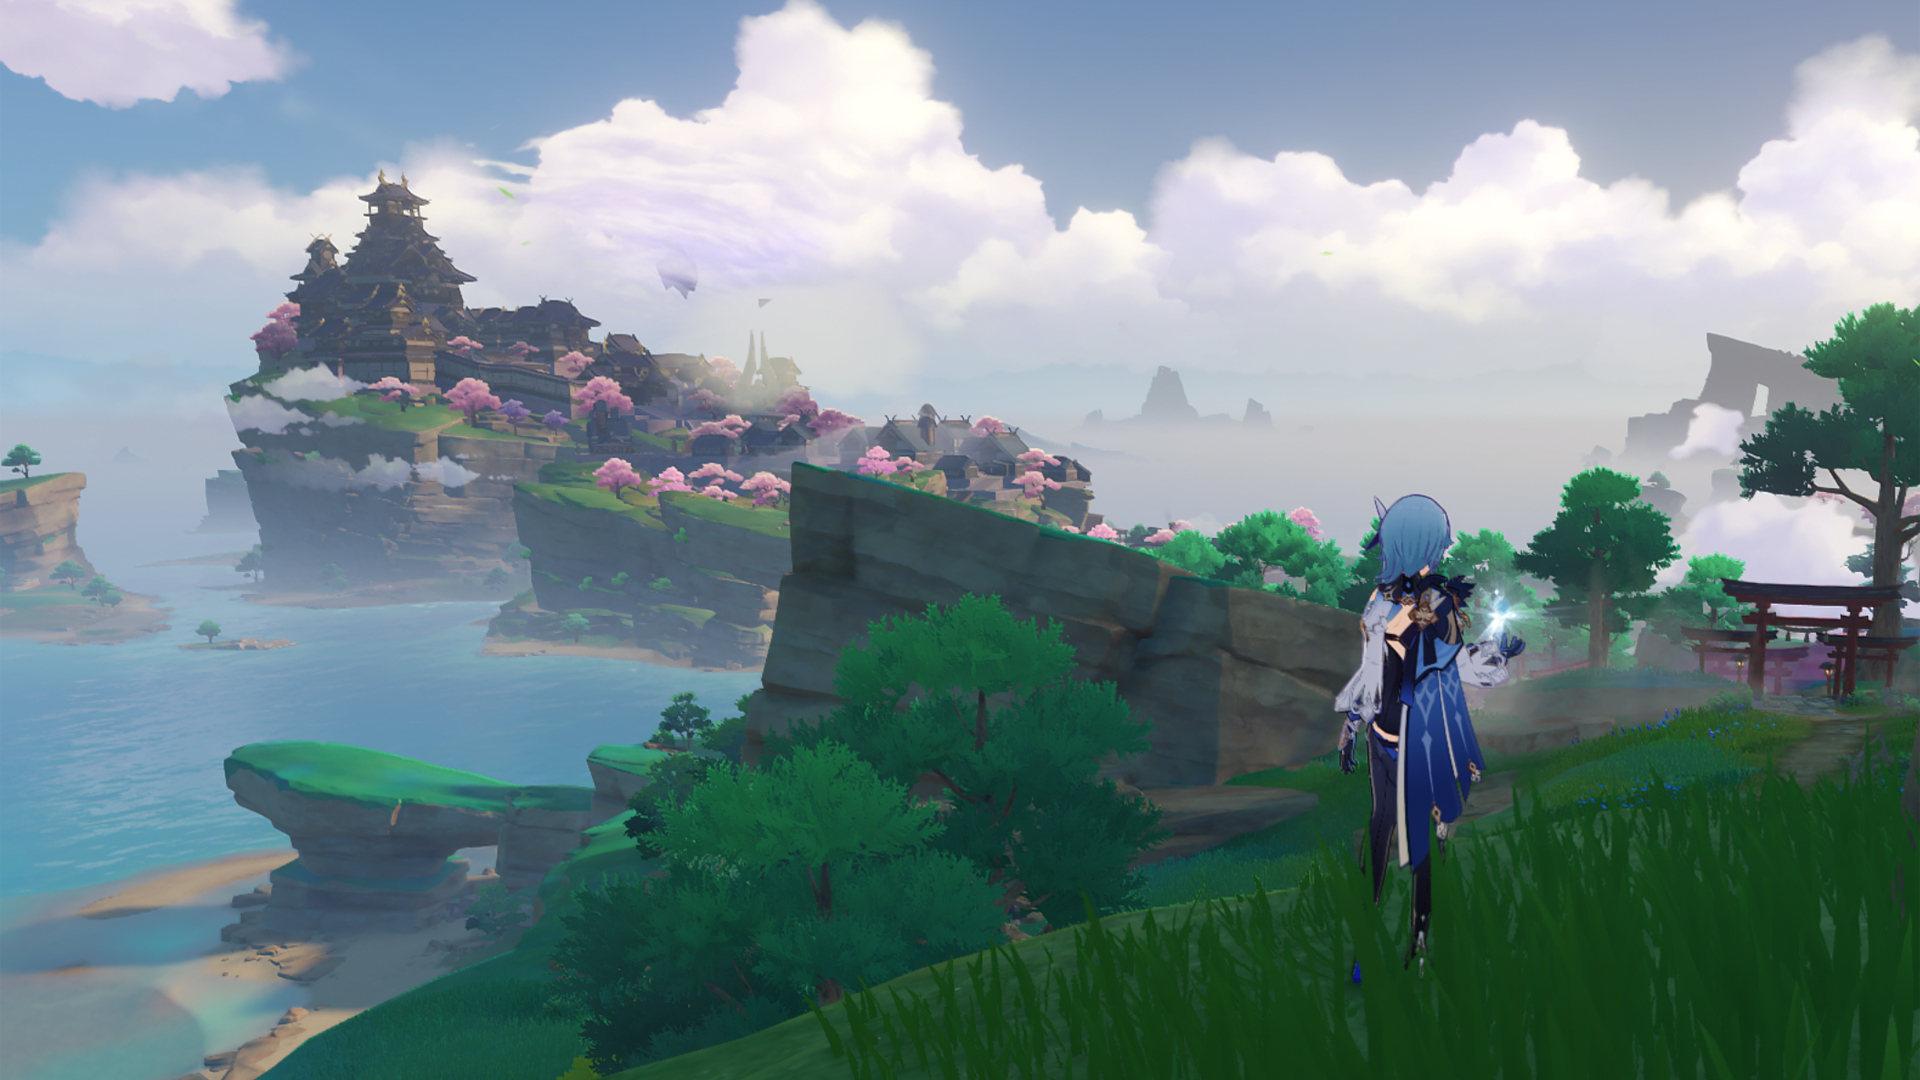
Looking for the Genshin Impact Electroculus locations in Inazuma? Now that the Genshin Impact 2.0 update is here, we can finally explore Inazuma, the chain of islands that is the home of the Electro Archon. There's plenty to do in the update, including new Archon and world quests, but if you want to start powering up the Statue of the Seven in the new region in exchange for Adventure Rank experience, Electro Sigils, Primogems, and Shrine of Depths key, the following Genshin Impact Electroculus maps will help you out.
Seasoned travellers will be familiar with Anemoculus and Geoculus already. These orbs, located in Mondstadt and Liyue, respectively, are required to level up the Statue of the Seven in those areas. Electroculus work in precisely the same way and are only found in Inazuma. So if you're keen to kickstart your adventure in version 2.0, here's every Genshin Impact Electroculus location.
All Genshin Impact Electroculus locations
You'll find Genshin Impact Electroculus maps for each of the islands below, and I've divided the list into handy sections—click the menu options you need to jump to where you need to go. Before you get started, there are a couple of things you'll need to bear in mind.
A few Electroculus are unobtainable until you've levelled up the Sacred Sakura tree to level 17. This automatically gives you Electrograna level 6 and the ability to walk through intermediate Electro Barriers across Inazuma. The tree is located a the Grand Narukami Shrine, and you'll need Electro Sigils to increase its level.
You should also familiarise yourself with Electrogranum found across Inazuma, as you'll be using these a lot to access many of the Electroculus.
With that out of the way, let's start hunting down all those Electroculus locations in Genshin Impact.
Narukami
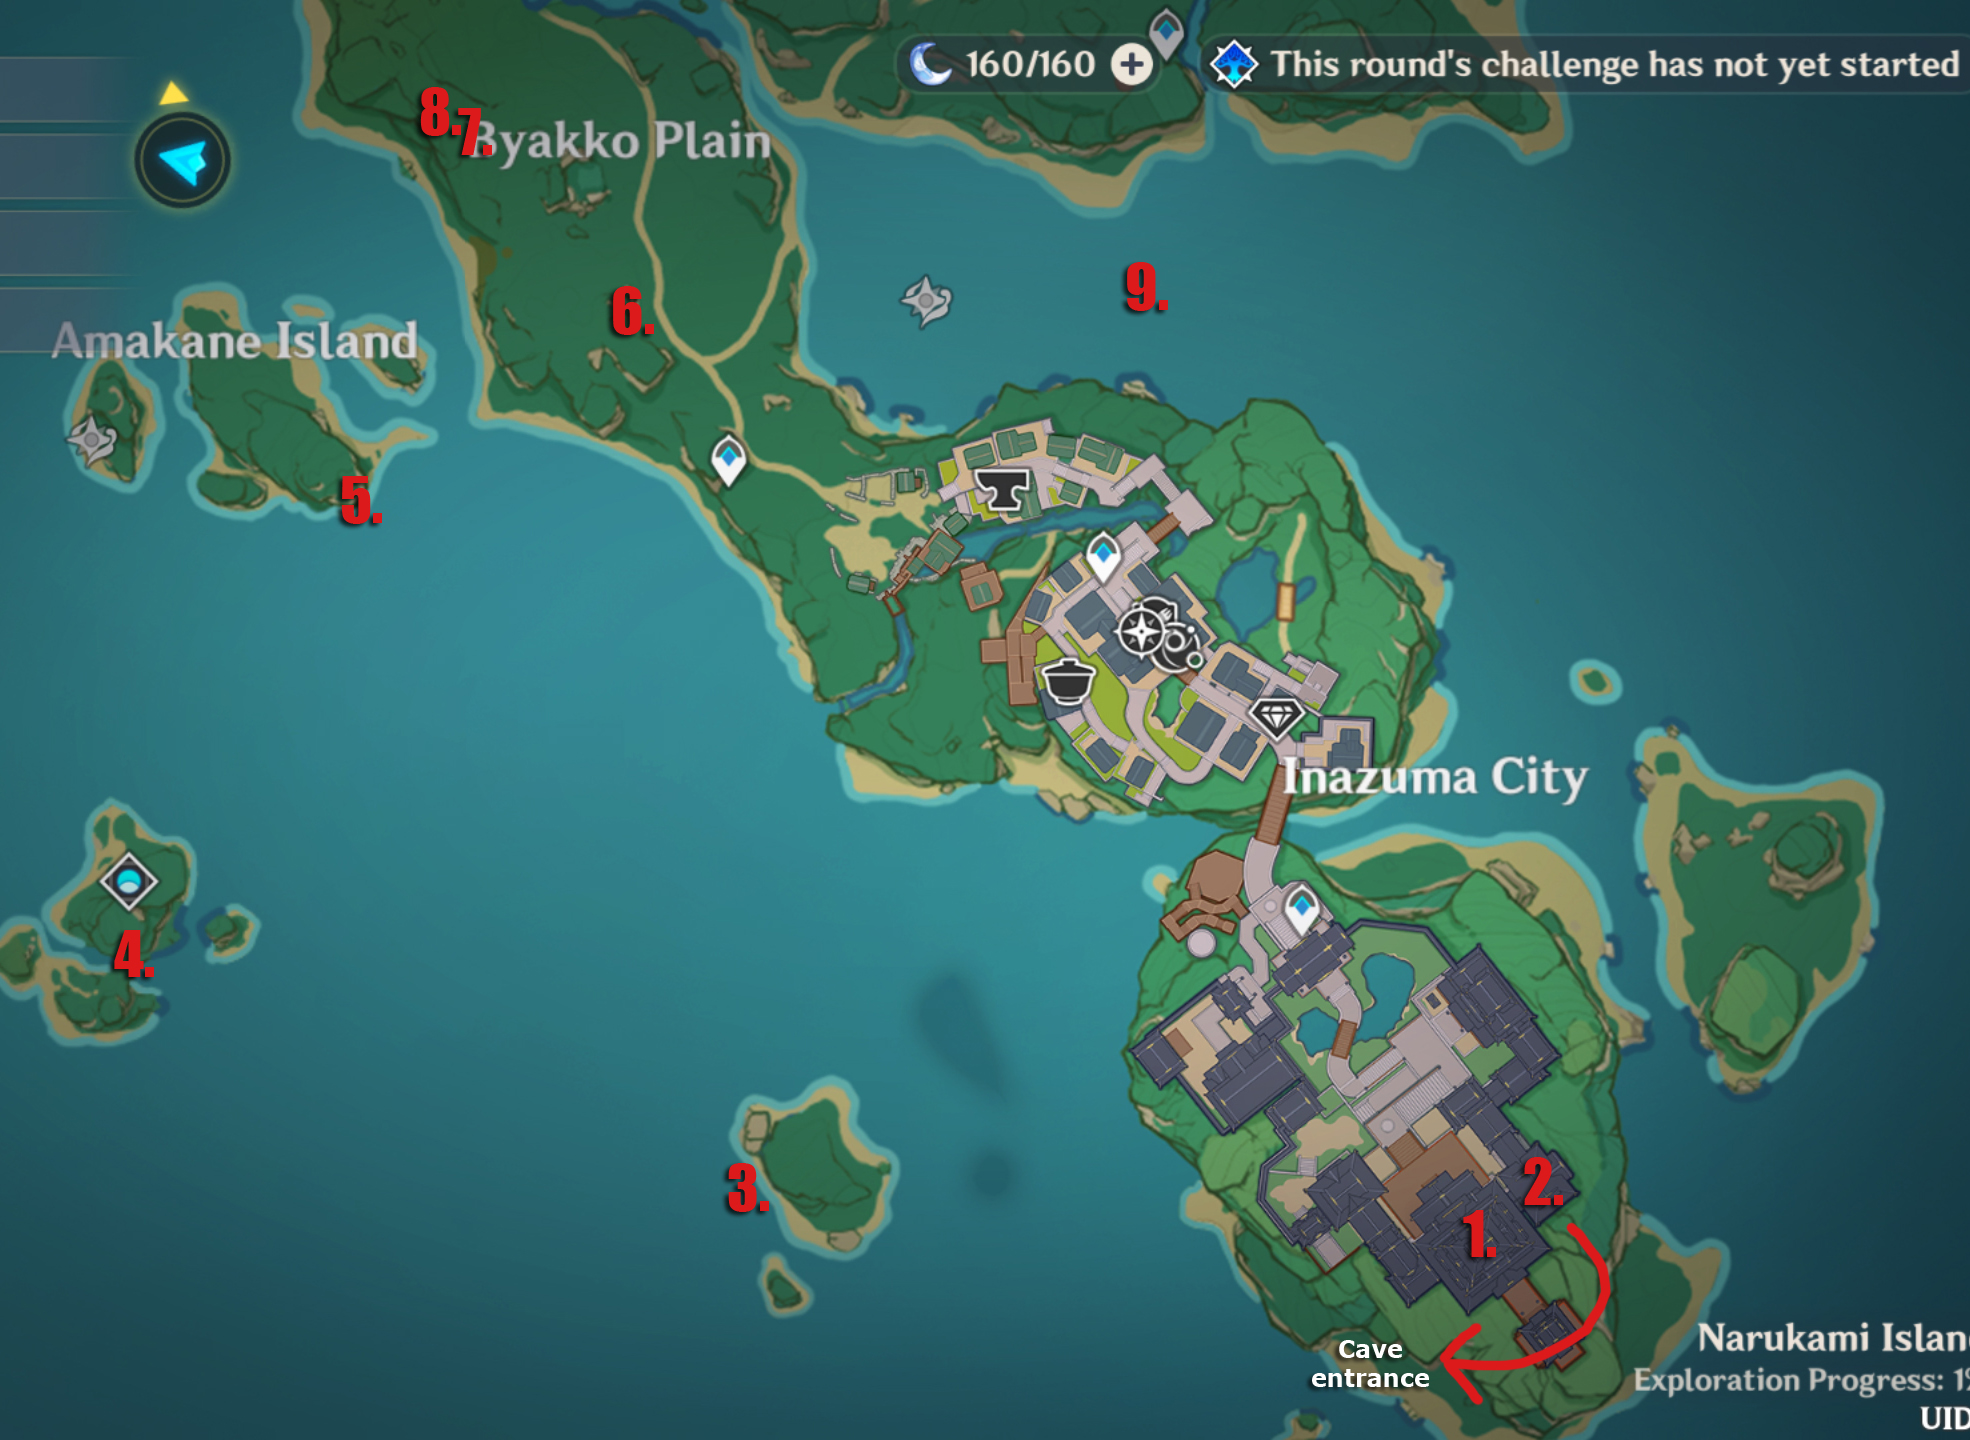
- 1: On the roof of the palace in Inazuma City.
- 2: Inside a cave underneath the Inazuma City island. Enter from the south coast and find a tiny cave entrance in the northeast corner. It's at the back of the cave.
- 3: Floating high in the air. Use the Electrogranum to grab it.
- 4: Beneath the rock bridge.
- 5: Floating above a dead tree. Climb the tree to reach it.
- 6: On top of the rock formation, next to a group of trees.
- 7: Found in the well during the Strange Story world quest you pick up in Konda Village. Breakthrough the boxes just after you enter the well to reveal an opening. The Electroculus is located here.
- 8: The same well as number eight, above. It's floating high up, just to the right of the gate, further on.
- 9: You need Sacred Sakura level 17 to get past the Thunder Barrier for this one. It requires three orbs to activate the Electrogranum here, but a barrier surrounds one. The Electroculus is high in the air above the water.
Genshin Impact guide: 9 beginner tips
Genshin Impact characters: Full tier list
Genshin Impact code: Rewards and how to redeem
Genshin Impact build: The best overall setups
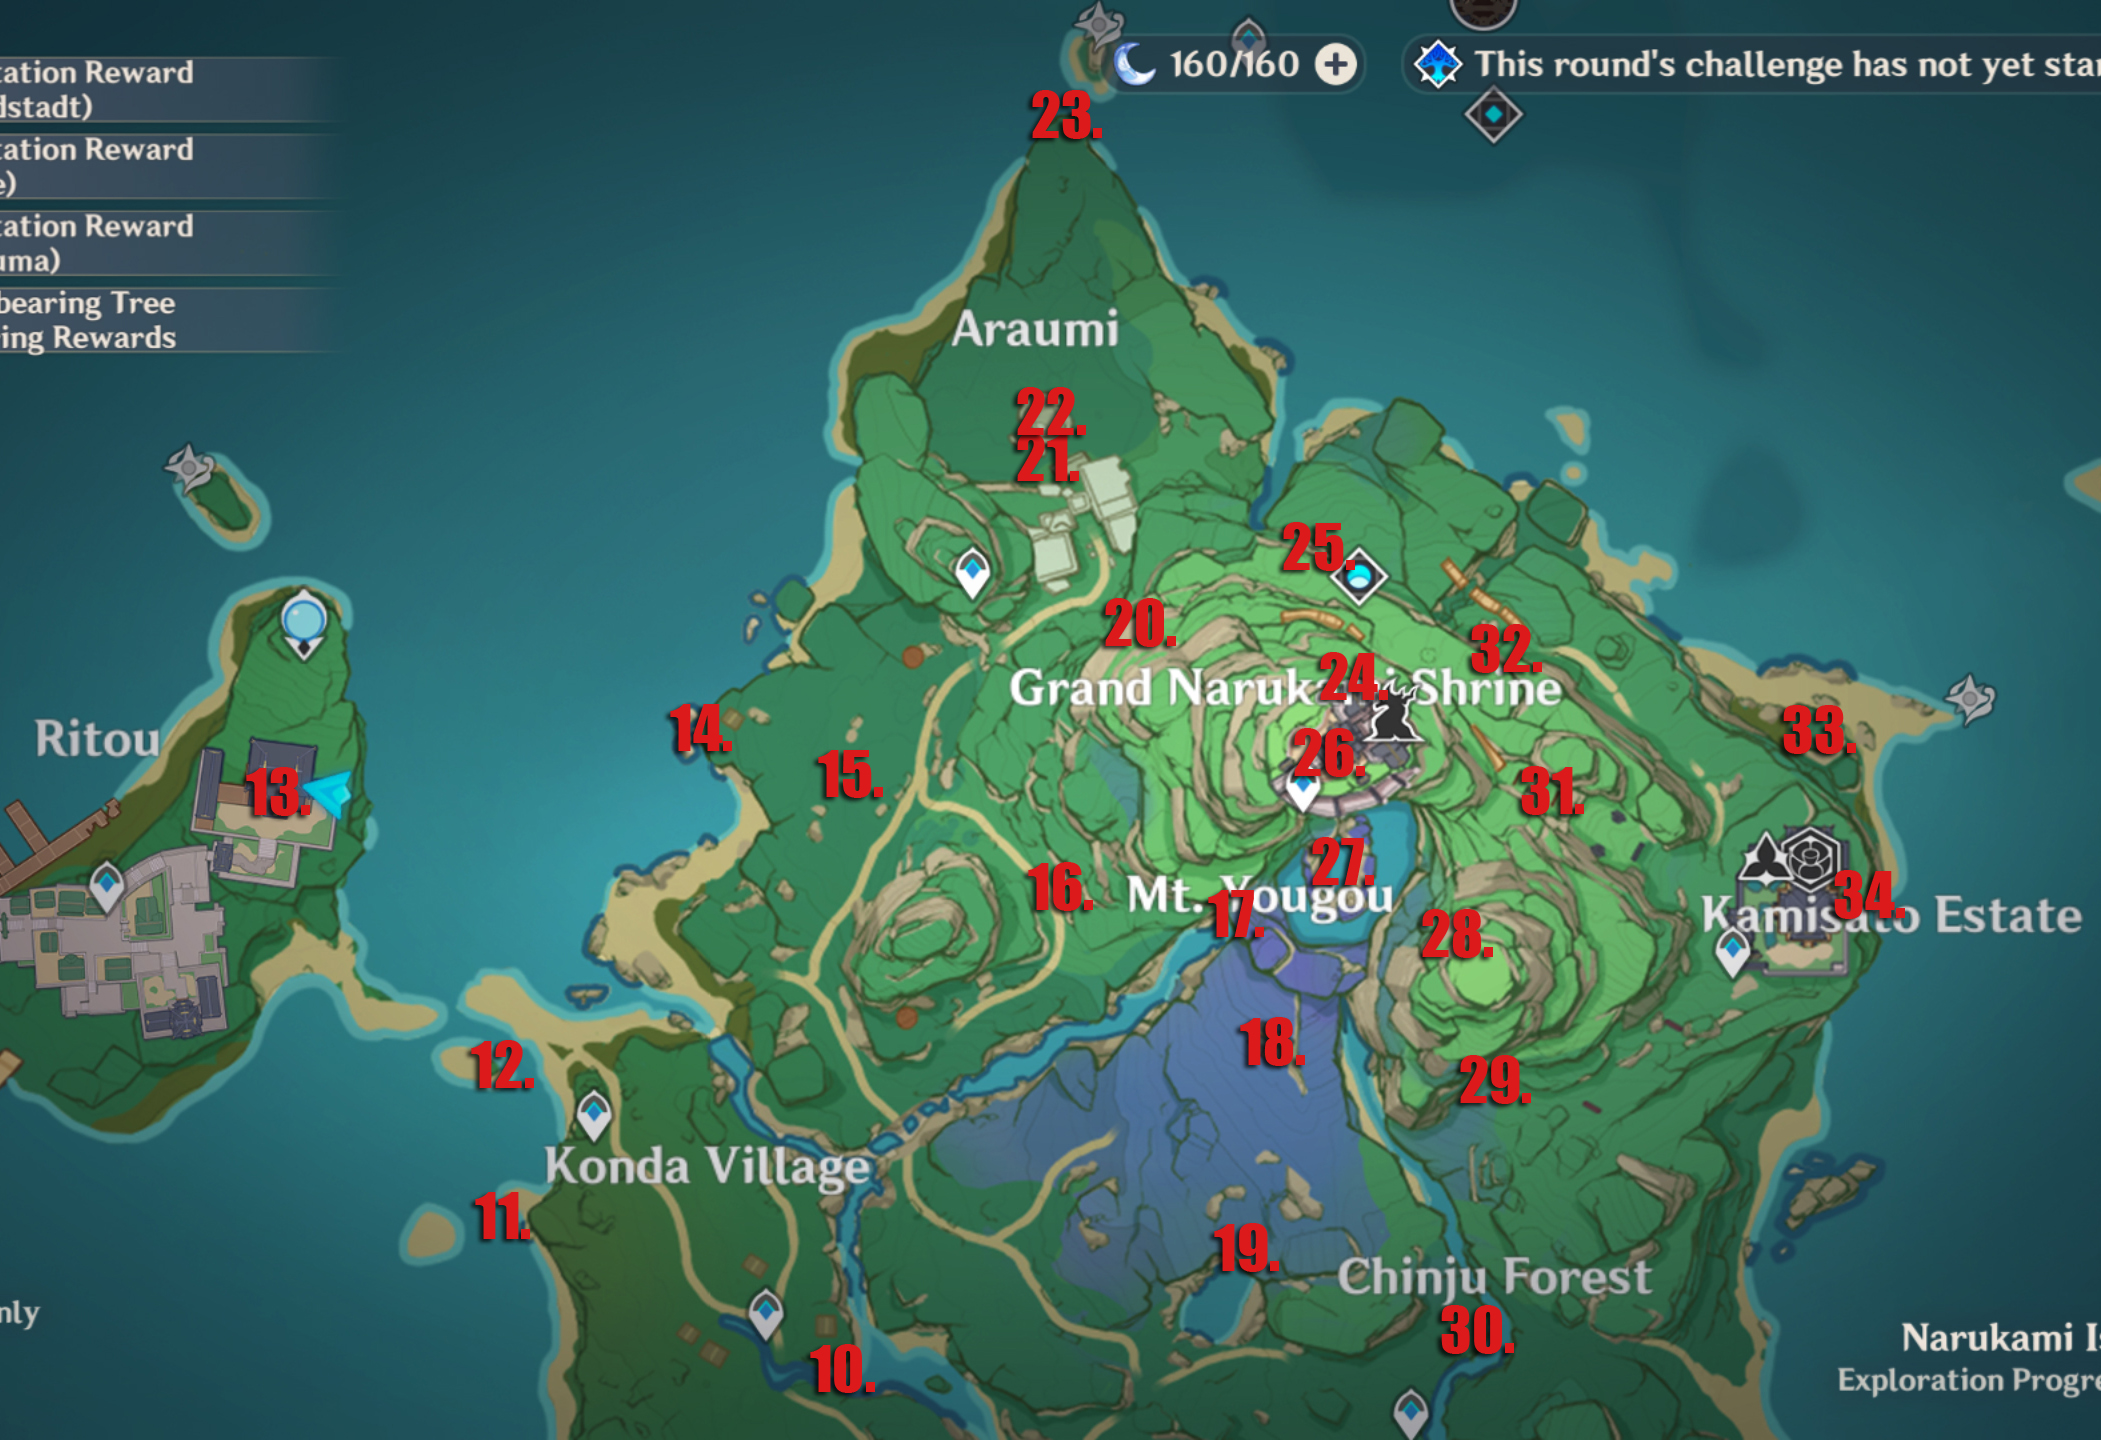
- 10: At the top of the pole next to the house.
- 11: Interact with the Electrogranum on the coast to get propelled into the air to grab this one.
- 12: On top of a pillar-like formation on the beach here.
- 13: On the roof of the building south of the Statue of the Seven in Ritou. Jump and glide from the Statue and onto the roof.
- 14: This Electroculus is at the top of a dead tree, next to a house.
- 15: At the back of a cave. The entrance is just north of number 13.
- 16: Floating high above the ground. Use the Electrogranum in the area to reach it.
- 17: Near the top of the waterfall.
- 18: In front of the door of the building here.
- 19: You'll need the Rust Worn Key from the Strange Story world quest to unlock the gate found here.
- 20: From the waypoint, look southeast, and you'll see a Thunder Barrier. There's a gap above it, so glide across to find the Electroculus inside.
- 21: You need Sacred Sakura level 17 to get past the Thunder Barrier for this one. The Electroculus is inside a cave.
- 22: Near the top of the circular tower.
- 23: Floating just beneath the edge of the cliff.
- 24: You need Sacred Sakura level 17 to get past the Thunder Barrier for this one. The Thunder Barrier blocking this one is to the northeast of the Shrine at ground level. It's big so you can't miss it.
- 25: Sitting on a rock in the waterfall.
- 26: On top of the building at the Grand Narukami shrine.
- 27: To the south of the shrine is a long drop down, and you'll see a hole in the rock below. Glide through the hole to find this Electroculus.
- 28: Floating in the air at the highest point here.
- 29: Above a shrine.
- 30: On top of a rock formation.
- 31: You'll find an Electrogranum tucked away here. Use it to reach the higher ledge and grab the Electroculus.
- 32: Hidden away in a small niche in the rocks, next to some wooden boxes.
- 33: Next to some fox statues and a big tree.
- 34: Drop of the cliff here, glide and turn to the cliff face. You should see the Electroculus floating at the top of the alcove.
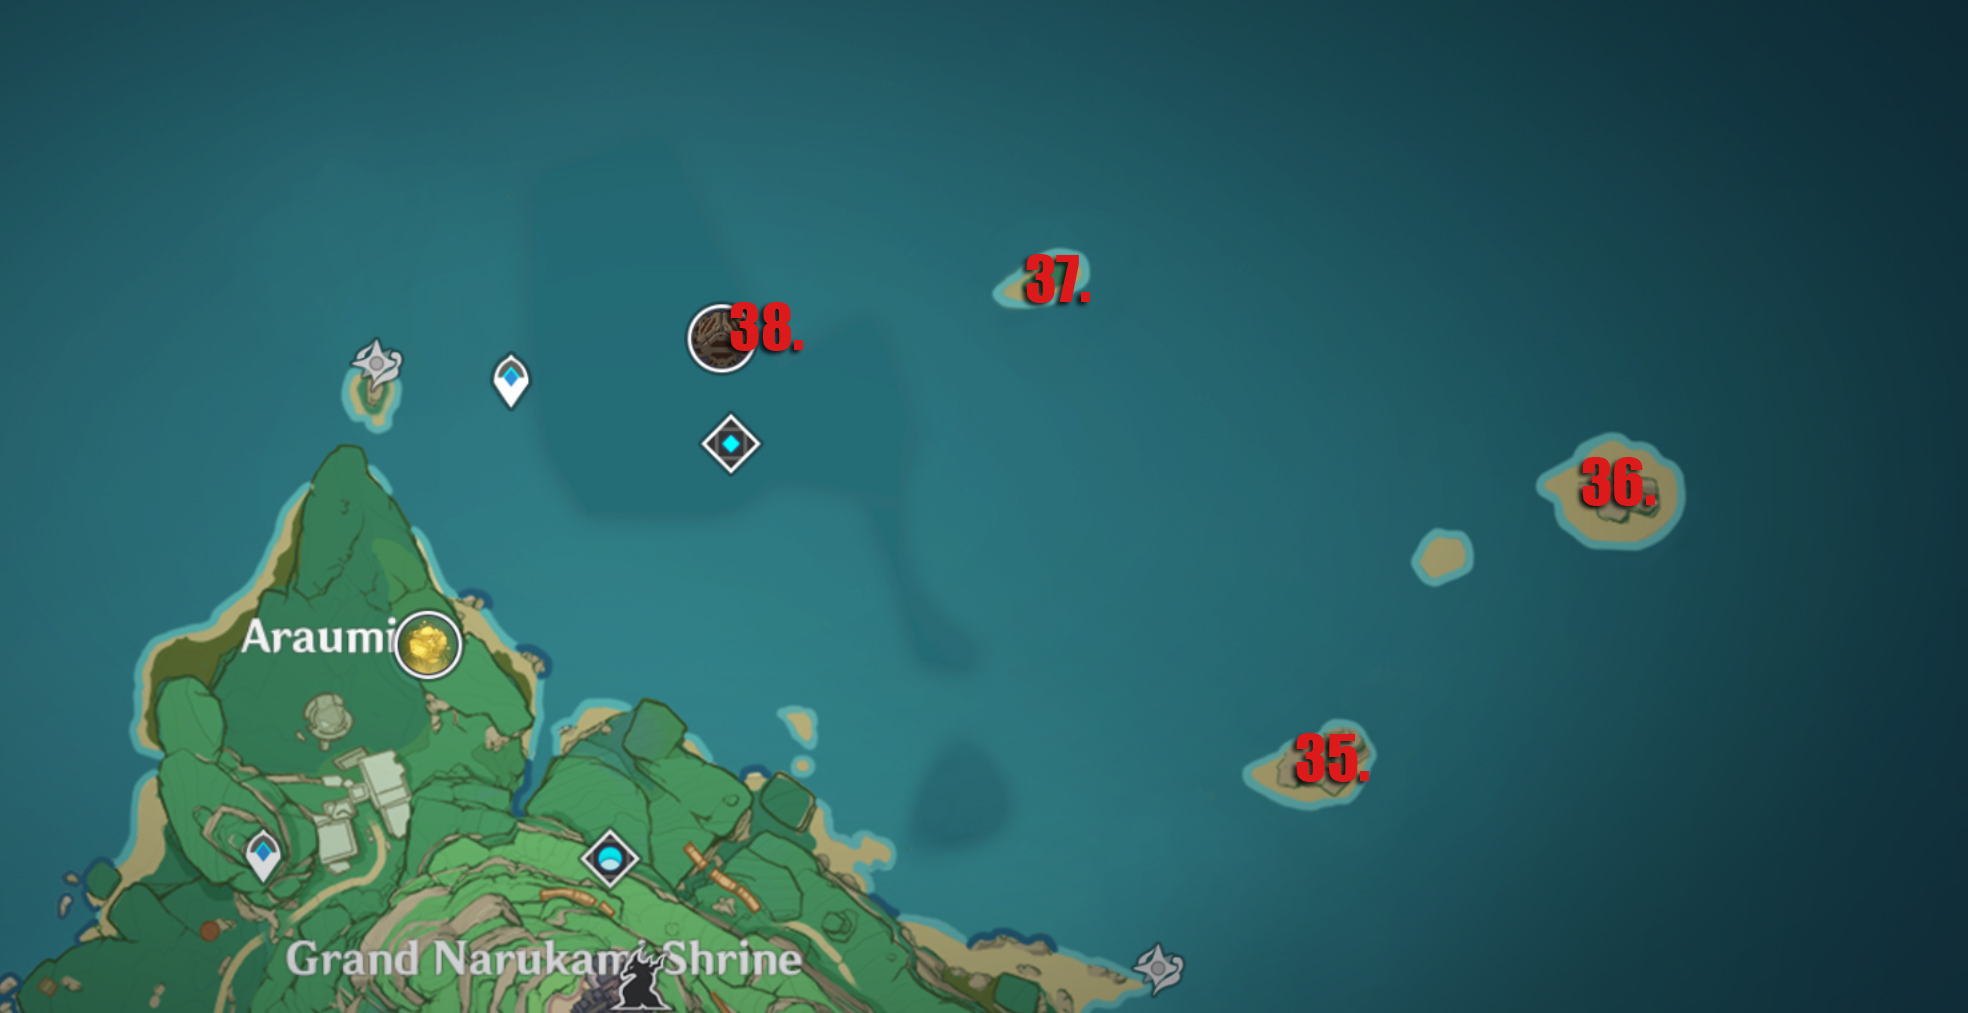
- 35: Summon a Waverider to get to this tiny island, then use the Memento Lens from the Sacred Sacrifice world quest on the fox statue here. The Elecroculus is down a hole revealed in the rock. Glide down to get it.
- 36: From the previous location, follow this cave through to the far end to reach the other island—just be aware that it damages you while you're inside. You need to do some climbing at the end, but you'll find an Electrogranum here. Use it to propel you upwards out of the cave to grab this Elecroculus.
- 37: Use the waverider to travel to this small island. Use the Memento Lens on the small fox statue on top of the pillar, then interact with the Electrogranum. Use the lens again on another statue inside the electro shield, then propel yourself upwards to grab the Electroculus floating high above you.
- 38: To get to this island, you need to enter a cave back on the mainland (same location as number 21). Head past the door with the Thunder Barrier on your right and head up the steps. Turn left and drop down to go through the circular doorway and follow this tunnel past some shipwrecks. When you reach a big cave, follow the ledge to your right to find an Electrogranum and use this to glide to the other side. The Electroculus is in an alcove to your right.
Kannazuka
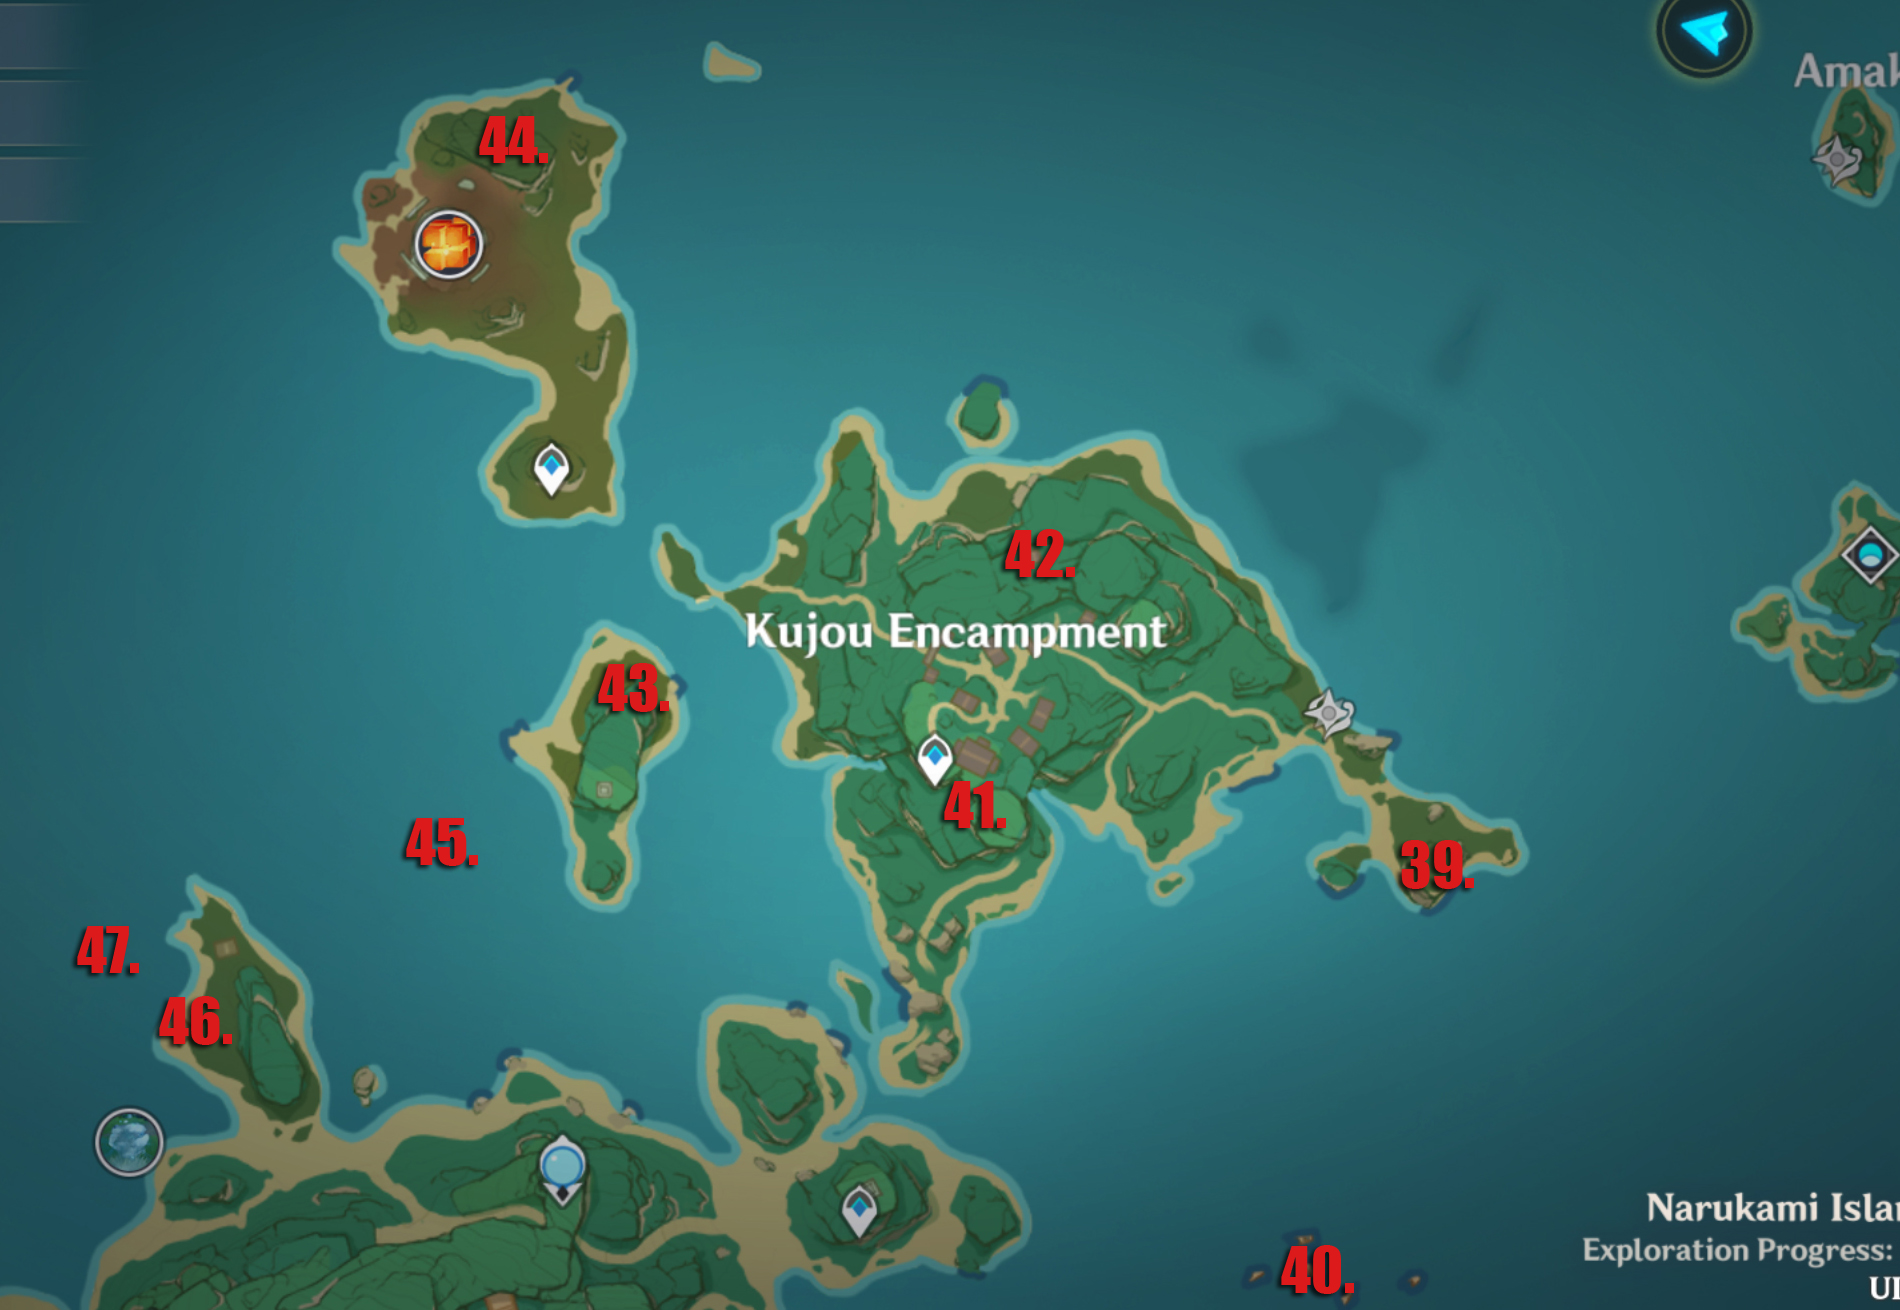
- 39: Attack the three glowing boxes to make them light up, then use the Electrogranum to launch into the air to grab this Electroculus.
- 40: Take a Waverider out to these shipwrecks. You'll need to climb up one of the masts to reach it.
- 41: Solve the stone puzzle here by lining up the purple relay stones so the beam passes through them. This will open a grate in the floor— drop down to retrieve the Electroculus.
- 42: At the top of a wooden tower.
- 43: Underneath the wooden decking to the side of the house here.
- 44: Summon an Electrogranum on the small island—it's next to a big enemy. Now run back to the mainland and find the Electroculus underneath the rock inside an Electro barrier.
- 45: Floating on top of the water.
- 46: This Electroculus is on top of the building here.
- 47: There are three puzzles to complete in this area. Each one reveals an Electro orb that you'll need to chase to use the Electrogranum here. There's a cube puzzle to the north, a compass puzzle to the east, and a challenge to complete just to the west. Once the three orbs are in place, use the Electrogranum to reach the Electroculus above.
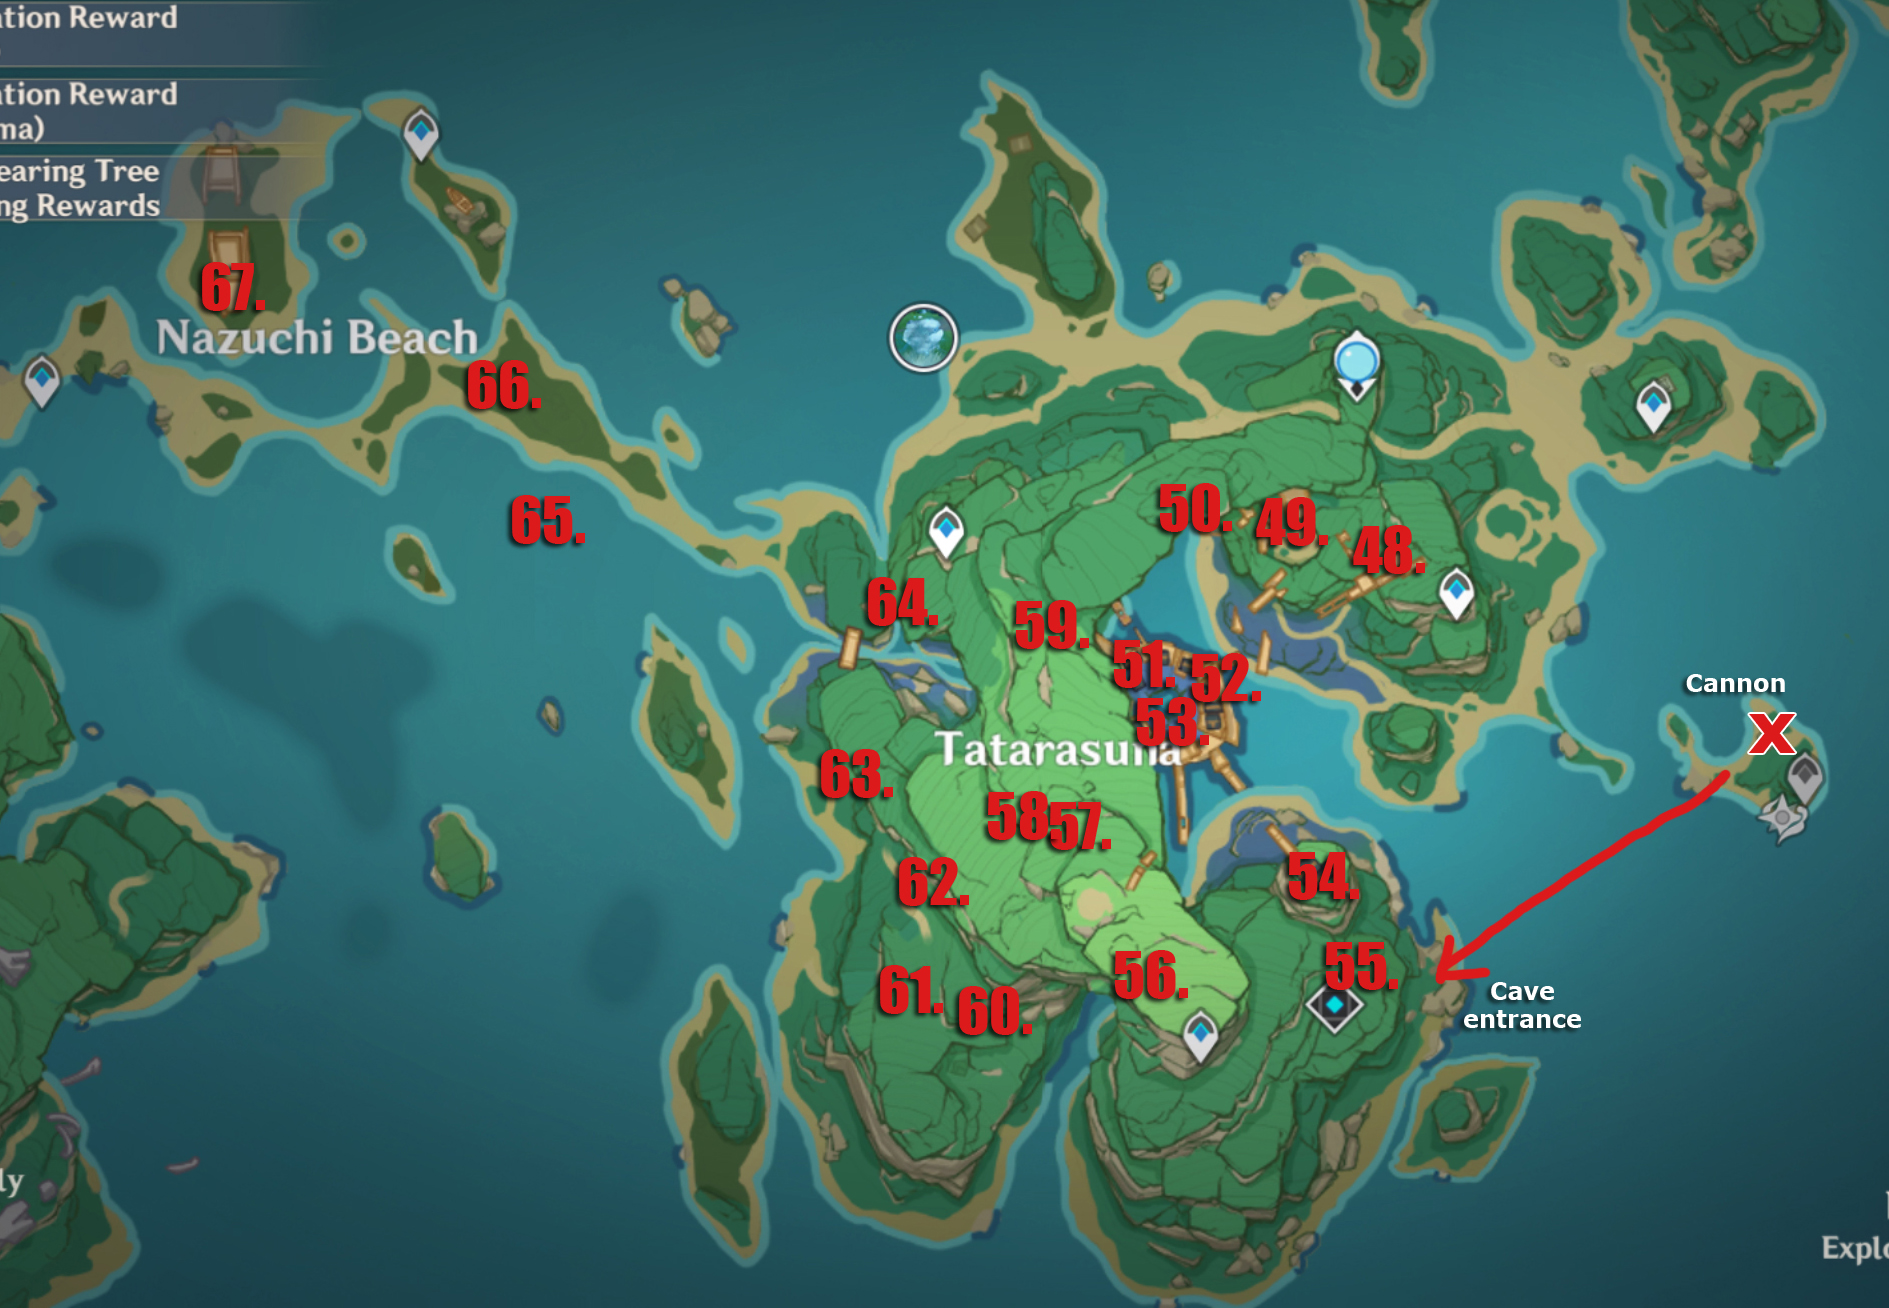
- 48: Tucked high in an alcove beneath the cliff. Turn around so the wooden bridge is behind you and glide down. You'll see a footpath—glide in here and grab the left-hand cliff face. Keep moving to the right and up to find this Electroculus.
- 49: Summon the Electrogranum and glide down into the building to grab it.
- 50: Behind the small shrine.
- 51: Summon the Electrogranum and drop down into the shielded done. The Electroculus is tucked away in the corner.
- 52: Inside a wooden hut.
- 53: High in the air. Use the Electrogranum nearby to reach it.
- 54: Inside a wooden hut.
- 55: You'll need to use the cannon on a nearby island to access the cave where this Electroculus is hiding. Go inside the cave and find the Electroculus high up to the right of the door.
- 56: Drop down and immediately glide into the large cave here. The Electroculus is on a high ledge on the right, just inside the entrance.
- 57: In an underground area that you can enter from the northeast. Summon the nearby Electrogranum and enter the small cave next to the purple plants to find this one floating high up.
- 58: You need three keys to access this one. Unlock the gate and kill the three mobs inside. The Electroculus is floating at the back of the cave.
- 59: You'll need to glide underneath the rock here and grab onto the cliff face—you should see the Electroculus high up. Climb around the rock until you have it positioned behind you, then jump glide to grab it.
- 60: Drop down a gap in the rocks to find a cave. You'll know you're in the right place if you find the enemy Tanba Tetsuo. The Electroculus is on a ledge to the right of him.
- 61: Floating above the top of an Electro-fied dead tree. Glide from a nearby cliff to reach it.
- 62: Hidden amongst the leaves of a tree, just below the edge of a cliff.
- 63: This Electroculus is also hidden by leaves against a cliff face. Glide down and look for the telltale purple glow in amongst the greenery.
- 64: Drop down into the gap between the rocks and glide to reach this floating Electroculus.
- 65: In the air between two grass-topped rocks poking out of the water.
- 66: Climb up onto the shipwreck here to grab this one.
- 67: Summon an Electrogranum to reach the Electroculus floating above the mast of this shipwreck.
Yashiori Island
Genshin Impact Venti build
Genshin Impact Diluc build
Genshin Impact Fischl build
Genshin Impact Klee build
Genshin Impact Razor build
Genshin Impact Diona build
Genshin Impact Childe build
Genshin Impact Zhongli build
Genshin Impact Xinyan build
Genshin Impact Albedo build
Genshin Impact Ganyu build
Genshin Impact Xiao build
Genshin Impact Rosaria build
Genshin Impact Hu Tao build
Genshin Impact Yanfei build
Genshin Impact Eula build
Genshin Impact Kazuha build
Genshin Impact Ayaka build
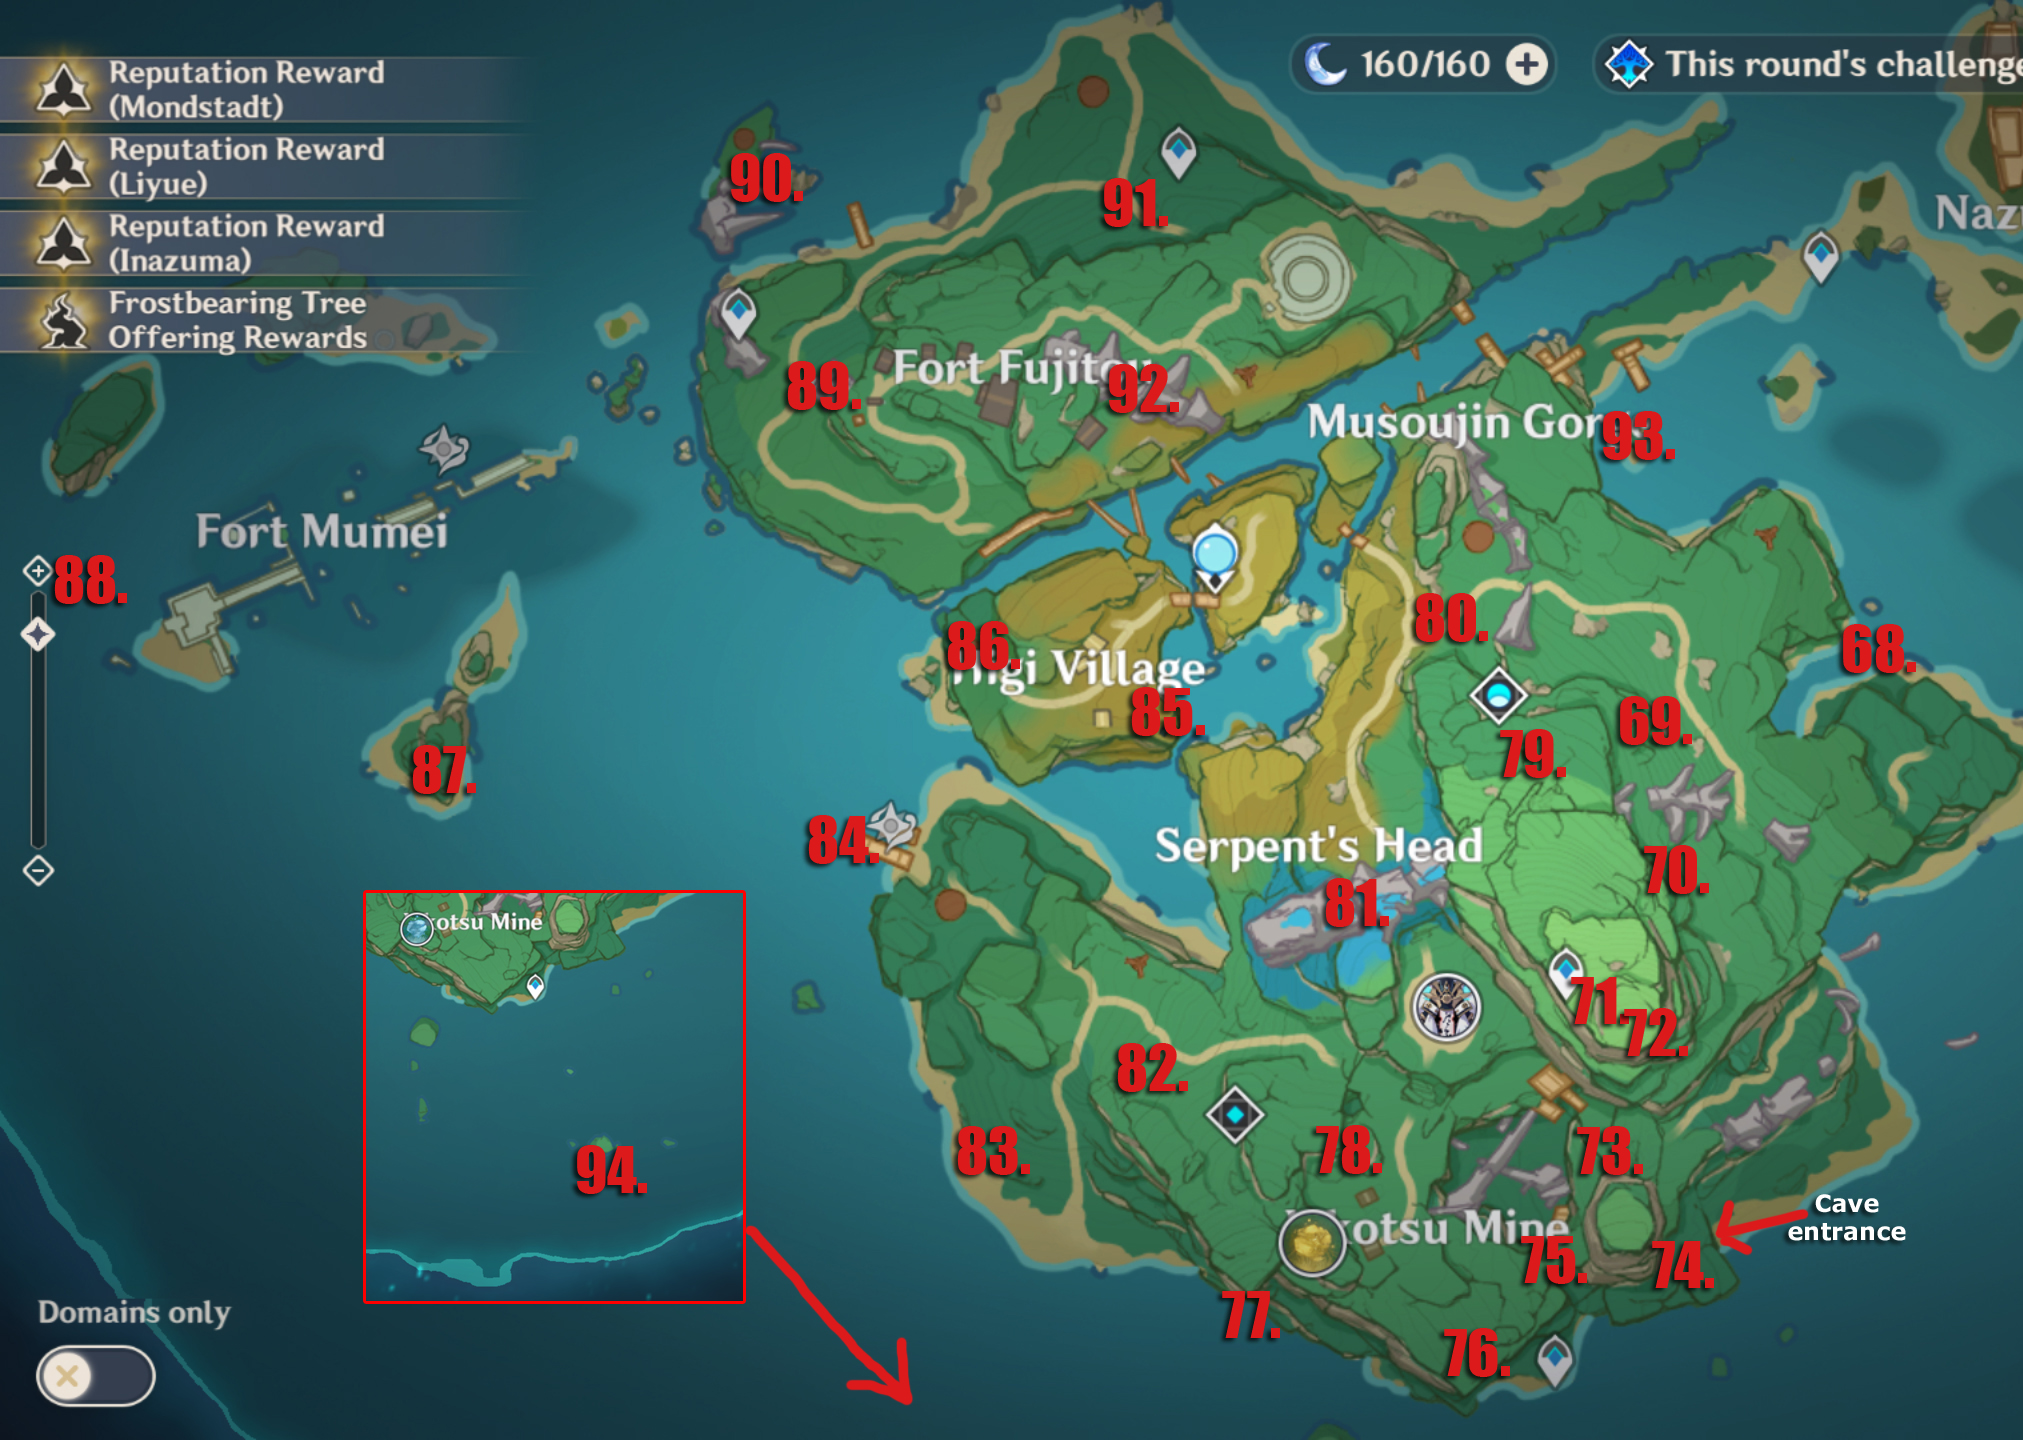
- 68: Use an Electrogranum here to launch high into the air to grab it.
- 69: On top of some rocks.
- 70: Find this Electroculus floating among the branches of a tree.
- 71: Glide down into the vast underground area to the southwest of the marker. Now follow the cave north, keeping to the left-hand wall. You'll find this Electroculus at the end of a tunnel.
- 72: Use the Electrogranum to propel high into the air to get this one.
- 73: Hovering beneath a rock overhang.
- 74: Inside a small cave. See the map above for the entrance.
- 75: Floating among the rock fingers that stretch between the two cliffs.
- 76: Find this Electroculus just hanging out on top of a tree stump.
- 77: Jump off the cliff here and glide out to the Electroculus floating over the ocean.
- 78: Glide down the hole in the rock into a large cave. Head south to find this Electroculus on a high grassy overhang to your right.
- 79: You'll find a gap in the rocks here. Glide down a little way to grab this one.
- 80: Use the Electrogranum on the cliff to the south to reach another—higher—one to the north. This one will allow you to get the Electroculus floating high in the air.
- 81: You'll need to complete the Serpent's Head puzzle to open the grate on the floor here. You essentially need to chase the nearby Electro orbs until they stop moving—each should end up in the eye sockets of the giant serpent.
- 82: Use the nearby Electrogranum to enter the shielded zone to grab this one.
- 83: High in the air. There's an Electrogranum directly below it that you can use to reach it.
- 84: On the hook of a crane at the docks.
- 85: Hidden behind a small shrine.
- 86: Hovering above the books on a rock.
- 87: At the edge of the cliff, hovering above some foliage.
- 88: This puzzle requires you to find a path to light up all the squares without backtracking and finish up on the highlighted one. Use the Electrogranum to propel high into the air to grab this one.
- 89: Sat on top of a large rock here.
- 90: Floating beneath the rock arch among the vines hanging down.
- 91: Use the Electrogranum on top of the cliff to the southwest and glide to this Electroculus inside the shield.
- 92: At the very top of the rock formation.
- 93: Look for the purple glowing rocks nearby and break them to reveal an Electrogranum. Use this to propel yourself to the Electroculus floating at the top of the shielded rock formation.
- 94: Take the Waverider out to this island to grab the final Electroculus.
Keep up to date with the most important stories and the best deals, as picked by the PC Gamer team.

Sarah started as a freelance writer in 2018, writing for PCGamesN, TechRadar, GamingBible, Red Bull Gaming and more. In 2021, she was offered a full-time position on the PC Gamer team where she takes every possible opportunity to talk about World of Warcraft and Elden Ring. When not writing guides, most of her spare time is spent in Azeroth—though she's quite partial to JRPGs too. One of her fondest hopes is to one day play through the ending of Final Fantasy X without breaking down into a sobbing heap. She probably has more wolves in Valheim than you.

