
 Join The Club


Hogwarts Legacy door puzzles are one of the many secrets you can expect to find around the titular School of Witchcraft and Wizardry, but after staring at their symbols of magical animals for a few minutes, you might be a bit confused by the fact that they are unsolvable—by which I mean, you don't have the info required to finish them.
Sure, you can brute force each by running through every possible combination on the dials nearby, but there is actually a way to solve these door puzzles properly. In this guide, I'll run you through the correct way to solve the Hogwarts Legacy door puzzles, their locations, as well as what you'll get for your efforts. Do note that there is a possibility that chest rewards are random, so you might not get exactly what I did, though it still amounts to one piece of gear and one Room of Requirement item.
How to solve all the Hogwarts Legacy door puzzles


Hogwarts Legacy spells: Every spell you can learn
Hogwarts Legacy Merlin trials: How to solve the trials
Hogwarts Legacy Room of Requirement: How to get in
Hogwarts Legacy Demiguise statues: Unlocking Alohomora
Hogwarts Legacy eye chests: How to crack them open
Hogwarts Legacy broom: How to take flight
While you can just spin the plates through every combination of animal symbols to eventually solve each door, the real solution to the puzzles is maths-based. This is a school, after all.

In the Library Annex area of Hogwarts, there is a door puzzle leading to the Arithmancy Classroom and beside it, you'll find a note that lists the number each animal symbol represents. This is the missing piece of the puzzle that you need to open the doors and claim the loot inside. The note explaining the animal numbers is at the first door location down below if you want to solve them for yourself, but if not, I've listed each puzzle solution.
If at any point you wonder what the hell I'm talking about when describing the solutions, here's what I mean for each symbol:
- 0 - Furry creature with eyebrows
- 1 - Unicorn
- 2 - Tentacle Goat
- 3 - Three-headed snake
- 4 - Weird owl
- 5 - Spider with a face
- 6 - Lizard
- 7 - One-eyed squid
- 8 - Spider
- 9 - Hydra
Door puzzle one: Central Hall Rafters
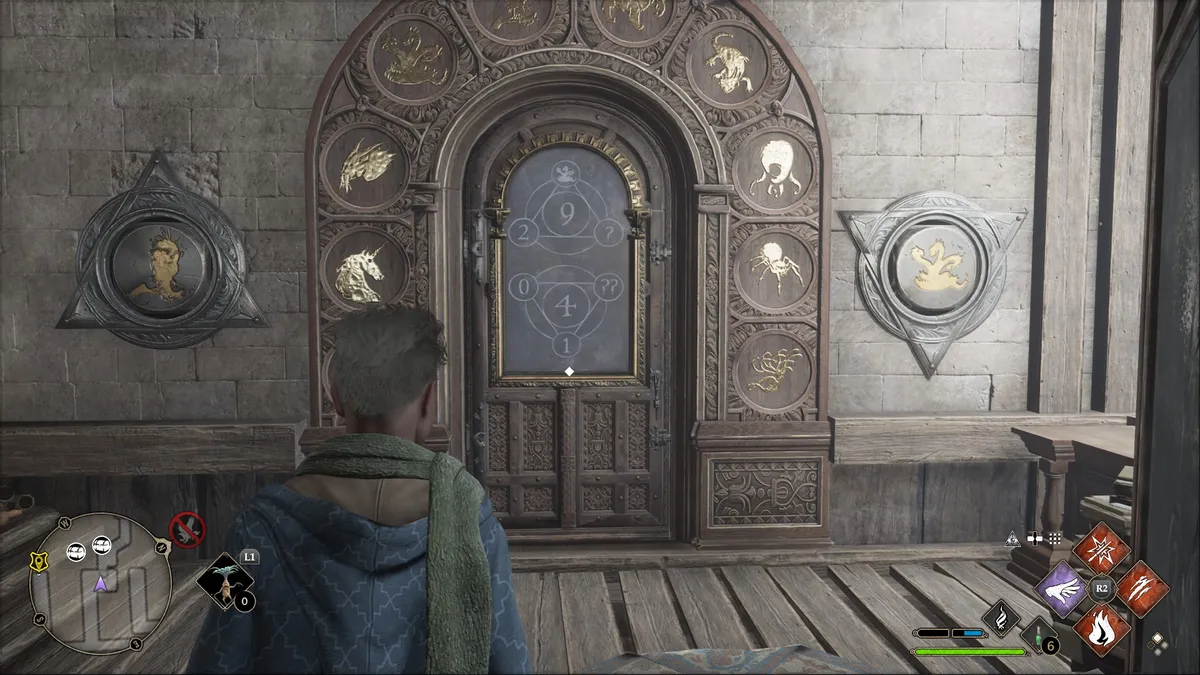
In the Library Annex area. Fast travel to the Divination Classroom Floo Flame, turn around and head into the rafters above Central Hall, then keep going along the walkway and turn right to find a door and a note that lists the number each animal represents. This info is needed to help open the other doors. The solution for this one is: left dial: weird owl, right dial: three-headed snake. The reward is a unicorn statue and the door leads into the Arithmancy Classroom.
Door puzzle two and three : Arithmancy Classroom

Again, in the Library Annex area, head through the first door puzzle to find the Arithmancy Classroom and two more doors. For the first door on the left the solution is: left dial: weird owl, right dial: spider with a face. This contains bushes for the Room of Requirement and an embroidered formal uniform.
The solution for the right door is: left dial: lizard, right dial: unicorn. This room contains the gardener's robes and some large rugs.
Door puzzle four: Central Hall

In the Library Annex area. Fast travel to the Potions Classroom Floo Flame and turn around to see a puzzle door a little way off. The solution for this one is: left dial: spider, right dial (on the floor above): three-headed snake. This contains mannequins and a fringed crimson clockwork scarf.
Door puzzle five: Long Gallery

Same as last one: head to Potions Classroom Floo Flame, through the doors, and go left down the stairs until you reach the locked level one door. Open this and run all the way down the Long Gallery until you reach a more open area with the door on the left. The solution is: left dial: tentacle goat, right dial: unicorn. This contains vivarium landscape paintings and tattersall shirt and tie uniform.
Door puzzle six: Charms Classroom

In the Astronomy Wing area. Fast travel to the Charms Classroom Floo Flame, then turn around and go around the corner to the left to find the door. The solution is left dial: tentacle goat, right dial: one-eyed squid. This contains elf-made ivory gloves and jobberknoll statue.
Door puzzle seven: Ravenclaw Tower

In the Grand Staircase area. Fast travel to the Ravenclaw Tower Floo Flame, run down the corridor and look to the right for the door. The solution is: left dial (on the far side of the room): weird owl, right dial: spider with a face. This contains grey quidditch gloves and a bookstand.
Door puzzle eight: Grand Staircase

Also in the Grand Staircase area. Fast travel to Grand Staircase Tower Floo Flame then head directly down the stairs to find the door set into the outer wall of the staircase. The solution is: left dial: lizard, second dial (behind you): one-eyed squid. This contains roughhouse gloves and a telescope.
Door puzzle nine: Near the House Hourglasses

In the Grand Staircase area. Fast travel to the Grand Staircase Floo Flame, run up the stairs ahead of you, turn right, and double back up the next flight of stairs before turning left to find a door. The solution is: left dial: furry creature with eyebrows, second dial on floor below: spider with a face. This contains the ancient mysteries scarf and large decorated tables.
Door puzzle ten: Faculty Tower

In the South Wing area. Fast travel to the Faculty Tower Floo Flame. You'll need to undertake "The Caretakers Lunar Lament" quest to get to this one. During the quest, you'll unlock the Faculty Tower and head inside. On the next floor up from the entrance you'll find the puzzle door, though you might have to distract a prefect to get to it. The solution is: left dial: furry creature with eyebrows, right dial: hydra. This contains an elegant house cloak and quidditch equipment shelf.
Door puzzle eleven: The Great Hall

In The Great Hall area. Fast travel to The Great Hall Floo Flame then run to the left and around the pillar to see a puzzle door at the end of a corridor. The solution is: left dial: spider, right dial: three-headed snake. This contains moving portraits and an unidentified legendary head item you can unlock in the Room of Requirement.
Door puzzle twelve: North Hall

This one is in the Astronomy Wing. Fast travel to the Transfiguration Classroom Floo Flame then go through the doors behind you into North Hall. Head up the stairs to the top floor to find a level one locked door. Open this and run down the corridor to spot the puzzle door on the left. The solution is left dial: lizard, right dial: three-headed snake. This one contains the graphorn statue and forest tartan scarf.


