The basics of building an open-air test bench
While we typically follow a standard formula for our Build It section every month, sometimes it's nice to deviate a bit from the norm and explore different types of systems that are a bit more unconventional. One such system is the type of build we use at Maximum PC HQ for testing hardware, known as the open-air test bench. We have several of them deployed throughout the office alongside our standard-issue desktop PCs, and both types of machines serve an important purpose. The standard desktops are great for YouTube and Reddit, and occasional “work,” while the open-air test benches are used for most of our component testing since they let us swap a video card, CPU, SSD, RAM stick, or even the entire motherboard with minimal effort. When you’re using an open test bench setup on top of a desk, you’ll never again have to dig through the guts of your computer while on your hands and knees, with a flashlight clenched in your teeth. All you need to set up one for yourself is a basic set of spare parts, and it will let you operate like a civilized gentleperson, from the comfort of a chair, without breaking a sweat. With that in mind, we thought we would show you how to build an open air test bench PC !

Thinking Outside the Case
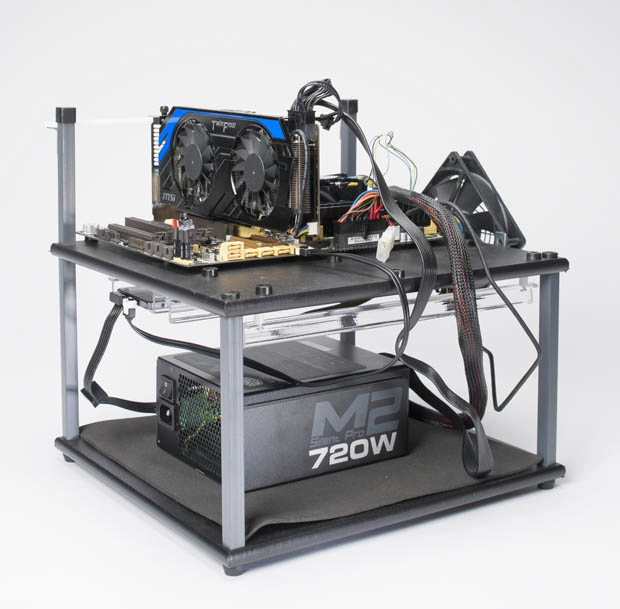
There are a lot of reasons any died-in-the-wool hardware enthusiast would want to have a test bench up and running at all times. The most obvious is that it’s great for quickly testing a stick of RAM, a malfunctioning piece of hardware, or benchmarking hardware outside of a system that needs to be used for productivity. At Maximum PC, our bench of choice is the Top Deck Tech Station Kit made by HighSpeed PC ($140, www.highspeedpc.com ). This is a two-tier workbench, where the motherboard sits on the upper tray, and the power supply and storage devices (or other external bay items) sit on the lower tier. The station’s legs, rails, and PCI-card support brace are all made of sturdy and nonconductive materials, and the kit supports a decent amount of hardware, too. The top of the tray looks just like a standard motherboard tray in that it has rubber standoffs for clearance. A nylon guide post helps you align add-on cards with their slots in the motherboard, and a bundled neoprene mat helps prevent items in the lower tray from sliding around. In place of your case’s power and reset switches, there are switches you plug into the board's front-panel connectors that allow you to turn the machine on, reboot, monitor drive activity, and hear the PC speaker. Yes, they are pricey, but very durable and able to accommodate hardware not even conceived of yet, due to their open-air design and flexibility. As always, there are several things to consider before diving in, so let’s take a look at what’s involved in letting your hardware go commando.
1. On the Rails
Storage devices slide into rails pre-installed on the underside of the upper tray, and they only accommodate 3.5-inch drives. The rails also have no holes for drive screws, by design—you just slide the drive in, then slide it out when you're done. If you want to install an SSD, you'll need to order a 2.5-inch rail kit separately at HighSpeedPC.com. Or you can skip the adapter, since SSDs don't need to be near the 120mm fan that cools the devices in that area, and since they have no moving parts they don’t need to be stabilized at all times like a spinning hard drive. The rails are long enough to support two 3.5-inch drives, and we put SSDs on the lower tray dangling from their SATA power cables.
Article continues below 
2. More Able Cables
A modular power supply is extremely useful when trying to keep your cables organized in an open test bench. If you’re not using an optical drive, there's plenty of space in the lower tray alongside the power supply to store the bag that contains the unused cables. Orienting the power supply can be a little tricky, since the 8-pin CPU power cable has to go to the top of the board, the 24-pin motherboard cable goes to the side, and the SATA power cables go to the bottom. Therefore, our preferred setup is to have the cables going toward the top of the motherboard, and the AC power plug facing the "bottom" of the motherboard. We also recommend using a stock CPU cooler since it makes accessing the area around the CPU easier, and if you can, just use the CPU's integrated graphics since it gives you one less PCI Express power cable to deal with. If we're testing a CPU without integrated graphics, we just use an old GPU that doesn’t require PCIe power.

Click on page two for the rest of the instructions on how to build an open-air test bench PC .


