Essential PC Building Tips
Motherboard/CPU Matters
Setting up the motherboard and CPU is often the most daunting task to a new PC builder. If you step back and think about it, though, installing the mobo and CPU are a lot less intensive than wiring up the PC in a neat manner. It’s really not that bad. Still, there are a few basic guidelines every builder should heed.
TIP 1: Don’t Overtighten It
A rookie mistake to avoid when building your system is screwing in the board so tight with the first screw that you can’t nudge it about. Instead, after you’ve put in the first screw, leave it sloppy enough so you can shift the board. If your case isn’t the best quality and has very loose tolerances, you may even want to put a card in the slot to make sure the board is in properly. Some newer cases even include a center mounting point that doesn’t need to be screwed down. Instead, you plop in your board and use the center point to orient your board to the exact position it needs to be.
TIP 2: Keep it Parallel
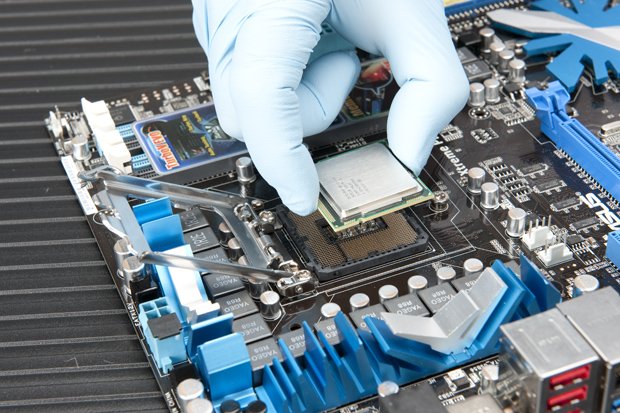
Intel actually makes a special field insertion and removal tool for its CPUs, but unless you’re building systems all day, your fingers can do the walking. The proper way to insert a land grid array CPU is to hold it parallel to the socket and gently lower it straight in. Don’t drop one side in and then the other, or try to slide it around the socket—you may kill your motherboard.
TIP 3: Mind the Notches
CPUs usually have small triangles to denote where to insert the CPU, but we’ve found the mark is difficult to see under poor lighting. In addition to the golden triangle that either lines up with a triangle or notched corner on the socket, you can also use the notches cut into the side of the CPU to help guide your proc into its home.
Keep up to date with the most important stories and the best deals, as picked by the PC Gamer team.
TIP 4: Getting the RAM Right
Before you place RAM in your board, always read the manual for the proper placement of DIMMs. Different memory controllers in different Intel and AMD CPUs means you have a very high probability of hobbling your memory bandwidth or possibly preventing your box from even booting at all if the RAM is in the incorrect slots. One of the most common mistakes builders make is not inserting the RAM with enough force into the slots. Most people do this because they don’t want to damage the motherboard, but boards are actually pretty tough. Once you’ve made sure the RAM is properly lined up with the key, or notch, in the RAM slot, push the module into place until the arms lock on both sides. You should barely be able to see the contacts if properly installed.
TIP 5: Grease it Good
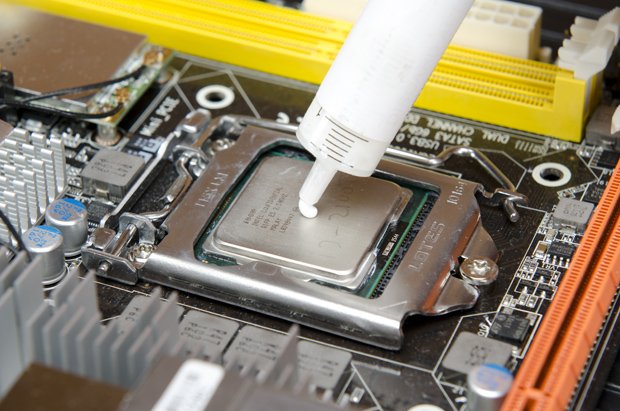
Like fan holes, everyone has an opinion on the proper application of thermal paste. How much, how little, and where it goes are issues of hot contention. Two methods have worked well for us: Put a dab the size of a grain of rice or BB smack-dab in the center of the heat spreader and then sandwich the cooler on it. This will spread the paste out in the center of the CPU where the cores are. The other method that also works well is to put the same amount of thermal paste on the CPU, and stick your finger into a clean plastic bag and evenly spread it over the CPU heat spreader. The real key to applying thermal paste is not to use so much that it acts as an insulator. If it’s oozing out the sides, you went too far. Just because the heatsink came with a tube, doesn’t mean you should use it all.
TIP 6: Know IEEE 1394 from USB 2.0
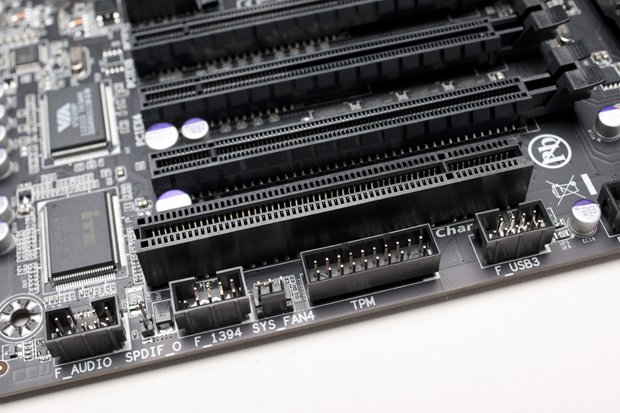
We were never huge fans of how IEEE 1394 (aka FireWire) was implemented. Among the many reasons we’re not sorry to see FireWire go is the tendency to mix up FireWire headers and USB headers. Both have similar pin-outs, so it’s easy to accidentally plug your PC’s front USB 2.0 ports into a FireWire header. Since FireWire carries a crapload of power, and on the wrong pins for USB, you could easily damage your devices in a heartbeat.
TIP 7: Be a Cover Snob
True connoisseurs of build techniques will show their colors when talking about the plastic cover on the LGA2011 socket. Some say the right method is to leave the cover in place and let the CPU pop it out when you close the lid. Others say to just pop it out with your finger first. Both cite Intel as their source. Who’s right? Both, actually. We’ve seen official Intel videos showing both methods in use. Both ways work and neither is wrong. More importantly, you may be tempted to toss the cheap plastic cover from your motherboard socket, but don’t. Most motherboard companies require that the plastic piece be in place and protecting the socket should you ever return the board for repair or replacement.
GPU Wisdom
Installing a modern GPU doesn’t take much effort beyond ensuring adequate airflow going to it. Still, for more advanced users, there are a few things to consider when you run multiple GPUs, as well as thinking—oddly enough—about your storage options before you install your GPU. Intrigued? Read on.
Tip 1: A Bridge Too Far
For those of you building multi-GPU systems, it’s always confusing how to set up the bridge properly. On the Nvidia side, a given motherboard should come with multicard bridges for all of the SLI configurations the board supports, so don’t expect a four-way SLI bridge on your microATX board. On the AMD side, the bridges come packaged with the GPU.
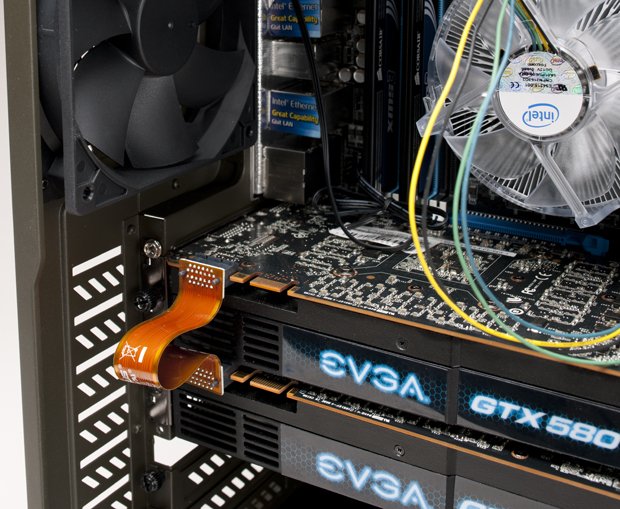
Installing the bridge on a two-card SLI build is always confusing. Do you put the bridge on the front or rear connectors? The answer: It doesn’t really matter. In fact, we tested a pair of GeForce GTX 680 cards using the latest drivers and found no difference between the two scenarios. Still, for some reason, we prefer to put the bridge on the connectors closer to the rear of the PC. AMD’s CrossFireX is the same, with the bridge location making no discernible performance difference.
Tip 2: Quad-SLI Port Protocol
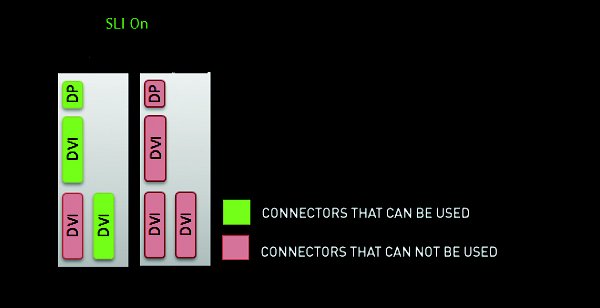
Few of us will be running two GeForce GTX 690 cards, but there’s a secret to doing it correctly. Most of us assume that all of the connectors work fine in quad SLI. That’s not true, and using ports other than those designated for quad-SLI use will result in unstable behavior that most experienced builders will attribute to a bad PSU, bad RAM, or other hardware issue. When you are running quad SLI, the first DVI port will give you issues. Instead, plug your monitor into the second or third DVI port on the top GPU, or into the DisplayPort on the first video card, to avoid random lockups related to an improper configuration.
Tip 3: Use Separate Cables
If your GPU requires a pair of 6-pin or a 6-pin plus 8-pin connector, consider using separate cables from the PSU rather than a combination cable that places the load on the same cable. If you have a borderline-undersize PSU or low-quality PSU, it may not be capable of supplying all the power the GPU needs, so if the option is available to use two different cables to power up your GPU, do so.
Tip 4: Mind the Slots
All of the slots in a motherboard might look the same, but the wiring under those slots often varies. For optimal performance, use the top slot for your GPU, as it should be the x16 physical and x16 electrical slot. We’ll be honest, a x8 PCIe slot on third-gen technology provides the same bandwidth as a x16 PCIe slot on second-gen—but there should be absolutely no reason in any modern motherboard or case or odd heatsink that should prevent you from using the top slot.
Tip 5: Install SATA First
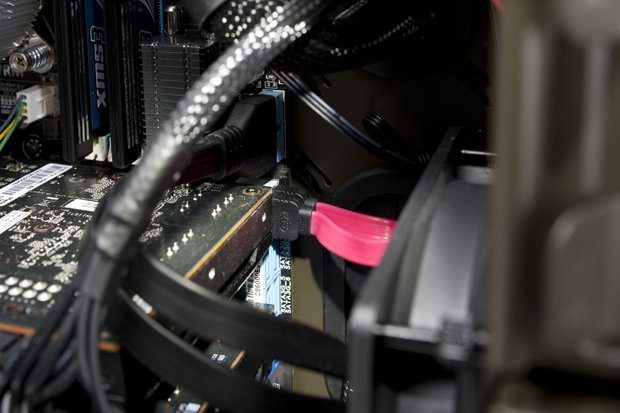
If you’re wondering why we put a storage tip within the GPU section, it’s because the two go hand-in-hand. That’s because most newbs make the mistake of installing their double-wide GPU before they wire up their drives, only to find they can’t access their internal SATA ports without pulling the GPU. That’s why we recommend that you install your SATA cables first. In fact, we recommend installing more SATA cables than you need.
Click the next page for a list of PC-building doo-dads!
