Essential PC Building Tips
Have a Fan Plan
It doesn’t matter how clean your wiring is or how powerful your components are if you can’t keep them cool. A good fan setup can turn a hot, dusty, and noisy PC into a cool, quiet, clean one. Here are the top tips to look for, whether you’re building a brand-new PC or renovating an older one.

TIP 1: Fan Placement Basics
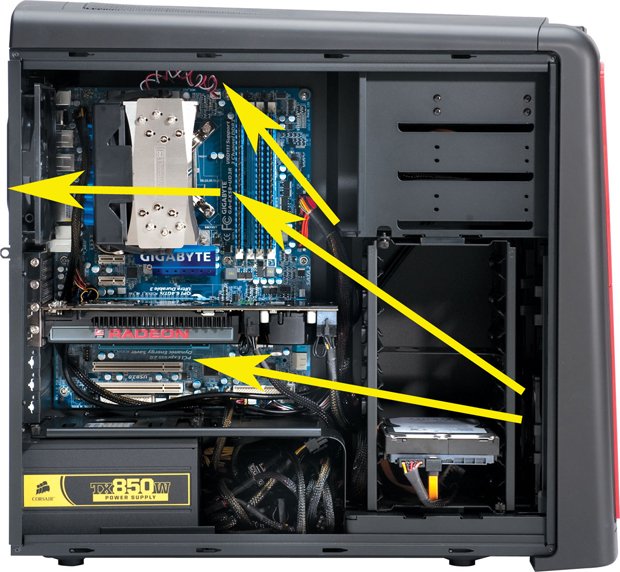
The traditional setup is to have a 12cm intake fan in the front of the case, right in front of the hard drives, and a 12cm exhaust fan at the top-rear of the case next to the motherboard I/O ports. This allows simple, unidirectional travel so that air goes first over the hard drives, then over the heat-producing GPU and CPU and motherboard, and then out the rear of the case near the top, because warm air rises. As components have become more powerful, they’ve started putting out more heat, and case manufacturers have had to add fans to keep up. The most common additions are a side-panel fan for added GPU cooling, and additional exhaust fans at the top of the case. Make sure you have intake fans in the front and exhaust fans in the rear. Side-panel fans should be intake, not exhaust, and top-panel fans should generally be exhaust.
Positive Airflow and Filtration
It’s best to have slightly more air intake than exhaust. This creates positive air pressure, which reduces “dead spots” in the case, without air circulation, and it prevents dust from coming in through unfiltered openings. Make sure your intake fans have dust filters, preferably removable. Clean them every month, especially if you have pets or carpets. If your case doesn’t come with dust filters, don’t buy it. If it’s too late, you can get dust filters for a couple of bucks on Newegg. Dust is a great insulator and a great killer of components.
Put filtered intake fans on the front panel first, then the side panel if you need more intake (and your case can accommodate side-panel fans). Stick with the standard rear exhaust fan, and add a top exhaust if necessary. There’s no need to filter the exhaust fans; no sense trapping in dust.
Know What Needs to be Cooled
Keep up to date with the most important stories and the best deals, as picked by the PC Gamer team.
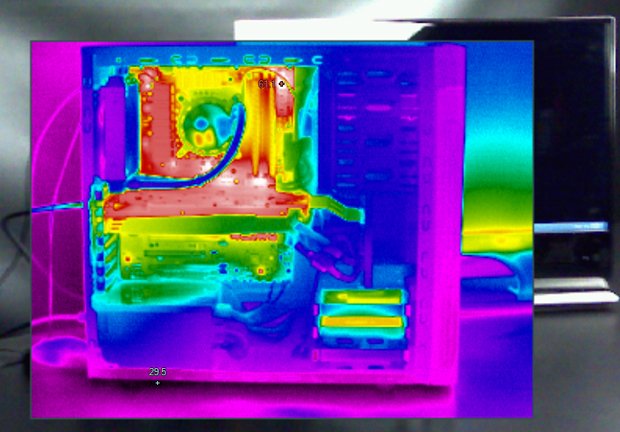
If you’re air-cooling, the airflow from your case fans and CPU cooler should be sufficient to cool motherboard components such as the voltage regulation modules and your south bridge, but if you’re water-cooling your CPU and GPU, those mobo components can overheat from lack of airflow. If you're water-cooling and plan to overclock, consider adding auxiliary cooling to your VRMs and chipset, too. A simple fan is generally enough to keep them cool. If you have a radiator mounted to the top of your case, consider mounting its fans as intake rather than exhaust so you can get more air flowing over the north half of the motherboard. As you can see from the thermal image of a water-cooled rig, the VRMs and the chipset (in red) get the hottest.

Courtesy of Falcon Northwest
TIP 2: Three Pins or Four?
Most case fans use 3-pin connectors, but some use 4-pin. Most CPU cooler fans use 4-pin. You can control 3-pin fans by changing the voltage to the fans—via the BIOS or a hardware fan controller. You can control 4-pin fans by way of PWM (pulse width modulation) and speeds can be changed in software, and sometimes in the BIOS. Some BIOSes let you switch the CPU FAN headers between voltage and PWM control. Either is fine, although PWM fans can often be tuned to lower speeds than voltage-regulated fans, which usually need at least 50 percent power to spin up, so PWM fans can run more quietly.
TIP 3: Mobo Control or Fan Controller
If your motherboard has enough fan headers to control all your case fans, there’s nothing wrong with using your mobo to do to the job. Some motherboards, like Asus’s new ones, include utilities that “auto-tune” your fans based on their speed capabilities and where they are in the case.
If you have a lot of fans or want really fine-grain control, you can get a stand-alone fan controller. Many cases come with built-in fan controllers, though most are rudimentary. Some top-end ones have fan-speed readouts and some have temperature sensors, so you can tweak until it’s just right.
PSU Guidelines
Don’t overdo it, but play it safe
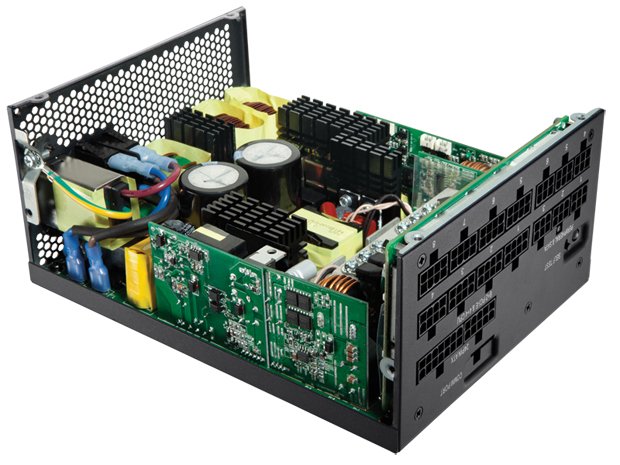
With today’s efficient CPUs and GPUs, you may not need the behemoth PSU you’ve been eying. We used three online PSU calculators from reputable sources to configure a box built on a Core i7-3930K, a GeForce GTX 680 , four DIMMs, an SSD, HDD, ODD, and four fans. The recommendations ranged from 400 to 650 watts. That may sound low to you, but we have one editor who runs a GeForce GTX 690 , overclocked Ivy Bridge CPU, and six HDDs on a name-brand 650-watt unit with no issues “so far.”

Our general guidance, though, is still to err on the side of caution by building in a little more headroom than you need. If a PSU calculator recommends a 600W for you, think about a 750W. This overprovisioning will help you in the hot summer months when your PSU will be pushed to its limits. Remember, an overloaded PSU will have a shorter life.
Click the next page to hear some tips from the PC building professionals!

