Build It: Big Capacity, Small Form

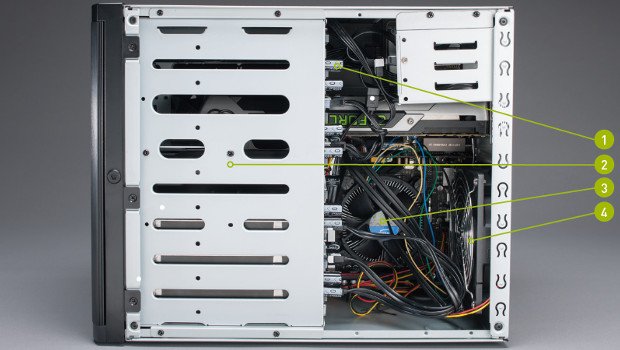
1.) These funny-looking cylinders are capacitors that help provide power to the storage devices in the 3.5-inch drive cage. 2.) With 8TB 3.5-inch drives on the way, this eight-tray cage could hold 64TB of data—plus the four-drive 2.5-inch cage. 3.) We wanted to add a third-party CPU cooler for overclocking, but the space here is just a little too tight. 4.) We added a grill to the rear fan, since there’s a non-trivial amount of wiring hanging around the area, even after tidying up.
Fancy Toys Bring High Price and Mixed Results
Ironically, we started with the Asrock C2550D4I because we wanted a more straightforward build. With an integrated CPU and cooler, it cut down on the steps we needed, giving us more time to fiddle with Ubuntu (the CPU on the original board doesn’t support desktop versions of Windows, and we couldn’t justify $700 Server 2012). It’s been a while since we gave desktop Linux a spin, but that’ll have to wait.
As far as we can tell, the C2550D4I is picky as hell with RAM. Asrock has a very short QVL list for RAM and many of them aren’t sold in the United States. After burning hours trying to get the board to POST with a fistful of different modules in every possible configuration, we gave up. But rather than completely bail, we decided to make something of the system, especially since we had some nice hardware waiting in the wings.
Almost no video card would be possible without the removable section on the 3.5-inch drive cage. Not even that shorty Nvidia GeForce GTX 760 that we used in one of the Minecraft builds last month. Even then, the dimensions of the cut-out clearly limit you to a reference-sized card—we ended up with only a few millimeters between the card and the edges of the cage. Luckily, we have several reference units lying around (and we made sure we chose one you could still buy).
Problem Fans
The other half of the equation was Silver-Stone’s cable kit, which is short and flexible. At $30, it’s not a cheap kit, but with over $3,700 already invested, it’s a relatively small expense. You could try using your own cable set, but, for safety reasons, we don’t recommend it. Each power supply’s set of cabling is designed for a specific range of tolerances. Our original power supply was 300 watts and had integrated cables, but only one PCIe connector. We needed two for the GTX 780.
We almost fit a Cooler Master 212 EVO on top of the CPU, but the capacitors on the drive cage’s backplane poke into that space. Putting the fan on the other side of the radiator fin stack would also compel us to reverse the airflow of the rear exhaust fan, or else the rear exhaust and CPU fan would be fighting over the air coming their way. There would be no proper exhaust for the case, and heat would build up. We could’ve experimented with a 120mm closed-loop water cooler, but the build was already in overtime.
We’d consider this build a qualified success but we honestly don’t recommend anyone follow our blueprint. It would have been cool to slap a load of high-capacity drives in there and see what the Asrock CPU-plusmobo combo could handle. At $280, the C2550D4I would also have been considerably cheaper. On the bright side, we get more adaptability with the higher cost and desktop OS driver support. But our price tag is on the high side. You’d probably be fine with an Intel Core i5 CPU, $125-ish mobo, 8GB of RAM, and 250GB SSD. That slashes about $1,000 off the build. Then you can go with much less expensive 4TB or 3TB drives. But like we said, why let the fancy toys collect dust?
Keep up to date with the most important stories and the best deals, as picked by the PC Gamer team.

