How to take your PC audio experience to 11
We take a deep dive into the often unexplored area of the PC, the sound setup.
The Speakers
Yamaha HS8 and HS8S subwoofer
Instead of "speakers," we're going to use studio monitors. With studio monitors, you're going to get a more accurate reproduction of what a recording is supposed to actually sound like. Their goal is to produce the entire frequency range with a flat response curve without emphasis on any particular frequency range. The drawback is they're usually near-field, meaning they have a very narrow sweet spot. In our testing, though, monitors still sound good even when you're not sitting directly in the "zone."
A name that's legendary in the monitor business is Yamaha. The company's NS10 studio monitors are widely use in professional mixing studios and have been a staple in the industry for many years. You can easily identify them by their distinctive white bass cone. Yamaha has since introduced a replacement to the NS series called the HS, and we opted for the HS8 monitors—8 for the size of its 8-inch low-frequency driver. Yamaha also makes smaller sizes: the HS7 and HS5. However, the HS8 has a lower frequency extension than the HS7 and HS5. In fact, the HS8's dynamic range is so good that for some cases, you won't even need a subwoofer.
A step down:
If the HS8 is too big for you, you can go for the HS7 and HS5. They're smaller, still blend seamlessly with the HS8S subwoofer, and are more affordable. Other options in this space include the KRK RP5G3-NA Rokit 5 Generation 3 monitors that go for $300, or the M-Audio Studiophile AV 42 set, which can be had for $180. The KRK speakers offer excellent flat response and are popular with those who mix (or listen to) hip-hop or synthesized music. Many people who want to swap out their desktop speakers for a pair of studio monitors find themselves picking M-Audio, and we reckon that's a great place to start. JBL is another brand we have no problem recommending, as they're popular with mixing and recording studios. Its LSR series are well regarded, including the very popular LSR305 monitors.
A step up:
All of the above-mentioned companies offer higher-end products as well, with price ranges similar to Yamaha's HS8 series ($499 per monitor). But if you want to go a step higher, you may want to consider three excellent choices (there are more): Genelec, Neumann, and Adam Audio. In the case of Neumann, the company also makes some of the world's best microphones, so if you're recording, you might want your entire system run on Neumann, but the prices for Neumann monitors can reach up to $10,000 apiece.
If we had to pick a good step up, we'd go with Adam Audio's A8X, which is a two-way powered monitor with a ribbon tweeter ($2,000 for a pair). Many in the mixing industry say that the ribbon tweeter used by Adam is less tiring to listen to over long hours than dome tweeters. It's no coincidence that we also chose Adam Audio as our supplier for the speakers included in Dream Machine 2015.
A closer look at the Yamaha HS8 studio monitors
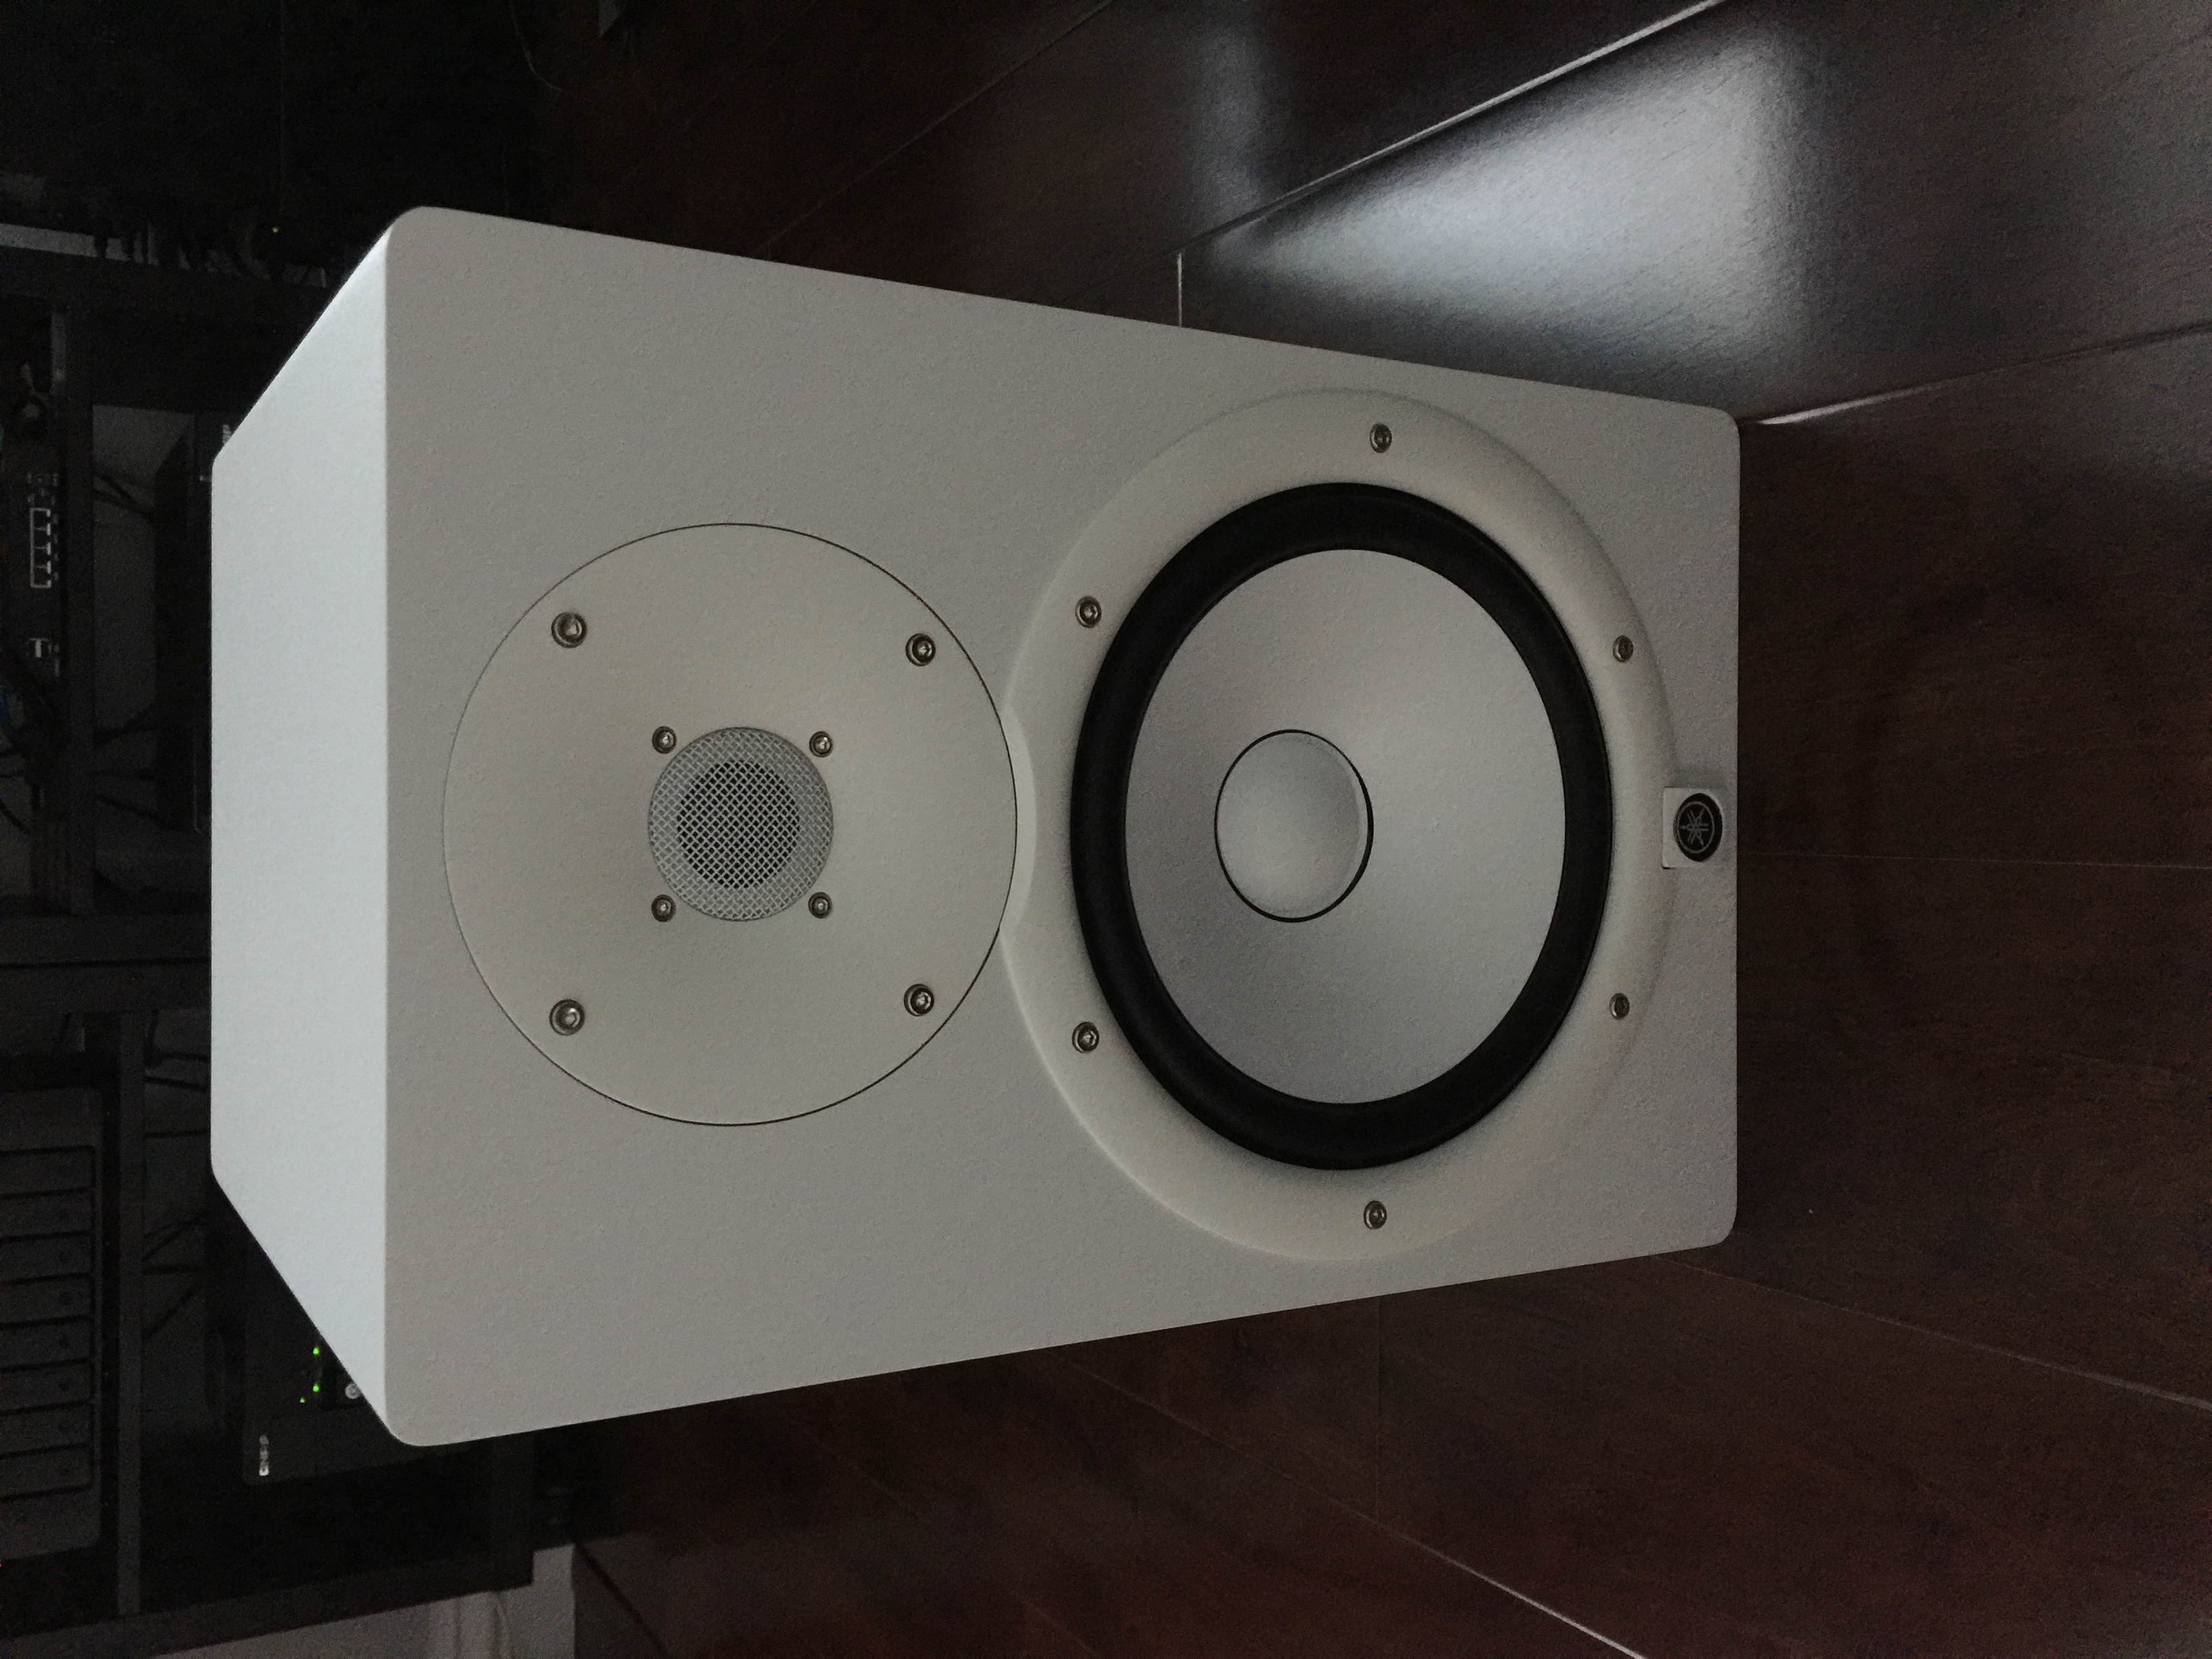
The HS8 is a two-way bi-amplified studio monitor with a frequency response of 38Hz to 30kHz with a total power rating of 120W RMS. The low-frequency driver receives 75W of power while the high-frequency driver uses 45W.
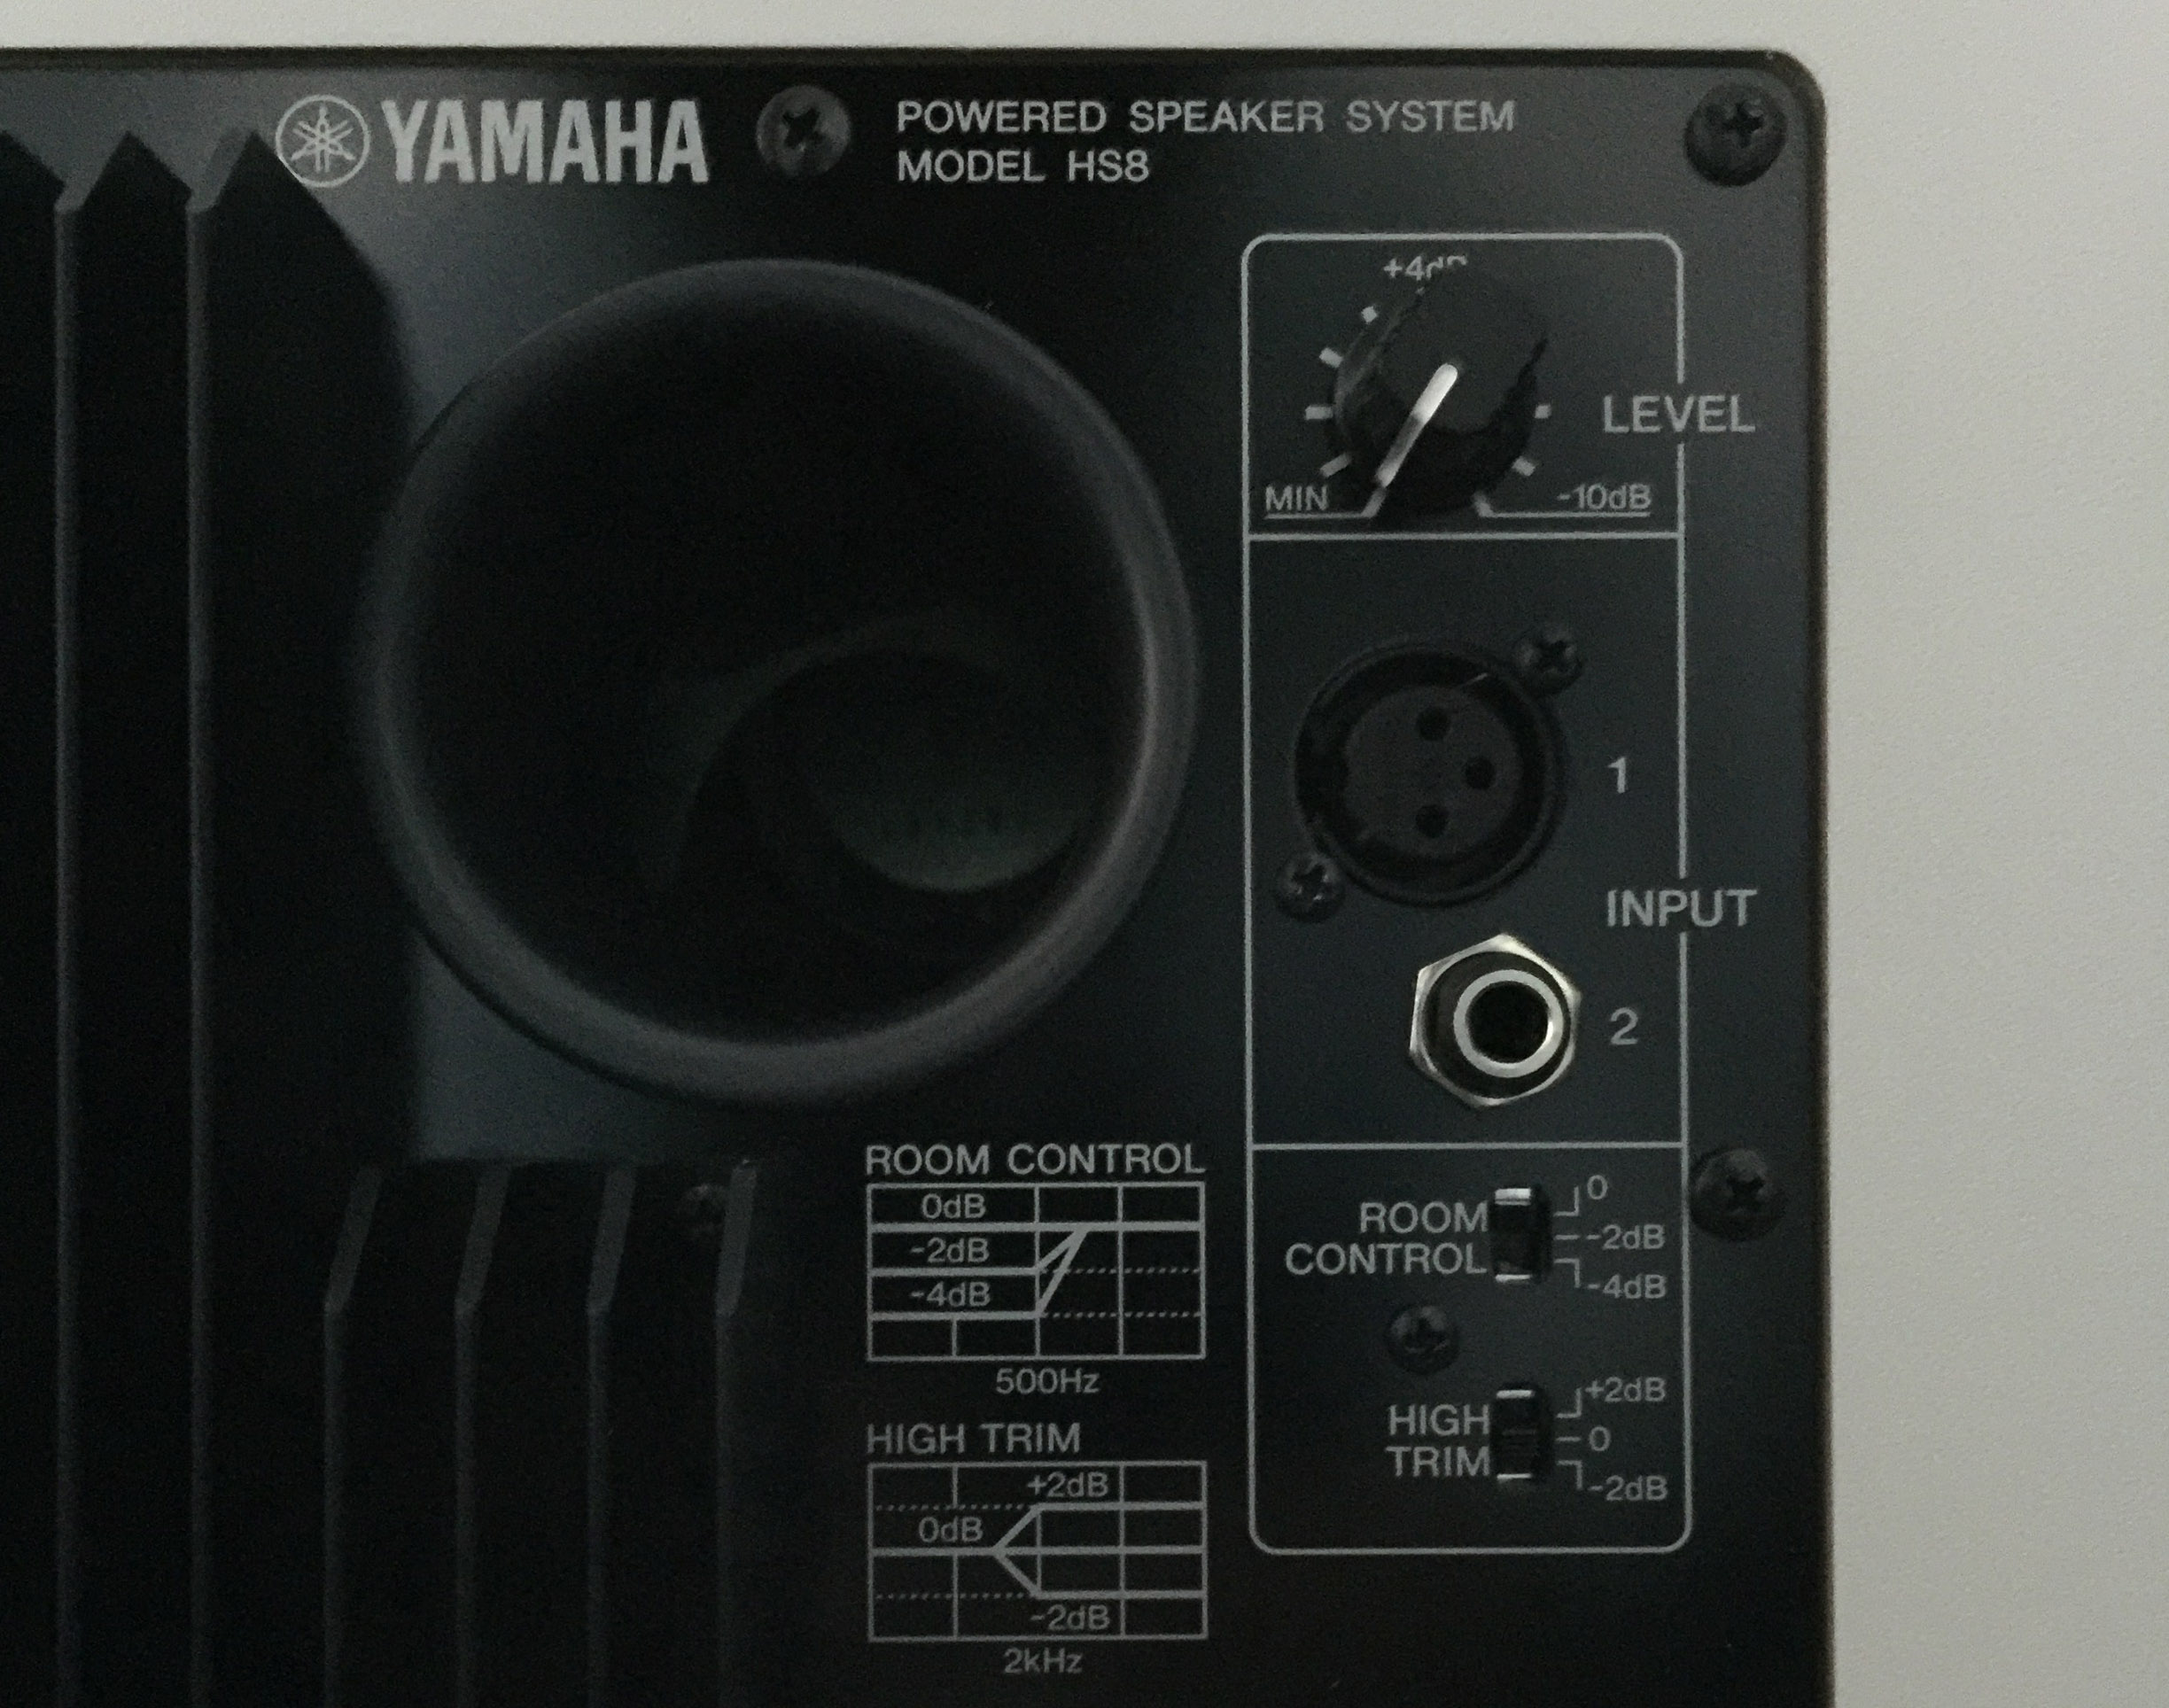
On the rear, the HS series has both single-ended and balanced XLR inputs—a perfect match for our Oppo HA-1. The monitor also features both room control and high-trim, allowing you to tailor the speaker to compensate for room acoustics.
Keep up to date with the most important stories and the best deals, as picked by the PC Gamer team.
For subwoofer duties—yes, we wanted one—Yamaha has an accompanying matched sub called the HS8S. With a sub, you'll have much greater dynamic range. The HS8S sub has both single-ended and fully balanced ins and outs. The HS8 monitors plug directly into the subwoofer in our case, but if you decide not to get a sub, they can plug directly into the Oppo HA-1's balanced outputs. Both the Oppo HA-1 and the Yamaha HS8S and HS8 monitors are fully differential.
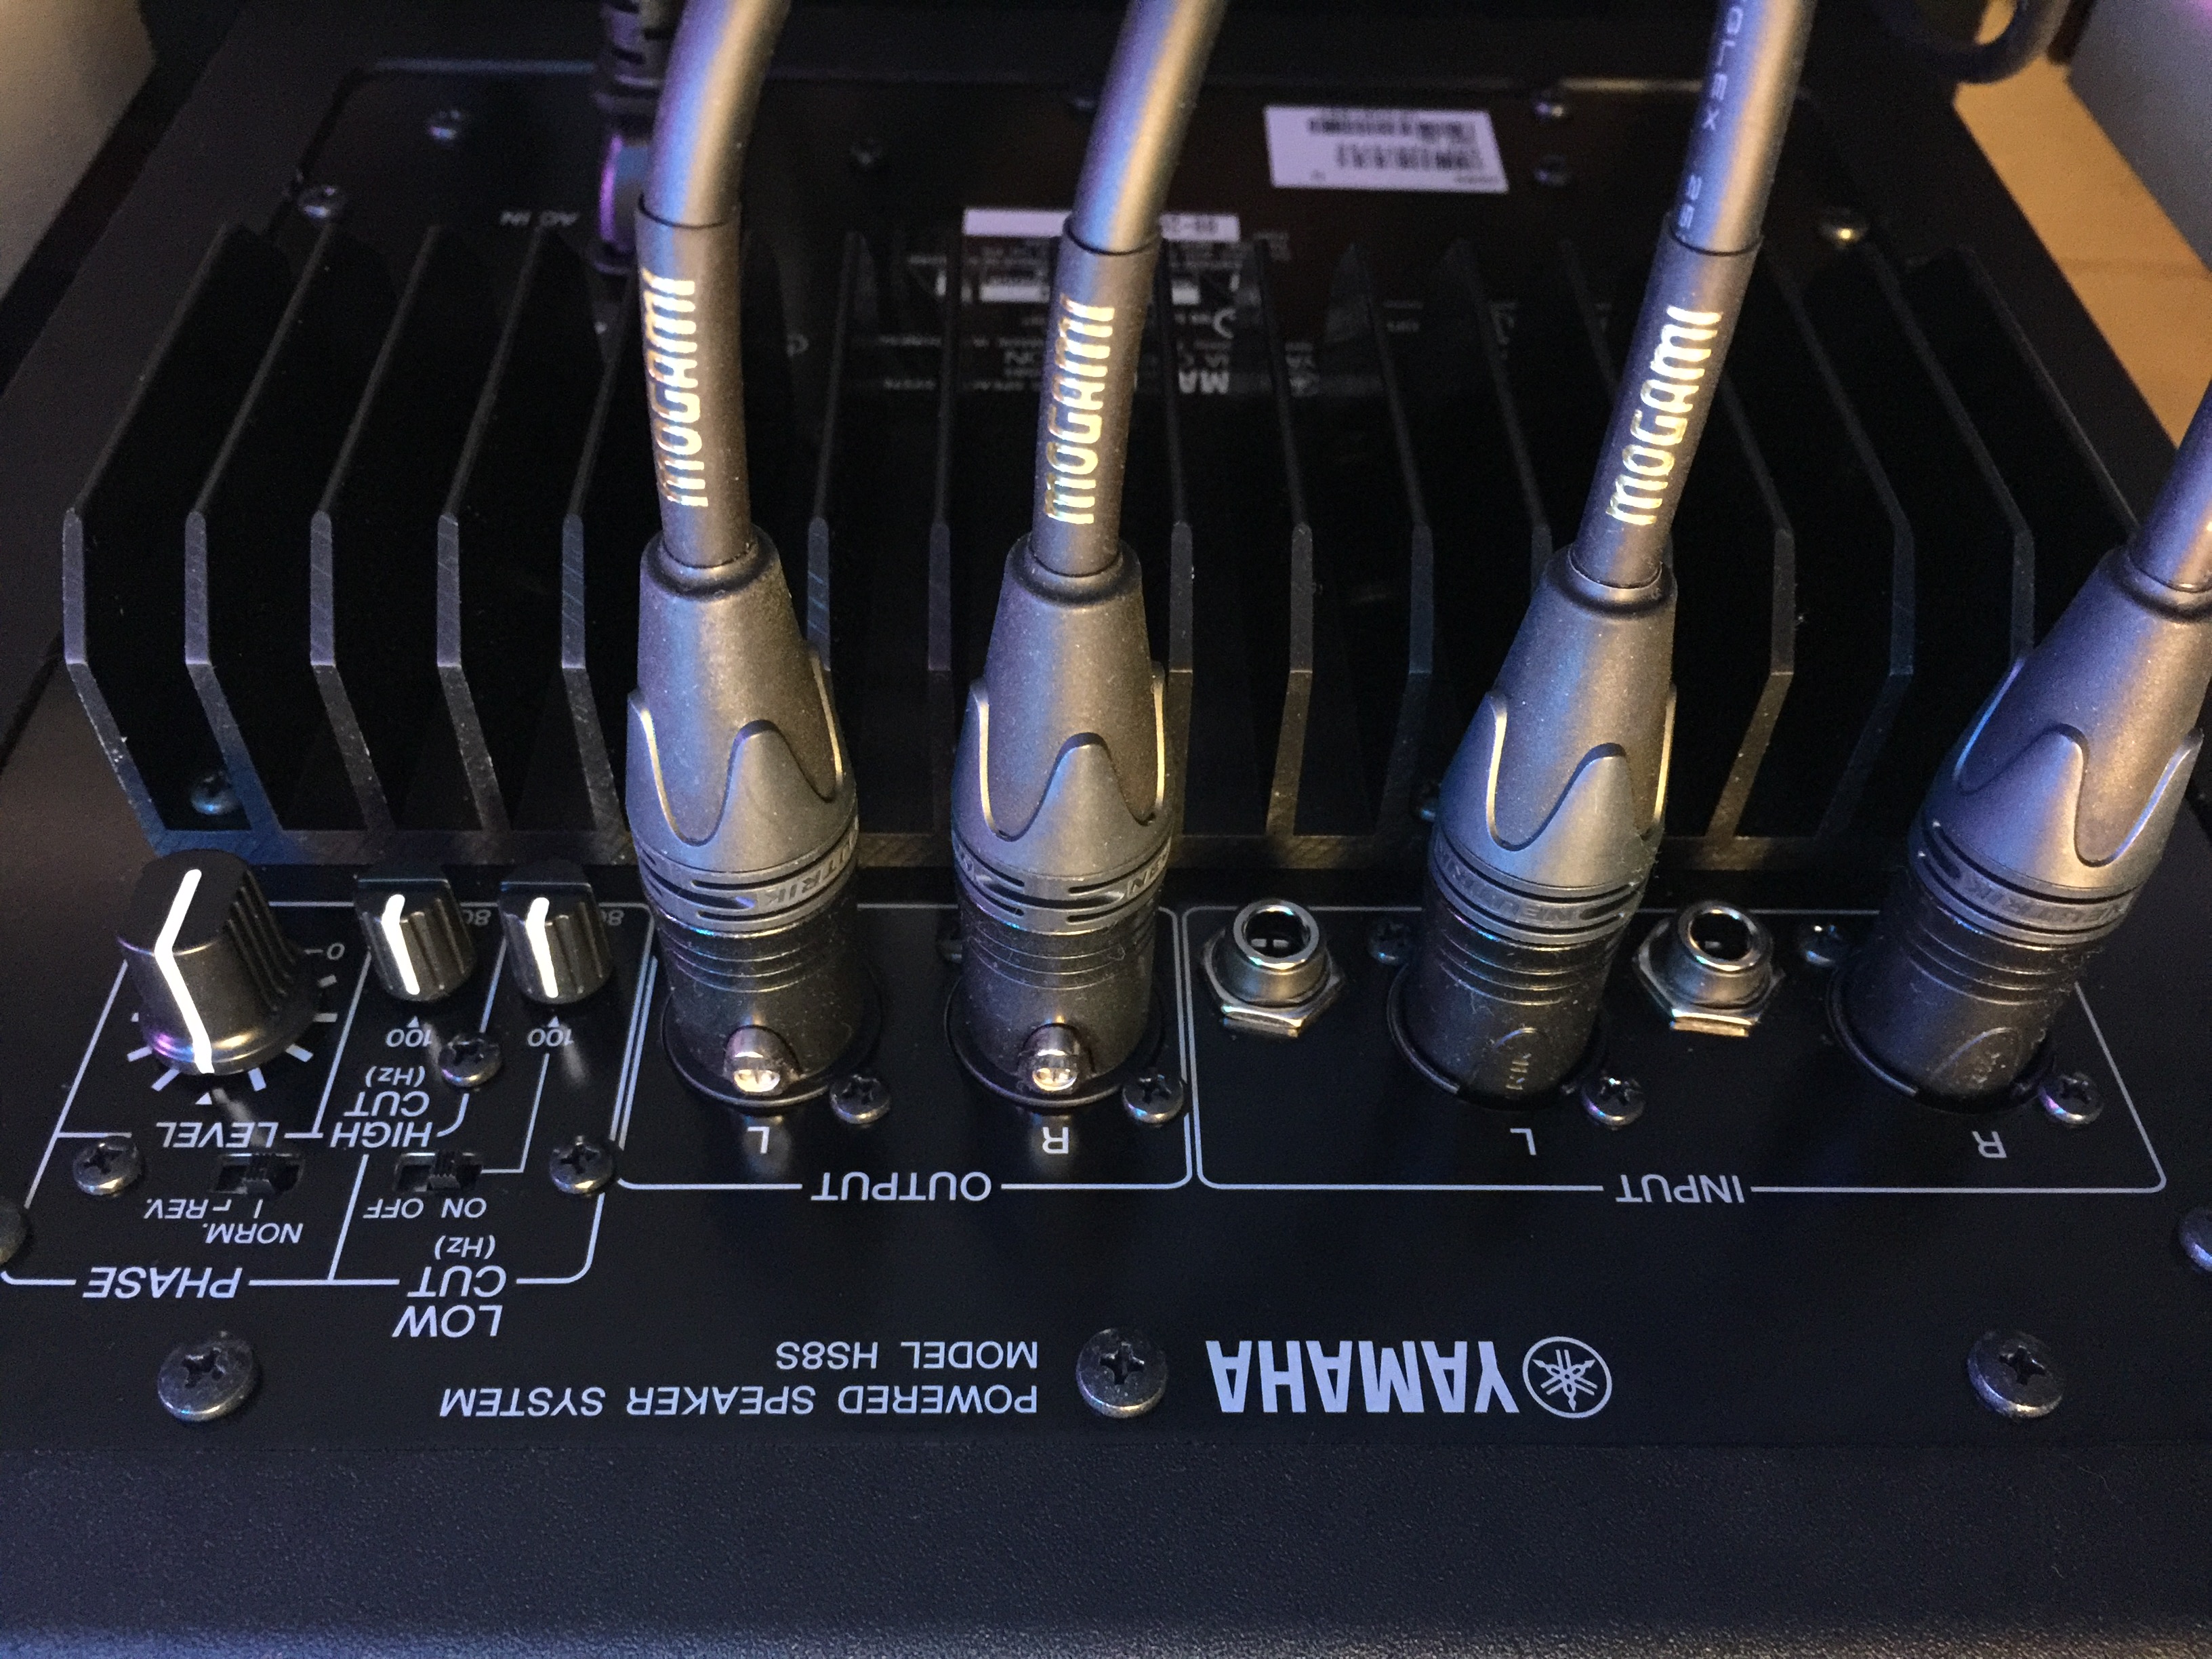
Yamaha features high- and low-cut options on the HS8S as well as phase control. The high cut will let you determine the high frequency ceiling of the subwoofer; in our case, we left it at 100Hz. Low cut determines the bottom end of the frequency range that is passed onto the monitors, which we also left at Yamaha's recommended setting of 100Hz.
Phase control is a bit more complicated. In a nutshell, it is like wiring the black cable to the red connector on a speaker, thereby reversing the phase of the output. In the case of the HS8S, this is to correct bass response depending on your room acoustics and where you've placed the subwoofer. In some cases, a sub can produce out-of-phase bass frequencies with the speakers, canceling out certain frequency ranges, causing an audible dip in frequency response. Essentially, phase control allows you to correct misalignment in cone movement timing between the speakers and the subwoofer, to make them in sync. If they're out of sync, you can correct this with a phase switch. For more information on phase correction, check out Rod Elliot's excellent write-up of phase shift and time delay.
Rear speakers that are facing the front speakers can also cancel each other's sound if wired incorrectly (out of phase). Always check if you've connected your speaker terminals correctly. In the photo above, we have our entire signal path running over a balanced connection.
The HS8 monitors will blow every PC speaker out of the water. Their response is fast and accurate, producing exceptional bass response as well as crisp highs. Midrange response is fantastic, too. The difference between even the Klipsch ProMedia Ultra 5.1 system that we were using before and the HS8 is night and day. With the accompanying HS8S sub, the setup is unmatched.
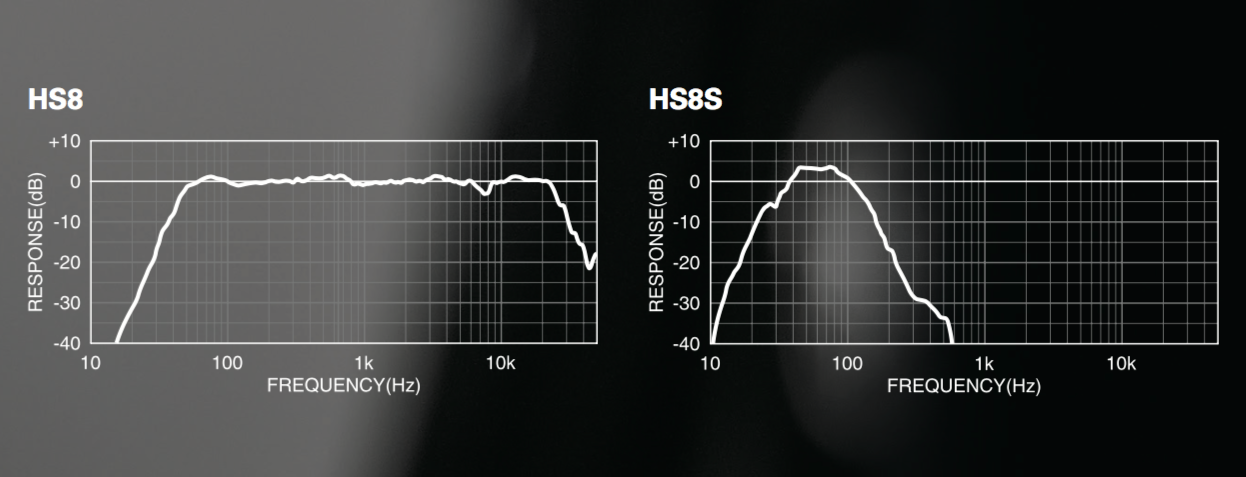
The HS8S produces tight bass, and responds down to nearly subsonic levels. Depending on your room acoustics, you can achieve frequencies below the HS8S's 22Hz bottom end. For accurate, full, and exceptional audio, you'll be hard pressed to find a better setup—save for going all out with hi-fi speakers attached to a receiver.
There are other great studio monitors from several other companies. The few that come to mind are M-Audio, KRK, JBL, Mackie, and Adam Audio. Your preferences on monitors may vary, but the common factor is they all aim to produce a flat frequency response.
Isolating your monitors
After moving over to monitors, you'll want to give them some isolation. Isolation pads decouple the monitors from the surface they're on—in our case it's the desk. They reduce resonance, which can interfere with your output, creating false acoustics and coloring the sound. We opted to use Auralex's MoPAD to isolate our HS8 monitors and they work incredibly well. They can be had for $34 on Amazon and can be positioned so that your monitors point upward, downward, or straight forward. For the HS8S subwoofer, we isolated it with Auralex's SubDude-HT. Our flooring is raised, and causes the bass to sound loose. With the pads in, the bass is significantly tighter, and clearer. The SubDude-HT goes for $72.50 on Amazon.
Ground loops
One problem people run into when running active monitors is the interference produced by ground loops. This is caused by either miswiring in a house/studio, or a badly designed power supply for a product connected to the same power line as the monitors. Simply speaking, ground loops occur when two or more components are going to the same earth ground, but they do so through more than one path. We ran into this exact situation. What you'll get from this is an annoying 60Hz humming sound emanating from the monitors, even at very low volumes. To learn more about ground loops, see this video:
Unfortunately, we weren't able to determine what was causing the ground loop in our setup, so we had to get some ground-loop isolators.
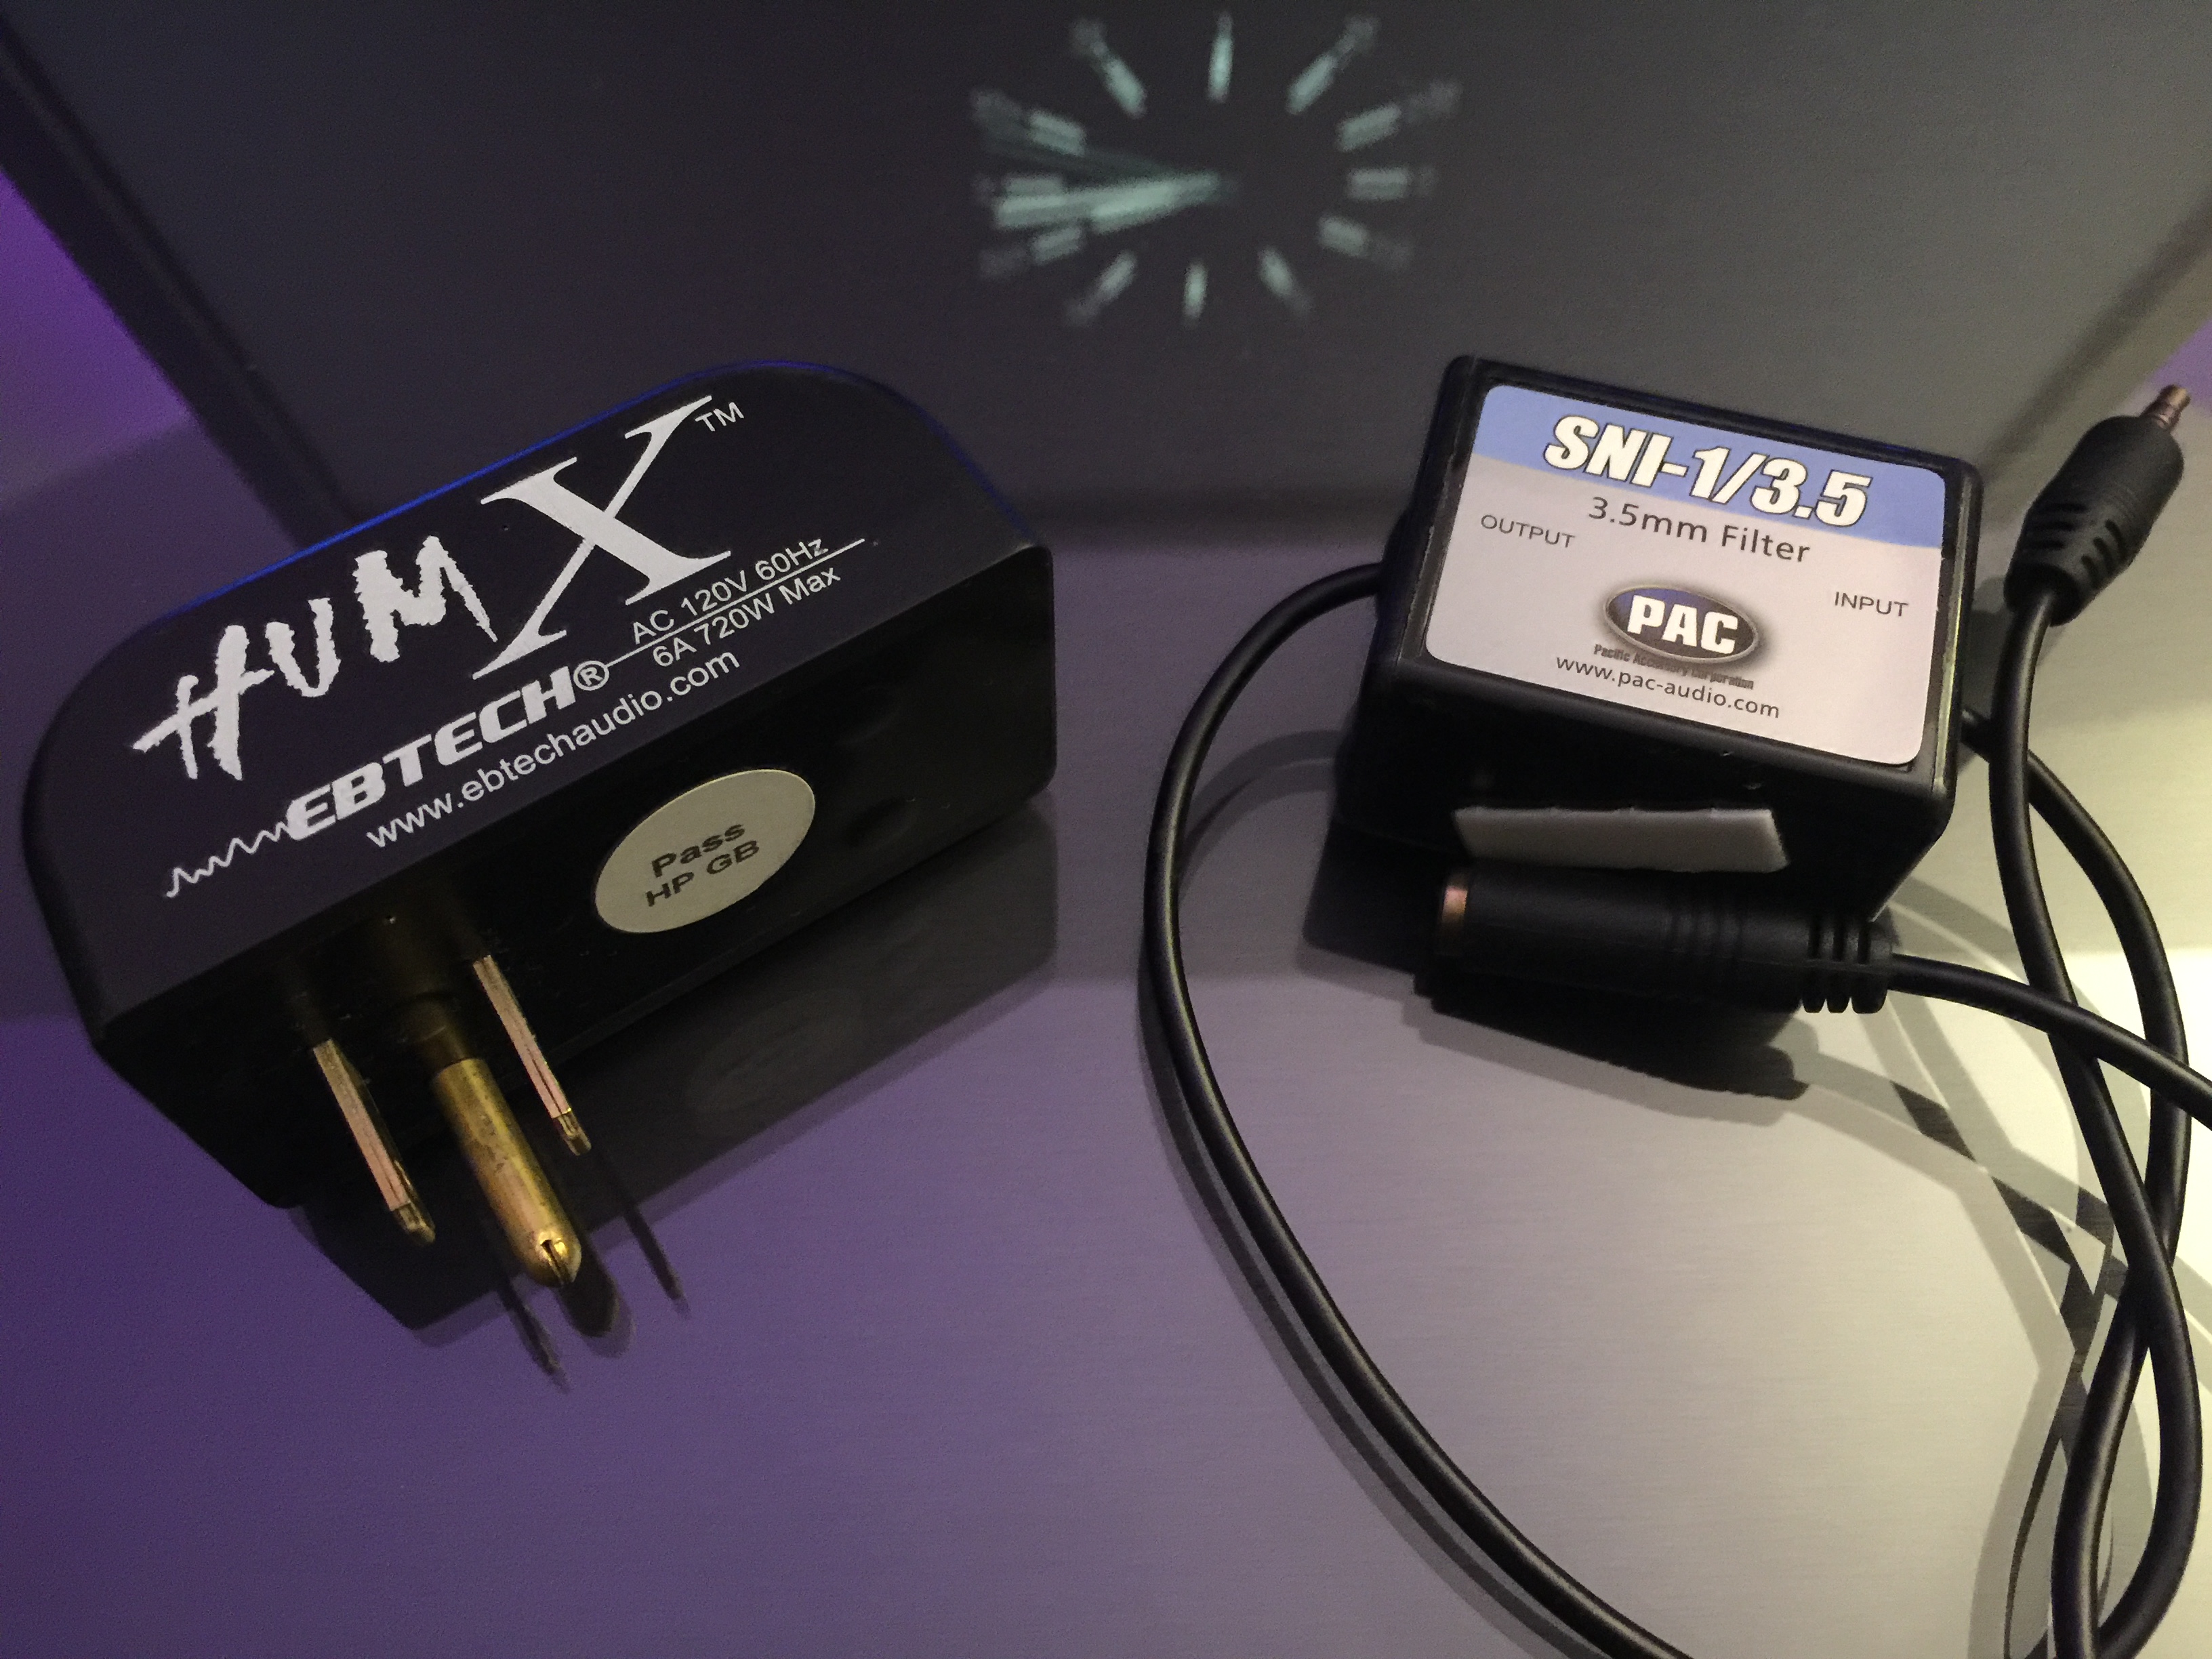
There are two ways to isolate ground loops: in-line on the audio path itself, or at the power plug. Using an in-line ground-loop isolator works, but it removes the 60Hz frequency and impacts low frequency response. We don't recommend this method. The way we solved our problem was to use a power-plug ground-loop isolator, solving the problem directly at the source, without interfering with the actual audio signal.
In our case, the HumX from EBTech worked perfectly, although they cost $55 a piece. The PAC in-line ground-loop isolator solved one problem and created another—not recommended.
Some people choose to eliminate ground-loop issues by actually removing the ground pins from their amplified components. This is most definitely not recommended, as it can cause damage to components, or in some cases, even electrical shock. A good starting place to test for ground-wiring issues is to get a GFCI AC outlet tester. They're cheap (less than $10) and can be bought on Amazon, HomeDepot, or any other electronics store.

