Join The Club


Core Keeper bosses: How to easily beat the bad guys
Core Keeper NPCs: How to build homes for merchants
Core Keeper tin: Where to find tin ore in the Clay Caves
The Core Keeper drill is used for the automated mining of ore, and it's an item you'll hear about long before you get a chance to make one. While exploring the underworld you'll quickly come across some large crystalline mineral deposits that look like jagged boulders, and when you hit one with your pickaxe you'll be told you can't mine them without a drill.
These boulders contain hundreds of units of ore, and to get your hands on those resources you'll need to craft and power a drill. But first you'll need to make progress through the early stages of the game, which includes defeating the first three Core Keeper bosses and finding a whole new biome.
Here are the requirements for a drill, how to craft one once you've completed those steps, how to rotate and power your drill, and how to automate gathering and smelting the ore the drill produces.

Requirements
Core Keeper drill: Requirements
- Defeat first three bosses
- Touch the Great Wall
- Find the Azeos Wilderness biome
- Mine scarlet ore
After you've defeated Glurch, Ghorma, and the Hive Mother and placed their gems into their statues, interact with the Core and you'll be told to touch the Great Wall. Once you touch the wall and it vanishes, speak to the Core again and it will tell you which direction to travel to find the new Azeos Wilderness biome.
There you'll start mining a new resource, scarlet ore, which can be turned into scarlet bars in a smelting kiln.
Once you're mining and smelting scarlet ore into scarlet bars, you're on your way to building a drill.
Crafting a drill
How to craft a drill
First you'll need to craft the following workbenches:
- Scarlet workbench: tin bar x10, iron bar x15, scarlet bar x25
- Electronics table: wood x8, copper bar x8, iron bar x8
- Automation Table: mechanical part x5, iron bar x8, scarlet bar x8
Using those workbenches, craft the following items:
- Drill: iron bar x10, scarlet bar x10
- Electricity Generator: copper bar x10, iron bar x5, gold bar x1
- Electrical wire: copper bar x1
- Robot arm: iron bar x5, scarlet bar x5
- Conveyor belt: iron bar x1, scarlet bar x1
Rotation and power
How to rotate and power the drill
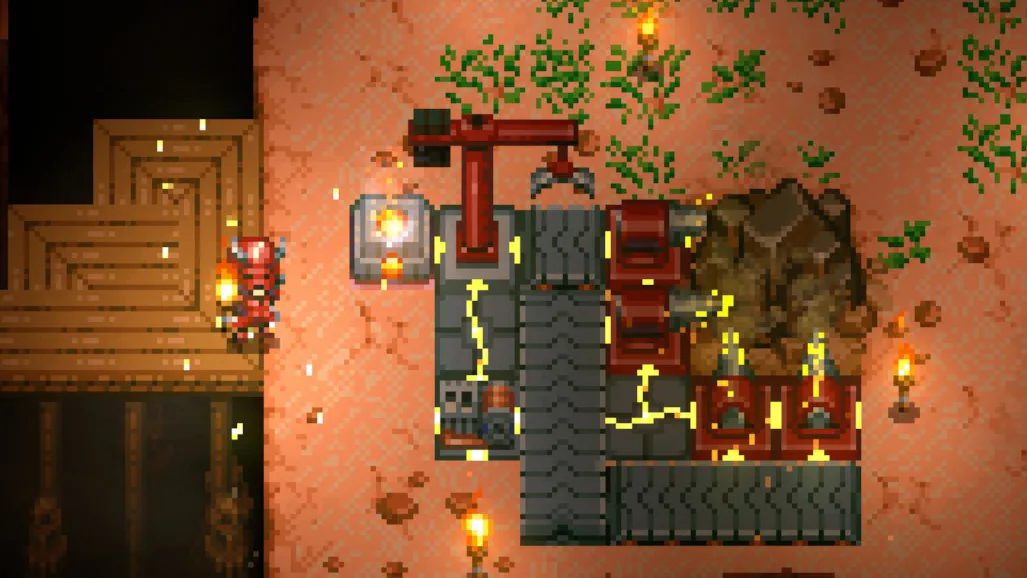
Place the drill directly next to the boulder. Once placed, highlight the drill with your cursor and tap E. That will rotate it 90 degrees until it's pointed at the boulder. You can fit a total of eight drills around a single boulder, two on each side.
Place the electricity generator somewhere nearby, a few blocks away. Place wire tiles between the generator and the drill. When connected, you'll see the wire tile displaying yellow lines indicating a connection. With the drill powered, it will begin to produce ore from the boulder. You can collect it by standing near it.
To automate ore retrieval, place a conveyor belt directly behind the drill. Once placed, highlighting the conveyor belt and tapping E will rotate it 90 degrees. Conveyor belts do not require power. Ore will come out of the drill and follow the direction of the belt.
For collection, place a robot arm where the belts end. Make sure the arm is next to a powered item or a tile with electrical wire. Rotate the arm by highlighting it and tapping E. Directly behind the arm, place a chest for collection or a furnace (for iron, tin, or copper) or a smelter (for scarlet ore or gold). The arm will collect the ore as it comes down the conveyor and drop it in.
Boulders aren't an infinite resource: Eventually, it will run out of ore. But each will produce hundreds of units of ore before it's depleted, after which you can pick up all your equipment and move it to another boulder.