RAID 1 and 0: Together, forever
When you’re trying to get the best performance out of multiple drives, a redundant array of independent disks (RAID) is your best bet. There are plenty of RAID modes levels (modes) to choose from, but many favor RAID 10 for its reliability and speed.
RAID 10 is an example of nested RAID, where two or more arrays are integrated into another RAID that is then visible to the system. In the case of RAID 10 (also known as RAID 1 + 0), this means having two or more RAID 1 arrays combined into a RAID 0 array. RAID 10’s sibling is RAID 0 + 1, where the top level RAID 1 array is comprised of two or more RAID 0 arrays.

RAID 10 is an example of nested RAID.
As a result, RAID 10 offers both the great resiliency of RAID 1 with the hot striping action of RAID 0. The only downside is that it requires at least four drives to work. Since RAID 10 stacks a series of RAID 1 arrays together, expanding storage means adding at least two drives, not just one.
As far as speed is concerned, you get all the speed benefits of RAID 0, but instead of speed as a function of the number of drives, speed is calculated as a function of the number of RAID 1 stripes.
To use RAID 10, there are two methods we’re going to show here: software RAID and FakeRAID. Software RAID is implemented by the OS, and the OS handles the logic for the array. FakeRAID is often denoted by motherboard manufacturers as “onboard RAID.” FakeRAID is still software driven, but that software works at the BIOS level, rather than the OS.
If you’re only running one OS, or you’ll only need your RAID in one OS, go for software RAID. If you’re going to need to share the RAID 10 array between two OSes, or plan on installing an OS on top of your RAID, go with FakeRAID.
Prepare your hardware
If you’ve been following along in our series, you’ll know that it’s always best to use drives of identical make, model, and capacity when constructing a RAID array. Even if you're forced to use different makes and models (as we were in our examples), you have to make sure that the drive capacities are identical. Mixing drives will at best result in an array that will performs as if each drive were the slowest one.
When connecting your drives for use in RAID, be sure to use the same interface for the drive. If two drives in your array are using SATA 6Gbps, use the same interface for every other drive you intend to add to the array. If your motherboard has multiple SATA controllers (our Gigabyte board had the built-in Intel controller as well as a Marvell controller), make sure you use the main controller if you plan on using FakeRAID. We had problems getting our BIOS to detect drives that were attached to our motherboard’s additional Marvell controller.
It’s also a good idea to make sure all of the drives in your array are using the latest firmware. Firmware fixes can result in better speeds and fix potential bugs that can wreak havoc on your data.
If you’re going to use FakeRAID, make sure your motherboard has “onboard RAID.” Most recent motherboards do, but if you’re building a server out of an old machine, this is something you should check.
Windows: Storage Spaces and Disk Management
Unlike with other RAID levels like 0, 1, or 5, Windows 8 doesn’t have an obvious option for creating RAID 10 arrays using Storage Spaces. Similarly, Windows 8 can’t combine RAID arrays in its Disk Management utility either. It can however combine RAID 1 arrays created with Storage Spaces with RAID 0 in the Disk Management utility.
To start, hit Win+S and search for “storage spaces” and open the utility. Next, click create a new pool and storage space . You’ll be prompted for administrator access.
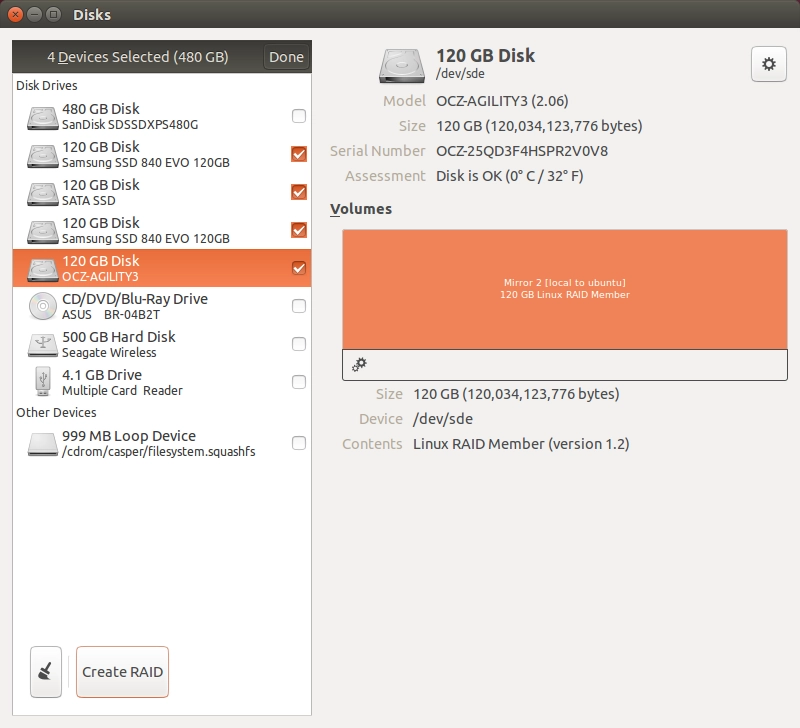
You’ll be greeted by a windows showing all the unformatted disks that can be used. Here, you’ll have to decide how you want your disks spread out in your arrays. Remember that you’ll need at least two drives for each RAID 1 stripe. Since we used four drives in our example, we selected the first two drives for our first stripe. Select the drives you want to use and click Create pool .

Each pool will represent a RAID 1 array that will be a stripe for RAID 0. Choose your drives for your storage pools accordingly.
Next, the wizard will prompt you to create a storage space in the pool. For Resiliency type, select “Two-way mirror.” This is the equivalent to RAID 1. Don’t worry about the filesystem or drive letter: that will be rendered irrelevant later. However, label each stripe something memorable (like Mirror 1, Mirror 2, etc.) so you’ll be able to find it later. When you’re ready, click Create storage space to create the array.

Give your storage space a drive label so you can find it later.
Once you’re done with the first pool, repeat the steps for every other stripe that you’ll be creating. In our case, we repeated the steps with our remaining two drives.
To tie these RAID 1 arrays all together, we’re going to use Windows’ Disk Management tool. To open it up, search for “Disk Management.”
When Disk Management is open, you should see your disks (RAID 1 arrays) in the bottom part of the window, identified by the labels you gave them. Now, we’re going to get rid of the filesystems on those drives. For each disk, right click on the blue segment and select “Delete Volume.” Be careful to leave your system disks and any other attached drives intact. When in doubt, double-check and cross-reference the drive label with the one shown in Storage Spaces.

Deleting a volume will remove the selected partition on that disk.
Once all the RAID 1 disks are clear of filesystems, it’s time to create our RAID 0 array. Right click one of your RAID 1 disks and select “New Striped Volume...” In the popup window that follows, add each of the RAID 1 disks you want to use and click Next .
Assign the RAID 10 array a drive letter. This isn’t necessary, but if you want to use your drive right away, it’s the fastest method to do so. The next screen of the popup window, select the filesystem you want (NTFS or ReFS), and enter a drive label. You can also enable drive compression here. If you forget, you can always change it later in Windows Explorer.

You've done the hard part. Now all you have to do is give the volume a name.
The last screen will ask you to review your options. When you’re satisfied everything looks good, click Finish. A final popup will ask you if its okay to convert your drives into dynamic disks. This basically is warning you that you’ll lose any data on them, and that other OSes won’t be able to see them. We’re okay with this, so click Yes.
That’s it! It will take Windows a while to format the drives for use, but when it’s all done, you’ll have a shiny new RAID 10 array.
Next, we’re going to see how Linux and FakeRAID handle RAID 10. (Spoiler alert: It’s much easier.)


