Build Your Own Home Server
2. Set Up Storage
Now for the fun part: volume management. Thousands of words can be and have been written about the relative merits of the various traditional RAID levels, as well as ZFS-specific types like RAIDZ1 and RAIDZ2. Any choice will be a trade-off between performance, capacity, and robustness. I’m going with RAID-Z2, which will allow me to tolerate up to two disk failures without data loss.
Go to Storage > Volumes > Volume Manager. Create a volume name (I used “mpcstore”), then hold Ctrl and select the drives to use—I used all four drives. For filesystem type, select ZFS, then RAIDZ2. Select Add Volume. My four 3TB drives created a volume of 6TB; I’m sacrificing space for redundancy.
Inside the volume, I’ll create individual ZFS datasets so I can set granular permissions on each of them. Because I’m the first user, I’ll create a dataset within mpcstore for myself. In the left navigation pane I’ll go to Storage > Volumes >
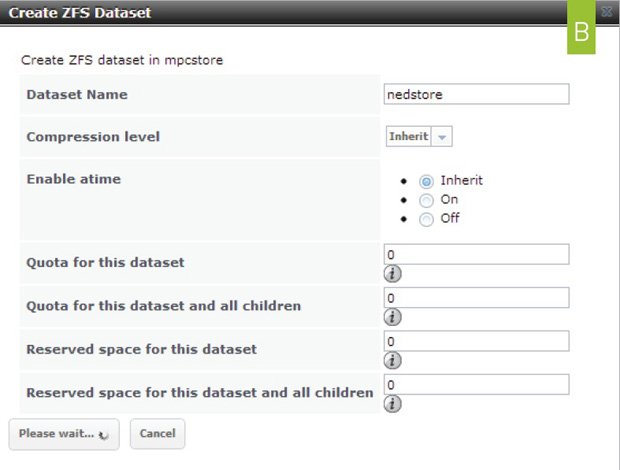
/mnt/mpcstore and select Create ZFS Dataset. I’ll call it “nedstore” and give it an unlimited quota ( image B ).

3. Add Users and Groups
FreeNAS can be configured to inherit users from an Active Directory or LDAP, but I’m assuming that this device will be used in an unmanaged home network, so we’ll assign users with the same names as the Windows login names they use, per FreeNAS’s instructions.
I’ve created a user named Nathan (for myself), and selected “Create a new primary group for the user,” which will let me fine-tune permissions. I set my home directory to the dataset I created earlier, i.e., /mnt/mpcstore/nedstore.
4. Configure Permissions
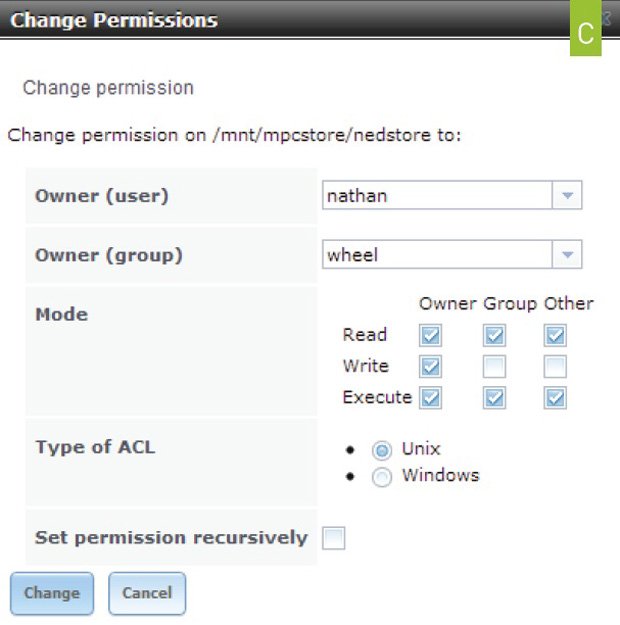
Go back into Volumes and find the dataset you created earlier—in my case, that’s nedstore. Click Change Permissions and select the user you just created. Here you can control which users and groups have read/write access to the dataset ( image C ). Repeat the dataset, user, and permission steps for any users you create.

5. Set Up a Media Share
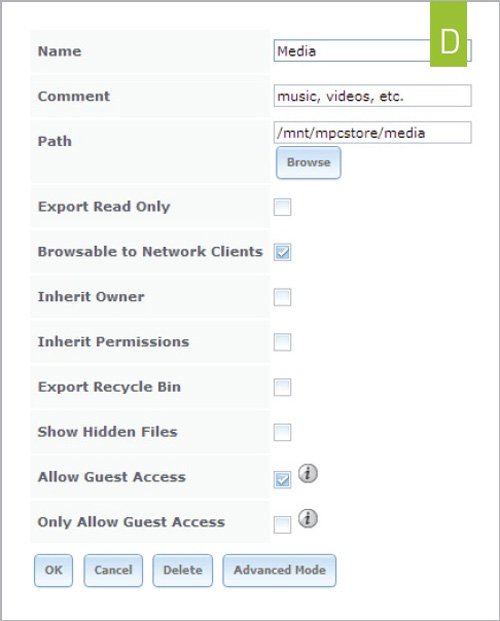
I’m going to set up a media dataset so I can share my music and movies with the rest of the Windows computers in my network. Follow the procedure above for setting up a new dataset (I called it Media), then browse in the navigation pane to Sharing > Windows (CIFS) > Add Windows (CIFS) Share. Create a new share and point it to the dataset you’ve just created ( image D ).
Keep up to date with the most important stories and the best deals, as picked by the PC Gamer team.
You can either restrict it to specific users or groups, or enable an anonymous Guest Mode. If you have Apple computers on your network, you should also turn on AFP; if you have Linux , enable NFS. You can also enable SSH, rsync (for replication), iSCSI, and more, all from the Services panel.


