How To Build Your Own IR Head Tracker
Building the Point Model
(Image E)
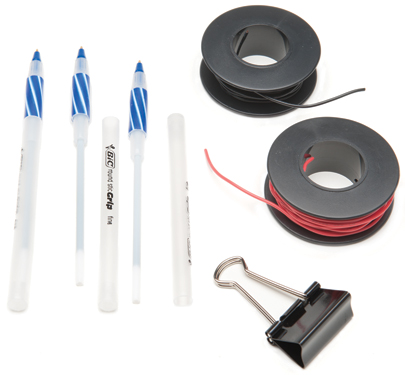
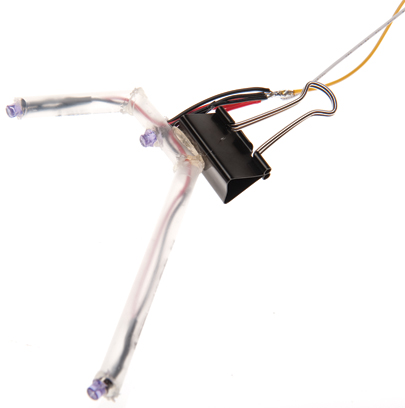
How you actually put your lights together into a point model is up to you. The optimal shapes for both clip- and hat-type point models are described here but the actual materials you use to construct them can include almost anything. For maximum thriftiness, we built ours out of the tubes of three basic Bic pens and a paperclip (image E). We simply cut the pen tubes to the right length (according to the diagram linked above), drilled holes for the wires, and glued the whole thing together. Then, we glued the clip on the back to hold the lights to a headset (image F). Is it beautiful? Hell, no. But it gets the job done, costs next to nothing, and makes us feel like MacGyver every time we wear it.
(Image F)
For lots more examples of how a completed point model looks, check out this page .
The Software
For this section of the how-to, we’re going to assume that, like us, you are using a PlayStation 3 Eye camera. If so, you’ll need to install a custom driver for the camera before anything else, as Sony hasn’t released official Windows drivers for it. You can download the custom driver here .
Installation is as easy as running the executable (making sure that your camera isn’t plugged in beforehand), and telling Windows it’s all right to install this unsigned driver. Afterward, plug in the camera, and you should see Windows recognize it as a PlayStation 3 Eye (image G). To make sure that everything’s working fine, you can run the program called CL-Eye Test that came with the driver. You can also use this program to see what your point model looks like through the camera and make sure everything’s working.

(Image G)
Keep up to date with the most important stories and the best deals, as picked by the PC Gamer team.
After installing the driver software for the camera, you can install FreeTrack itself. The latest version is available at www.free-track.net .
If you’re using the PS3 Eye, don’t run FreeTrack after installing it. First, you have to download the hack file and extract it to your FreeTrack folder. If you already ran FreeTrack, just uninstall it and reinstall, then apply the fix.
Finally, you’re ready to launch Free-Track. If you’re running Windows 7, you’ll have to run the program as an administrator, or else it can’t access your webcam. To run it as an administrator, just right-click the FreeTrack executable, and choose Run as Administrator (image H).
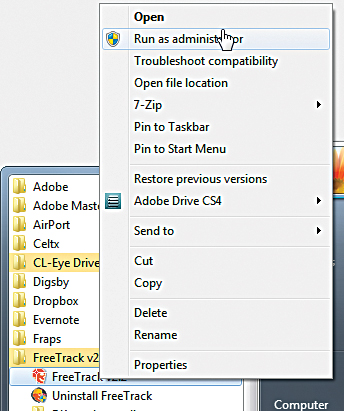
(Image H)
When you launch FreeTrack, you’ll need to make some major settings tweaks. First, click the Model button in the upper right corner and choose the type of point model you built. Next, go back to the Cam window and click the Source drop-down and select your webcam. Now, click the Start button and you’ll begin to see a live preview of FreeTrack’s point detection, which will help you perform the rest of your calibration. Clicking the Camera button will show you some camera-specific options including gain and exposure, which you can adjust to increase how bright your point model will appear (at the expense of adding noise).
Back at the main window, look at the Threshold slider. This sets the brightness cutoff for the point detection. What you want to see are three steady circles, and nothing else. If you see extra speckles or noise on the screen, adjust the slider to the right. If any of the three circles are flickering, adjust it to the left. If you can’t get three steady circles, consider going back and adjusting the exposure and gain again, or reducing sources of environmental IR light by turning off overhead lights.
Move on to the next tab, labeled Framerate. By default, this is set to 30fps. The best feature of the PS3 Eye is its amazing frame rate, so if you’ve got it, bump the fps up to 120. The multiplier should automatically reduce to 1. This will make the head tracking noticeably more responsive.
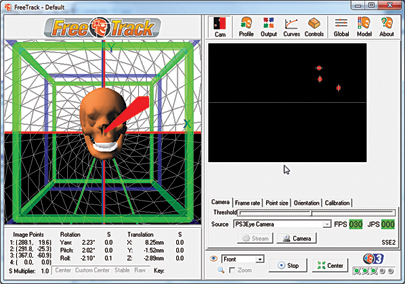
(Image I)
The next tab, Point Size, lets you set constraints on what the program will consider when it’s looking for points. For instance, if you can tell by looking at the preview window that your points tend to be in the 10–20 pixels wide range, then you should set the minimum point size up higher than the default of 2 pixels. Setting the minimum pixel size higher will reduce lag, so set it as high as you can without causing the program to lose track of the real points.
In the Global Settings menu, you can change the sensitivity of FreeTrack’s movement axes. Leave these alone for now, but you’ll probably find yourself wanting to come back and adjust these once you’ve played a few games.
FreeTrack should now be working as advertised—the 3D skull in the FreeTrack window should smoothly mirror the movements of your head in real time (image I). We can finally get into the games.
The Games
There are three ways that a game can support FreeTrack. First, the game can support FreeTrack natively. There’s actually only one game that does this, but it’s a doozy: Arma 2. The high-water mark for soldiering sims, Arma 2 takes excellent advantage of FreeTrack head tracking, allowing you to look around, lean, and zoom in or out by moving and turning your head.
Even if a game doesn’t support FreeTrack directly, you can still make it work. Many sim and racing games support TrackIR, a commercial head-tracking package from NaturalPoint. FreeTrack can emulate TrackIR, so it works with most TrackIR-compatible games (for a list, see here ). Recently, NaturalPoint has started encrypting the TrackIR software, specifically to break compatibility with FreeTrack.
How you set up FreeTrack with a game is different for every game, of course, but generally you’ll find the option somewhere in the control-settings menu (image J).
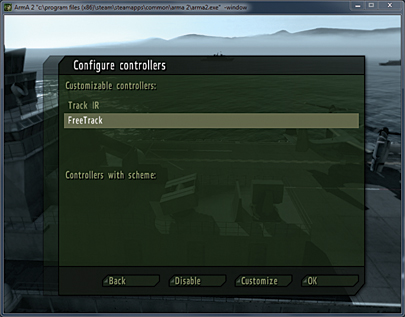
(Image J)
Even if a game doesn’t support Free-Track or TrackIR natively, it’s still possible to incorporate head tracking. In the Controls menu, under the Main tab, you can see the different control options available using FreeTrack. Below the FreeTrack and TrackIR options, you can see an unchecked box labeled Mouse. Enabling this option allows you to control your mouse with FreeTrack. Obviously, you’re not going to want to play shooters with this kind of head tracking, but it can work for some other types of games. In the controls menu there’s also a tab marked Keyboard, which allows you to bind head movements to keystrokes, giving you yet another option for controlling games with head tracking.
It can take a little finagling to find the combination of control setup and sensitivity options that works for you, but once you do, you won’t want to go back.
