The Fall 2015 Turbo Build
A build we can covet like a Red Ryder BB gun
Here it comes, in all its consumer-economy glory: Black Friday. The name alone evokes visions of the plague, demons, and the apocalypse. What horrors await unsuspecting holiday shoppers.
If you've been following our Fall builds, we've already listed our Budget Gamer and Midrange builds. Now, hold on to your hot chocolate, it's the Turbo's turn.
The Turbo is a build enthusiasts can aspire to. With a budget of $3,000, the Turbo skirts the territory inhabited by the parts you'd find in boutique builds. All the power, without the coordinated colorful paint schemes and gorgeous cable management. (We do try, but there's only so much we can do under deadline.) For perspective, the Turbo costs about the same as a semester's in-state tuition at at a California State University campus.
Screw sugar plums; here's the kind of stuff that runs through our heads:

| Row 0 - Cell 0 | Product | Price |
| CPU | Intel Core i7-5820K Haswell-E | $385 |
| GPU | 2x Zotac GeForce GTX 980Ti (reference) | $1,260 ($630 ea.) |
| Mobo | Asus X99-M WS mATX | $276 |
| Case | Fractal Design Node 804 | $110 |
| Memory | 32GB (4x 8GB) Corsair Vengeance LPX DDR4-2400 (Blue) | $200 |
| SSD | 500GB Samsung 850 Evo M.2 SATA | $178 |
| HDD | 4x 1TB WD Black 7200 RPM | $280 ($70 ea.) |
| CPU Cooler | Corsair H80i GT | $90 |
| PSU | EVGA 120-G1-1000-VR 1000W 80 Plus Gold | $135 |
| Fans | 2x Fractal Design Silent Series R2 | $20 ($10 ea.) |
| Row 11 - Cell 0 | Total | $2,934 |
Note: All prices reflect in-cart price at time of procurement. This includes instant rebates and sale pricing, but does not include tax or mail-in rebates. Prices vary all the time.
Great things come in small packages
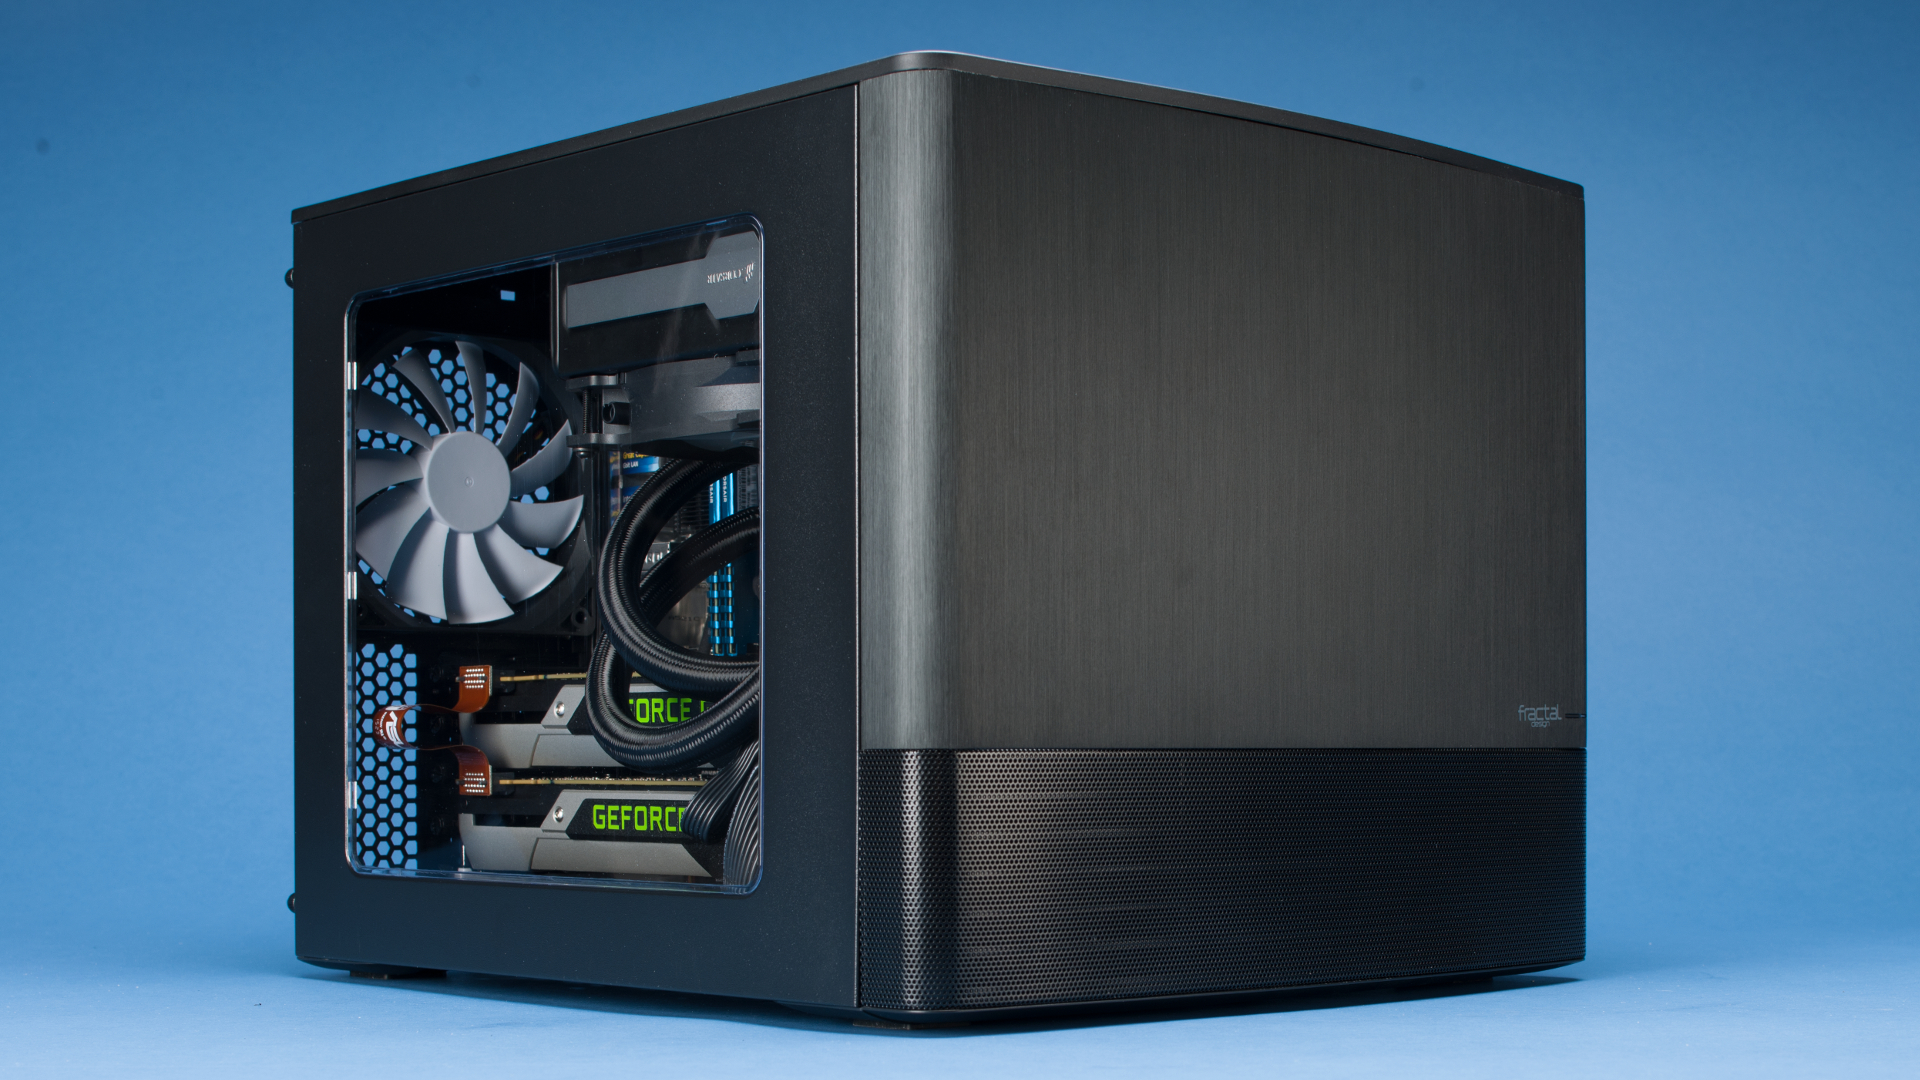
Normally, when we build a Turbo, we look to big honkin' military-looking towers that strike fear into the hearts of children and anyone who gives a damn about interior design. This time, we wanted something smaller, nicer, and classy. When we laid eyes on the Fractal Design Node 804, we had to have it.
The Node 804 has an interesting two-bay layout, each with its own cooling options. The front of the case supports up to four intake fans, while the rear supports up to two (one for each bay). The top of the case allows for more fans, or cooling radiators. Fractal Design says that the top racks can support 240mm radiators, but we'll talk about that in a bit.
Keep up to date with the most important stories and the best deals, as picked by the PC Gamer team.
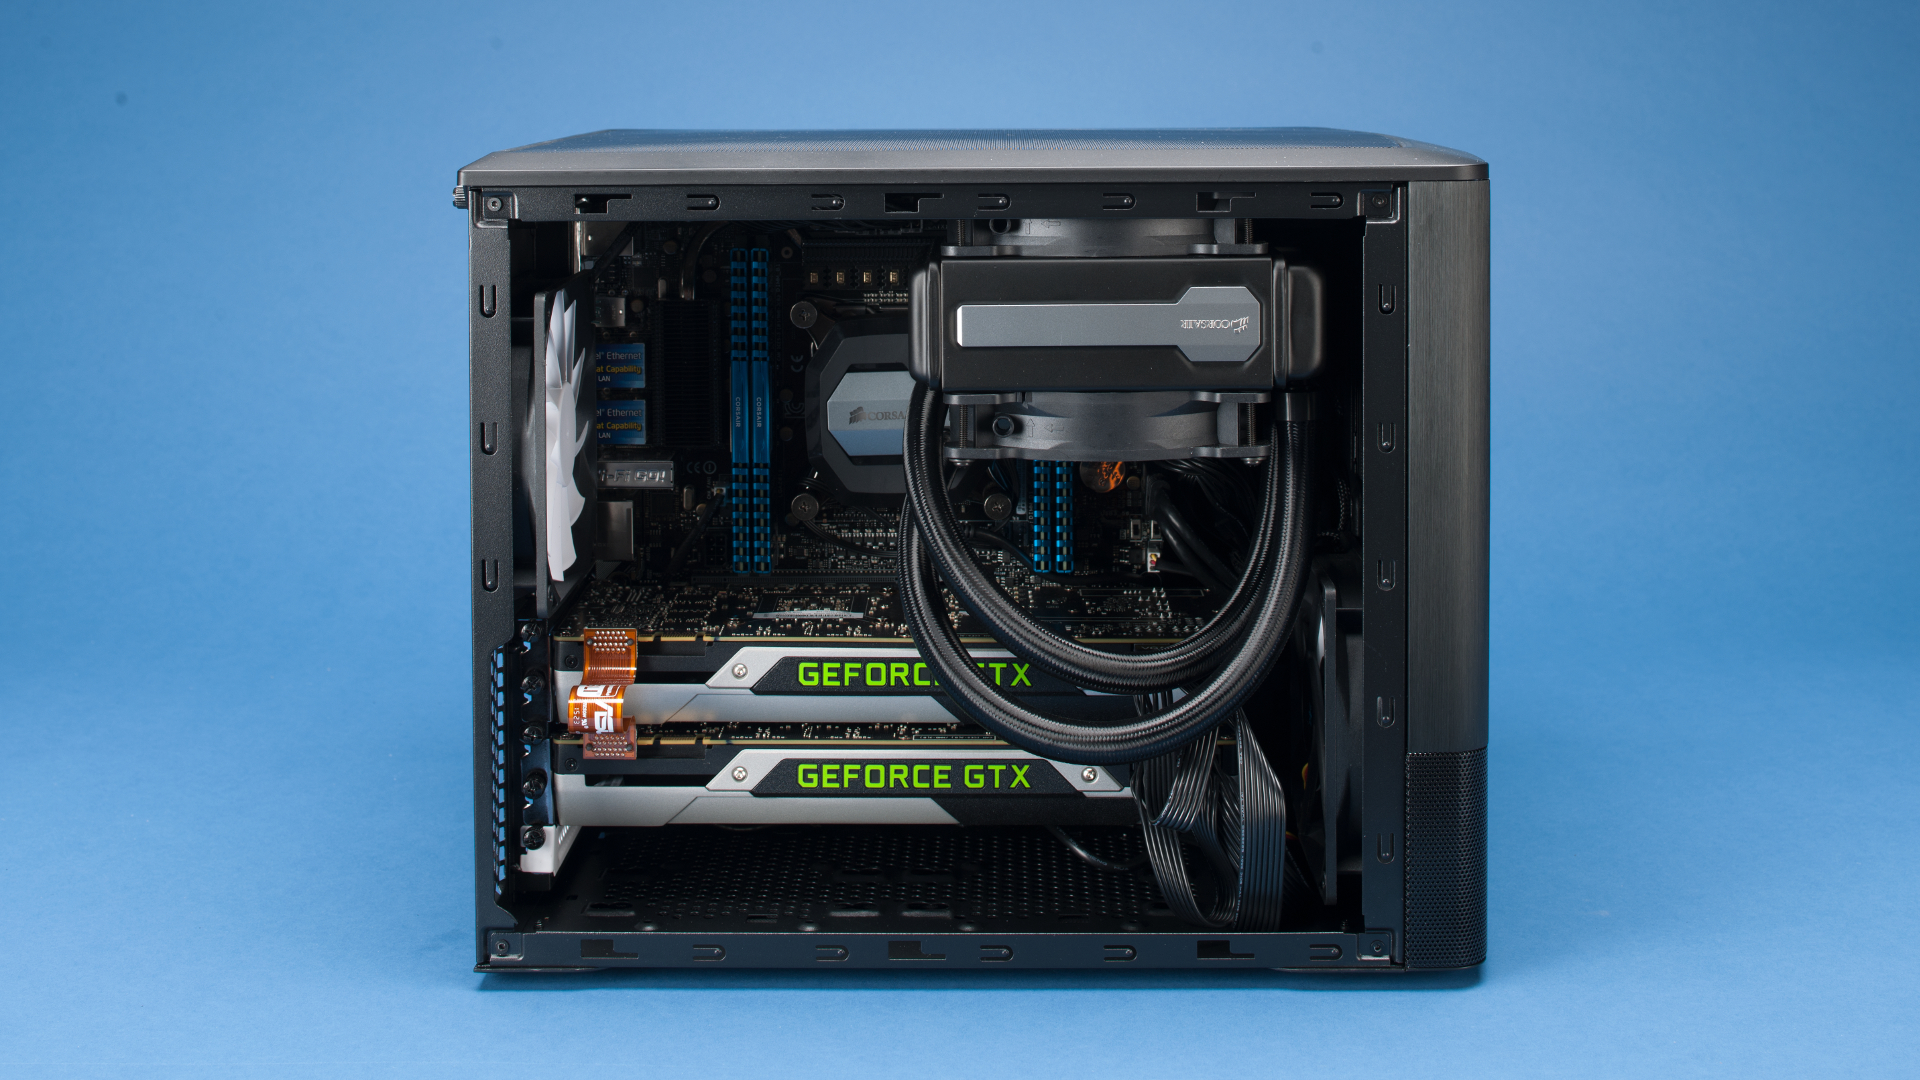
The rear bay of the case holds up to eight 3.25-inch HDDs in removable vertical cages of four each. Those cages sit above the mount point for the PSU, which offered only a little clearance for the SATA power cables. In fact, we actually broke one of the connectors (on the cable, not the drive, thankfully) when we slid in the hard drive cage above our PSU. A word of caution: If you're installing drives above the PSU in this case, tuck those cables away and be very, very careful.
The other gotcha in this case has to do with cooling. We originally wanted to go with an NZXT Kraken X61 CPU cooler. However, there's a fan controller at the back of the motherboard bay, which just doesn't let you put in the X61 without removing it. On top of that, our RAM modules were in the way of the radiator, which kept us from mounting it in the motherboard bay. These weren't big modules, mind you; they were just a few sticks of DDR4 Corsair Vengeance LPX (which have quite modest heat sinks).
If you want to mount the radiator in the hard drive and PSU bay, you have to remove the hard drive cages and their mounts, which kind of killed it for us. Additionally, the alternative mounting position was denied by our 1,000W PSU (the cables connectors pushed the cage out of the way).
We tried, we really did, but we couldn't get that ful-size radiator in the case with our choice of components. Luckily, we had a spare Corsair H80i GT we had on standby for just such an occasion. The H80i fit splendidly into the front of the motherboard bay, and helped hide some of our cable mess, too.
The heart of the matter
When we started out this build, we wanted to make sure we kept up with our small form factor theme. We also wanted to make sure we bumped up our game to the X99 platform. In those pursuits, we succeeded.
We went with the Asus X99-M WS micro-ATX motherboard as a base to build on. The board's form factor fit nicely in the Node 804, and offered a layout that complimented the case.
We dropped an Intel Core i7-5820K into the 2011-v3 socket with pleasure. We eyed the 5930K before we made our decision, but we opted for fewer PCIe lanes so we could spend some cash on storage and memory. Had we been willing to go over budget or with three-way SLI, we would have jumped on the 5930K to get the most out of our video cards. The choice to stay with a SATA M.2 SSD instead of NVMe kept the demand for PCIe lanes low as well. With only two video cards in our SLI setup, going with the 5820K was perfectly acceptable, even if it meant using the second card at 8x. (The small delta in performance between 8x and 16x for the second card didn't warrant the price jump to the 5930K in this build.)
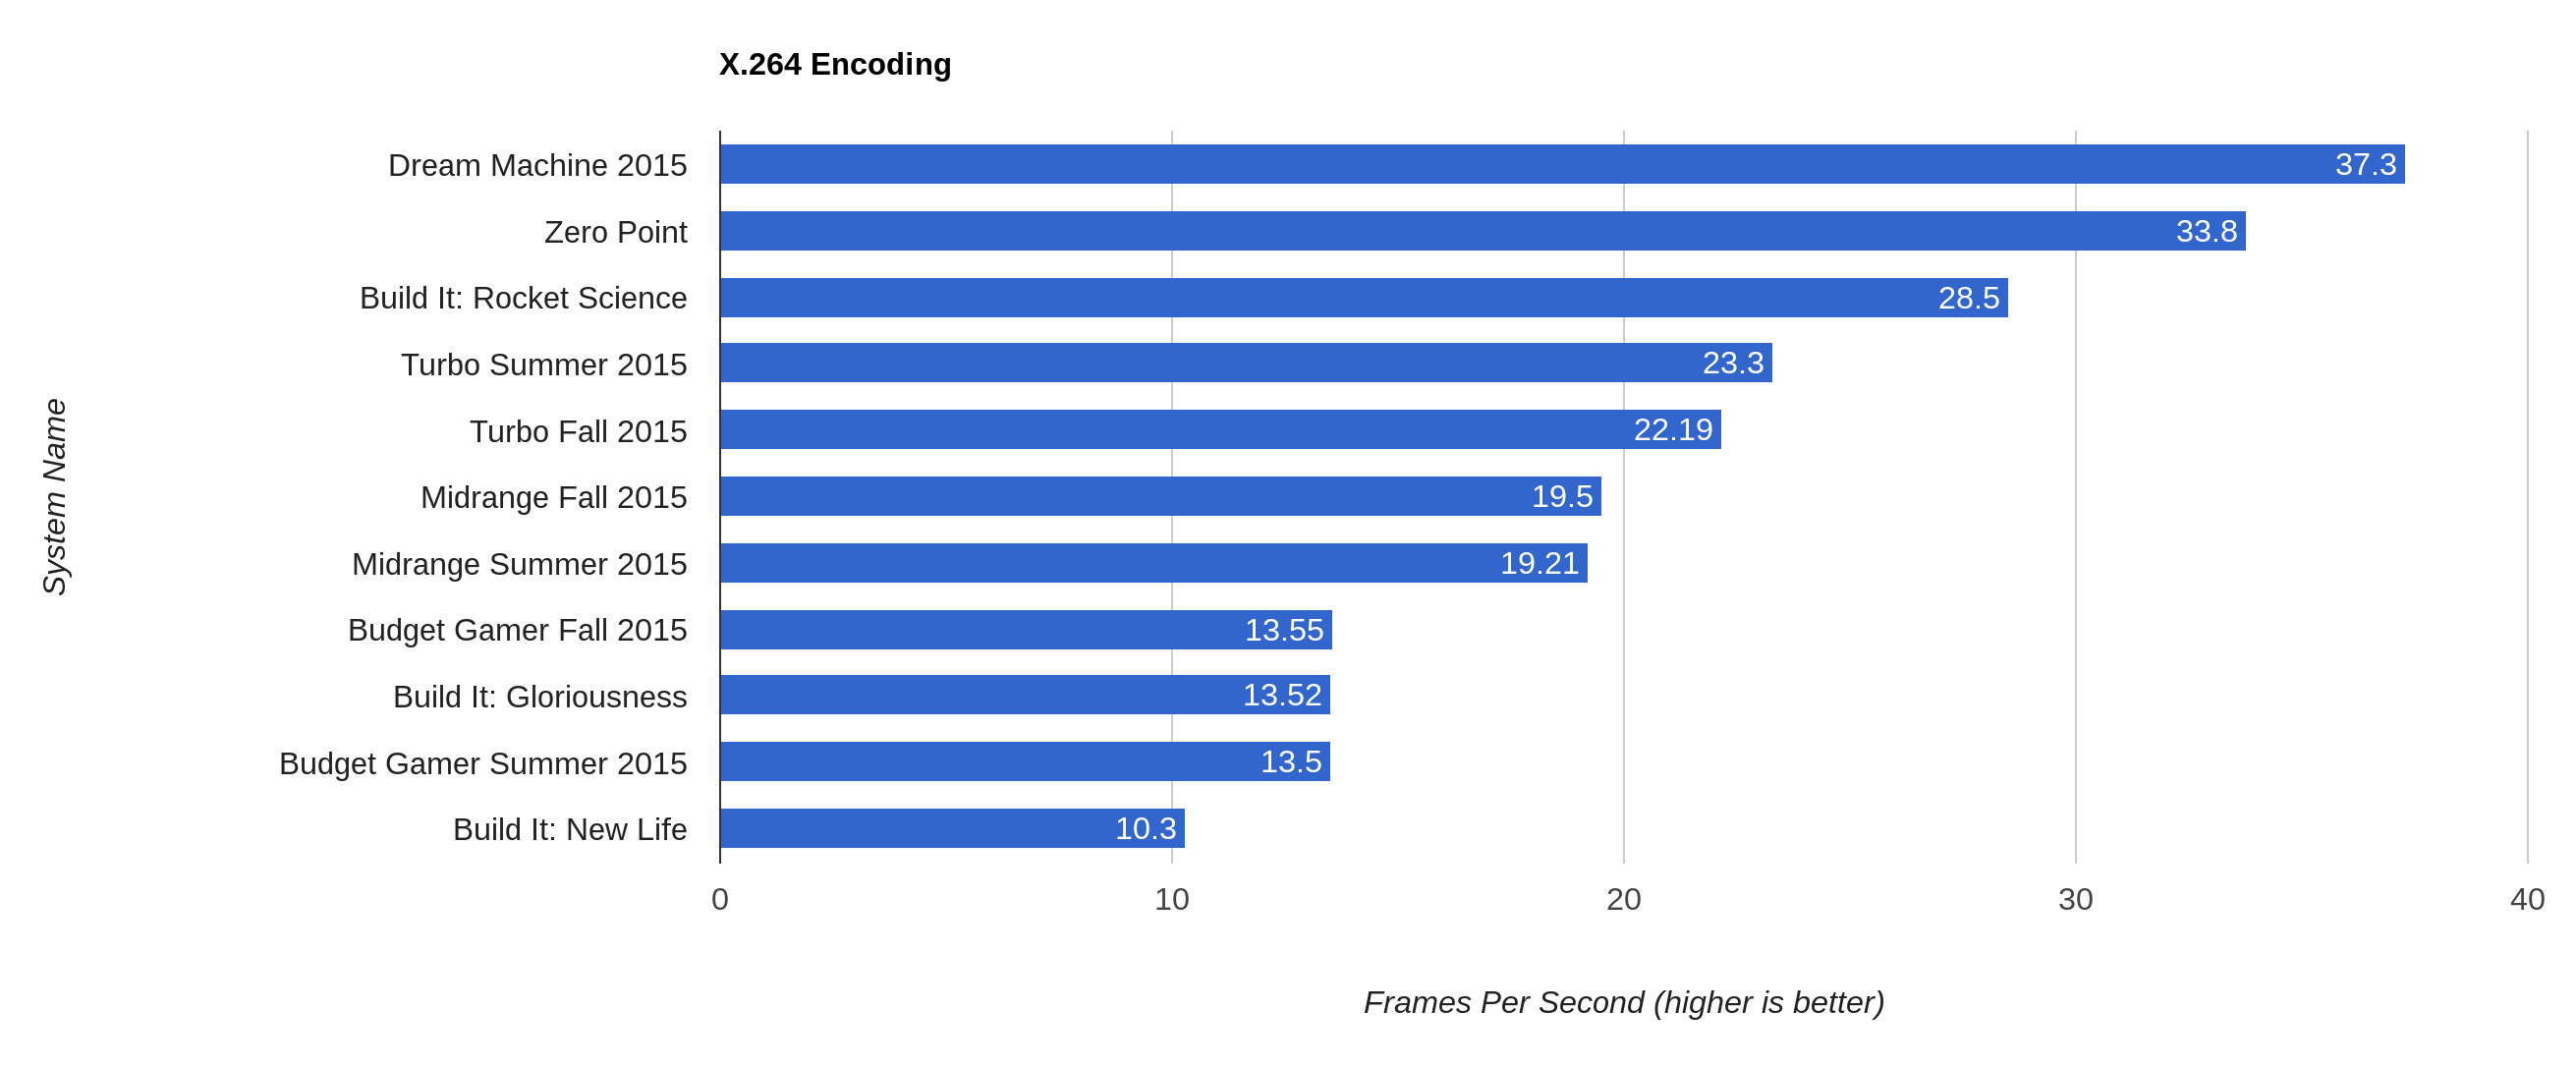
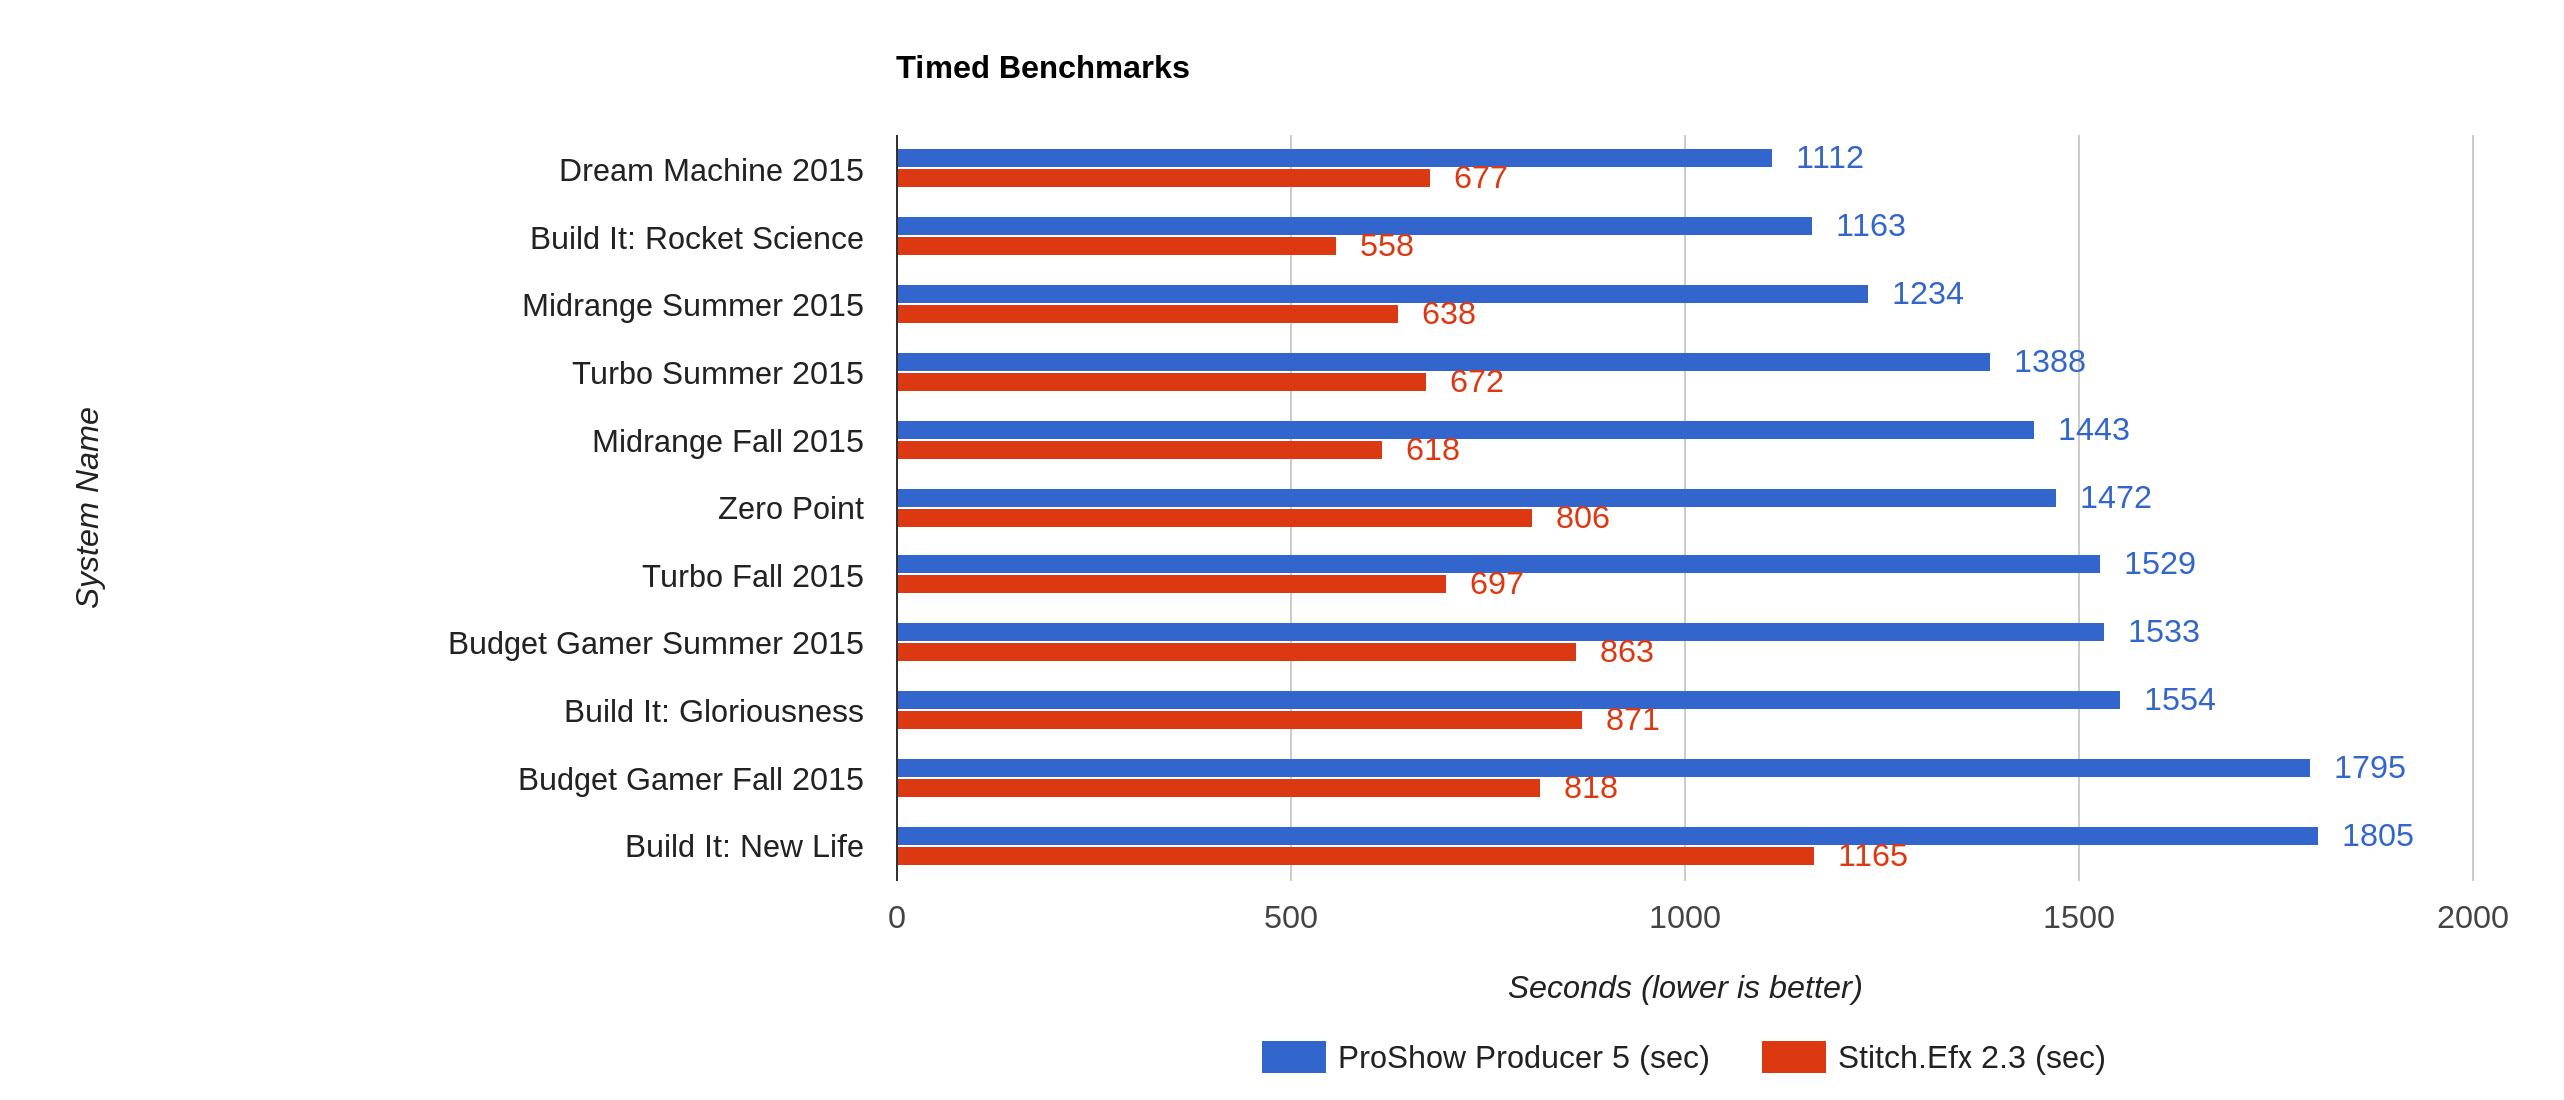
The 5820K shone when we put it through our multi-threaded x264 benchmark. A total of 12 logical CPUs with Hyper-Threading really punched through the encoding task. When it comes to single-threaded tasks, the Devil's Canyon is still the hottest CPU of the bunch, however. Cores aren't everything, and a quad-core with high clocks will do very well for most tasks and games.
Memories of holidays past
We've experimented with a couple of storage solutions in the Turbo. We've gone with NVMe storage over SLI, while other times we've opted for SSDs in RAID. This time, we changed it up again.
We've been trending toward building with SATA M.2 SSDs for a while, for their small form and lack of cabling. Since this is a micro-ATX build we felt this was a prime place to use an M.2 SSD as our primary storage. The Samsung 850 Evo M.2 has identical specs to the 2.5-inch version, but has a tiny footprint. In fact, you can't even see it under our 980Tis.
We saved RAID for our hard drives, and got four 1TB WD Blacks to build our array. While a set of four 1TB drives isn't much, having the physical redundancy of RAID 10 netted us 2TB of total storage and peace of mind. The 2TB of total HDD space is enough to back up our SSD four times over. If more storage is needed for movies, music, and photos, we'd recommend a NAS.
Making the most of those Steam gift cards
When it comes to graphics, it's hard to beat two GTX 980Tis in SLI. Besides dominating games at 1440p, two 980Tis can really let you crank up the settings in 4K.
We put these reference 980Tis through the ringer with Fire Strike Ultra and our three games, Tomb Raider, Batman: Arkham City, and Middle Earth: Shadow of Mordor.
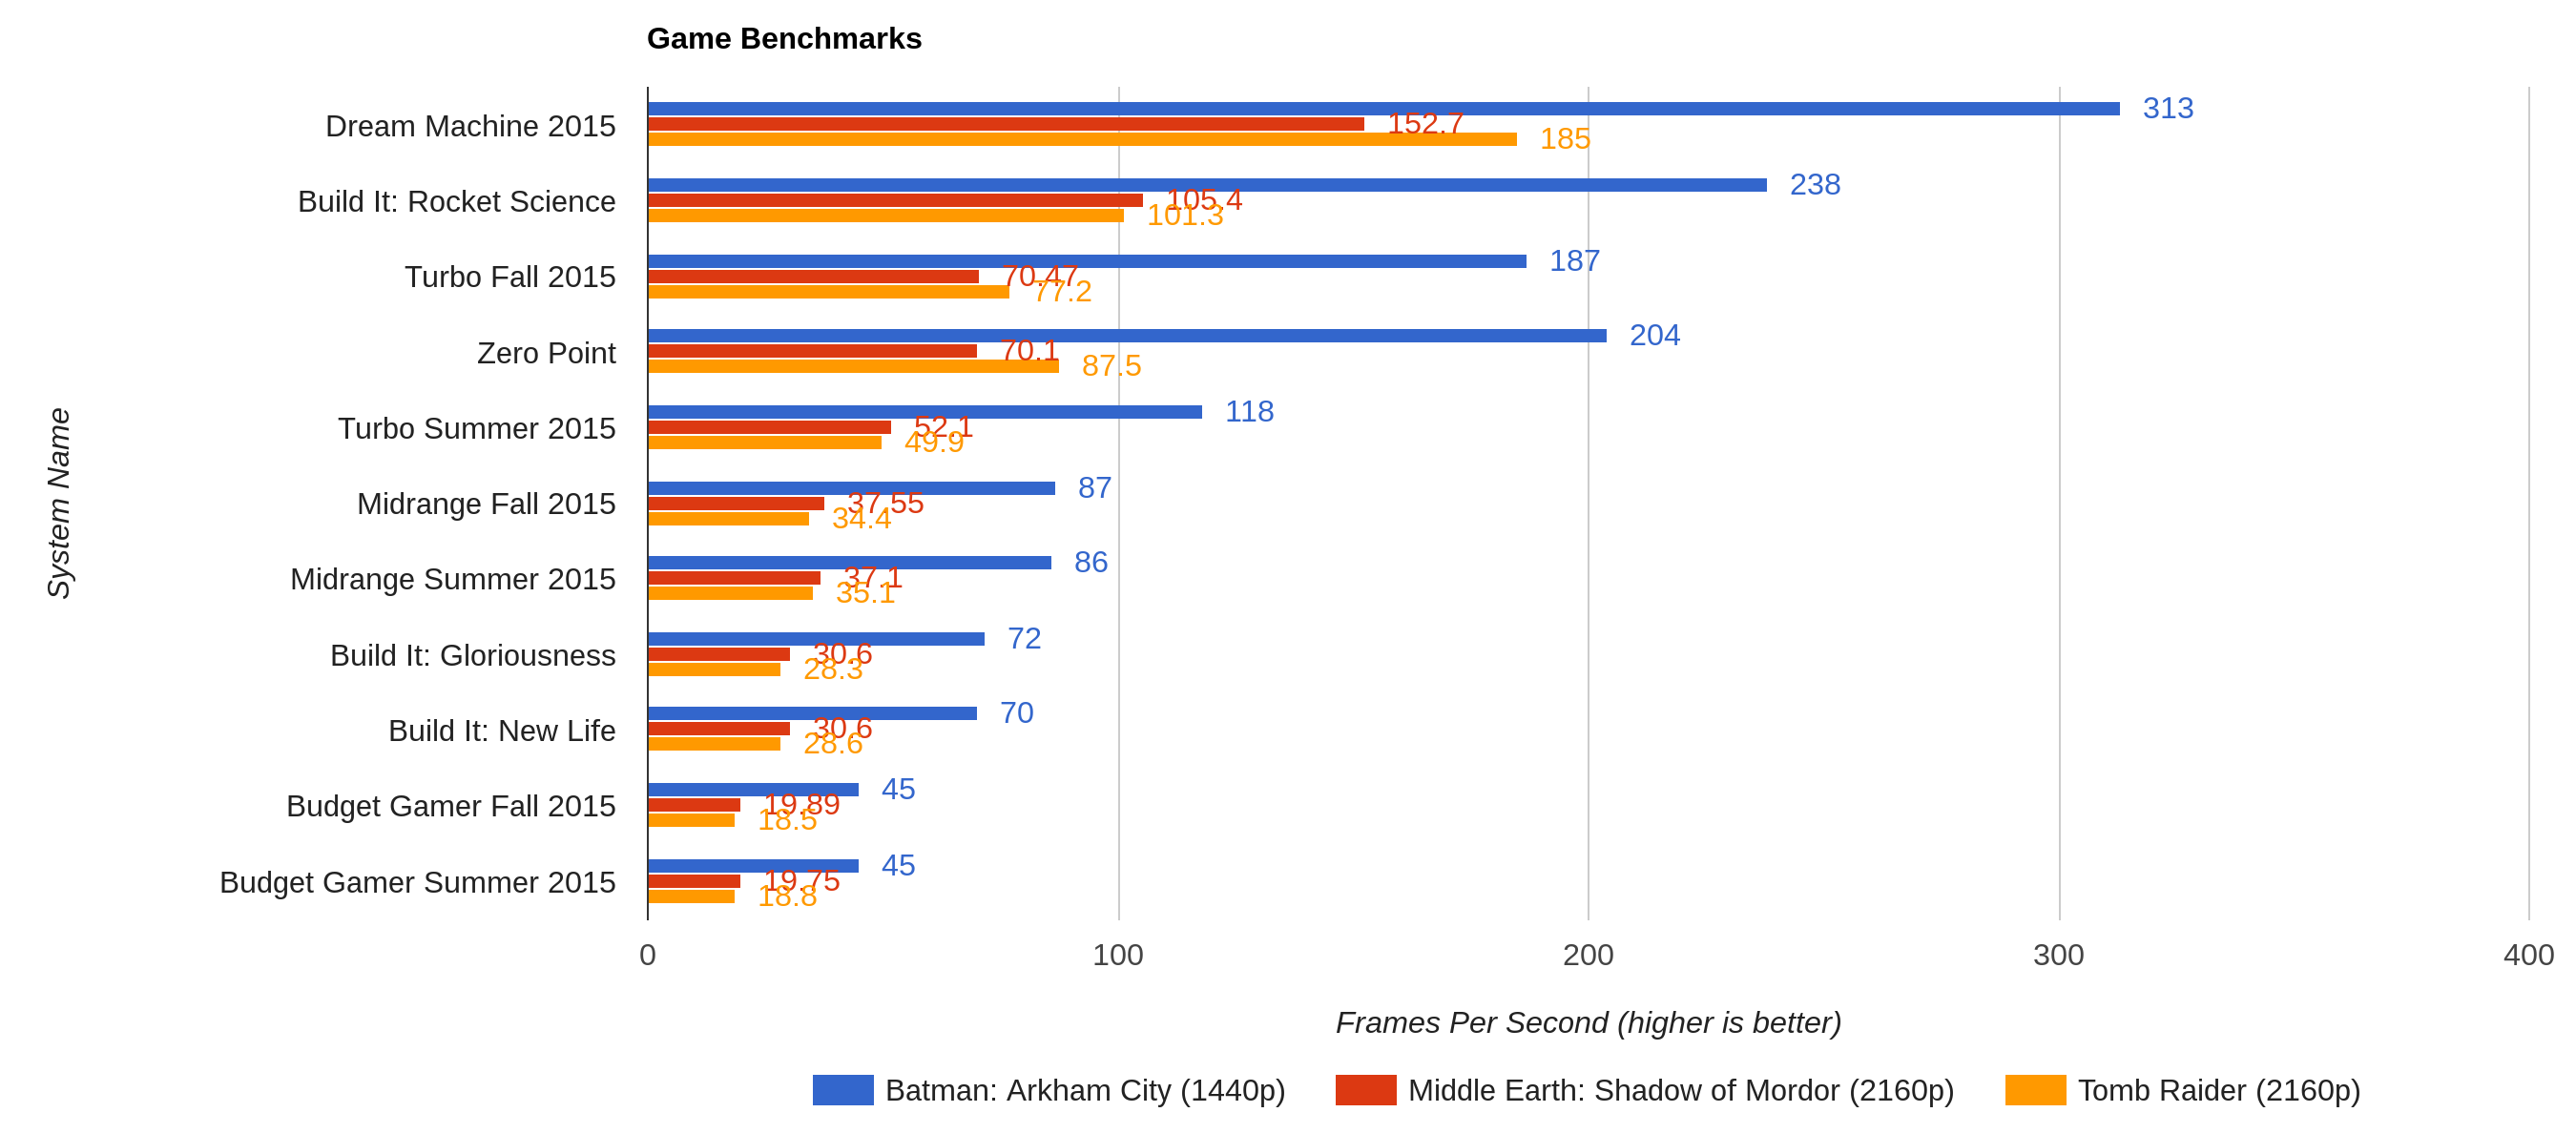
As we expected, the duo ate the game benchmarks for lunch. The rig didn't score as high as our Rocket Science Build It, which we built to complement the 2015 Dream Machine. But to be fair, Rocket Science had an overclocked 5930K and a pair of factory overclocked EVGA 980Tis that we overclocked some more. In comparison, this Turbo build is running at stock clocks. There's plenty of overclocking gains to be made with the headroom our beefy 1kW PSU gives us.
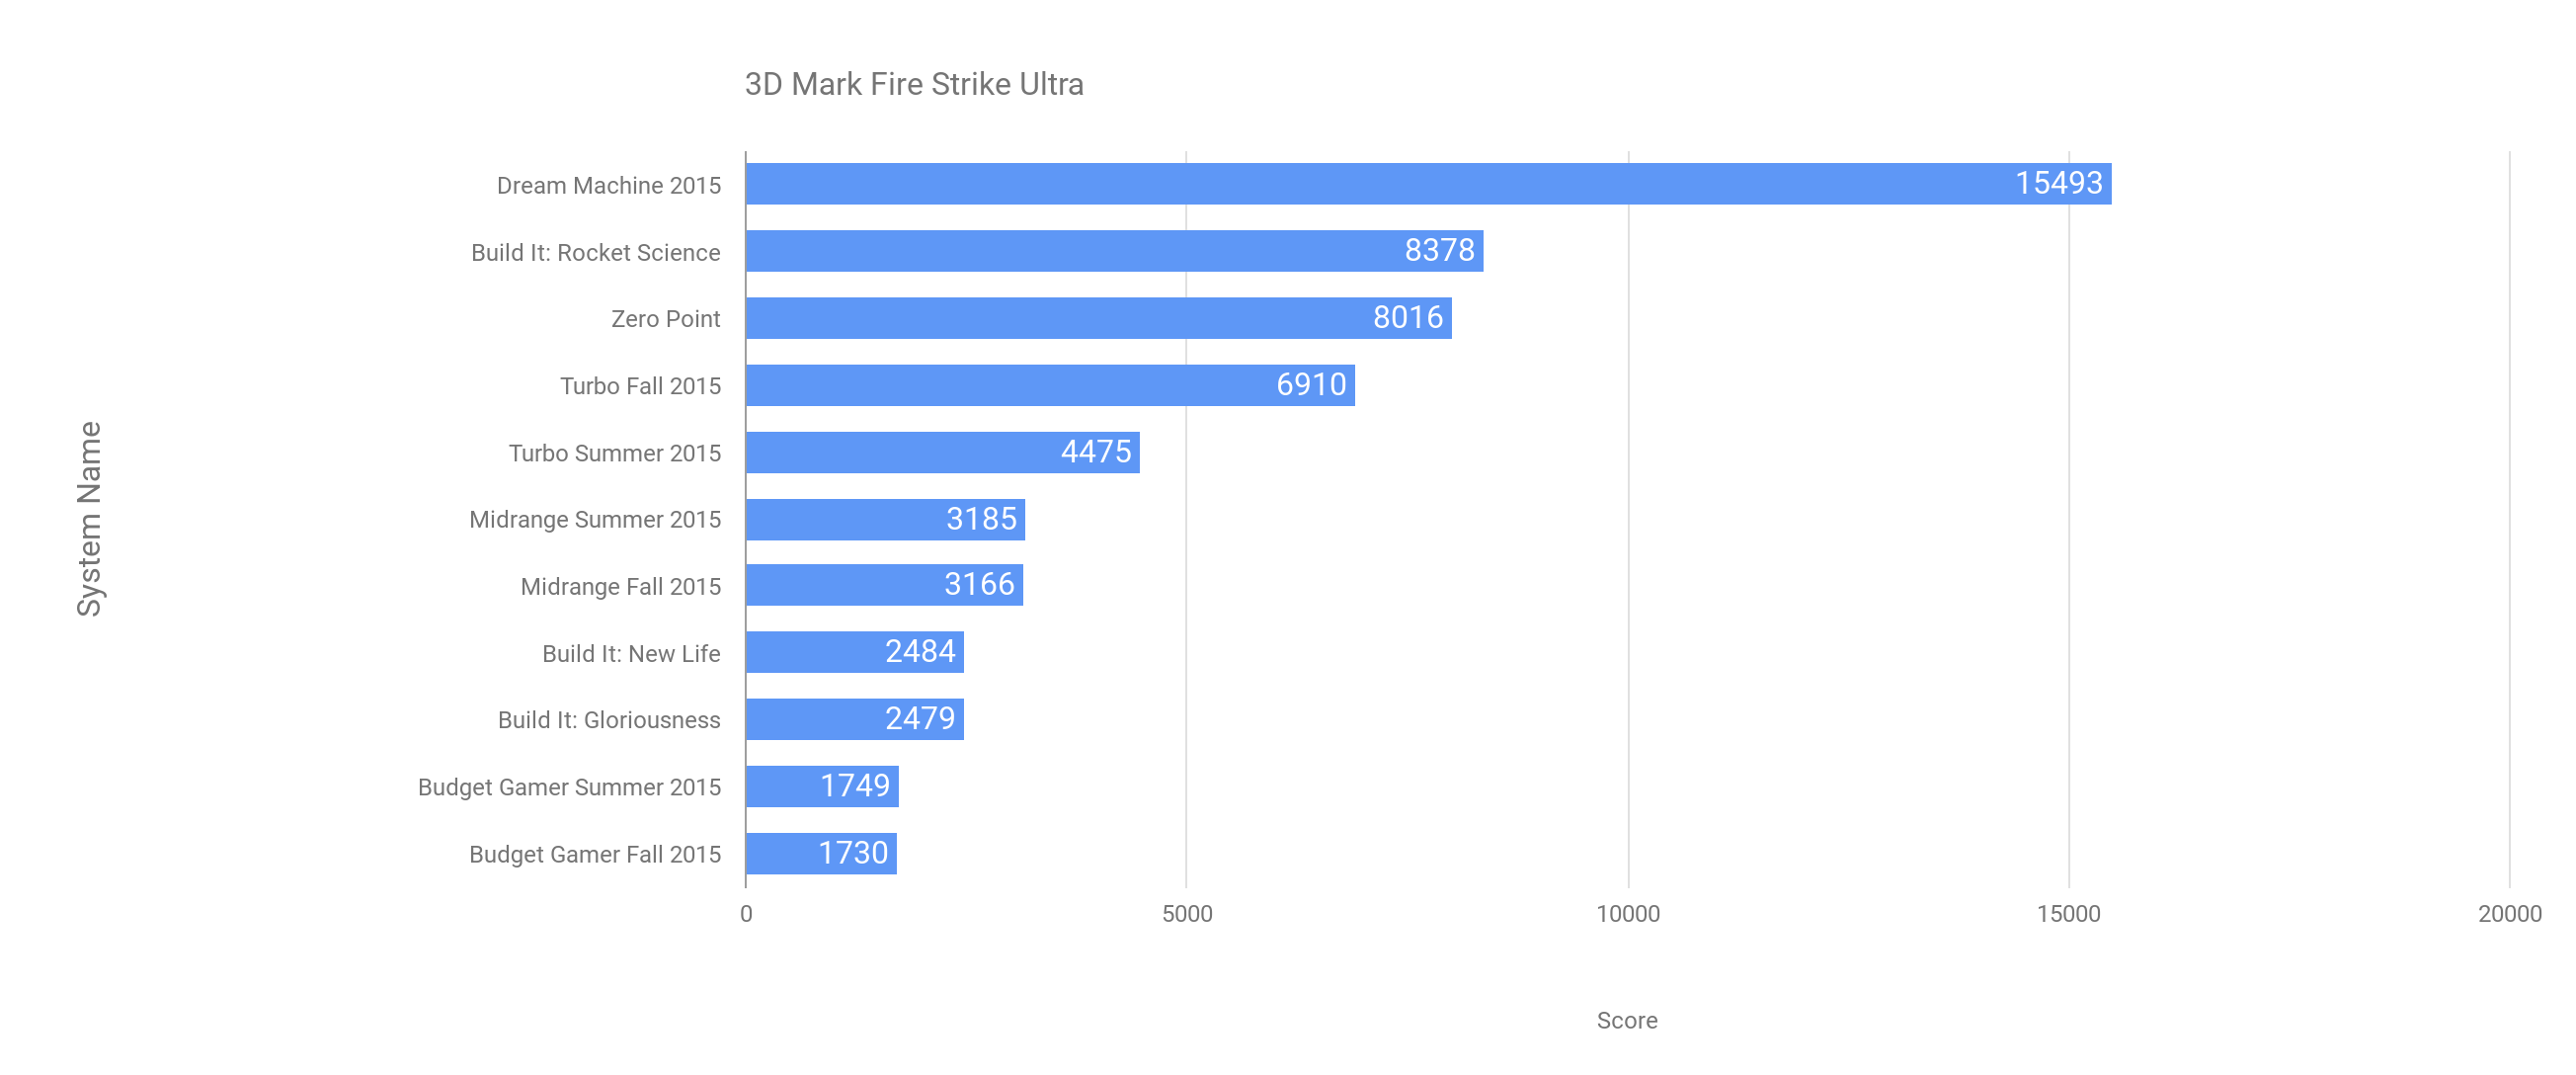
In Fire Strike Ultra, the Turbo scored significantly lower than the Rocket Science build did. (But as we said before, the Rocket Science Build It was overclocked and had a 5930K CPU.) That said, it sailed over the VR gaming score (2,596) and passed the 4K gaming score (5,552) as well, with a total score of 6,910.
At the end of the day, we feel that this rig can really keep those holiday woes away. You'll be able to play pretty much any recent game at 4K, even with anti-aliasing cranked up. (You don't really need 8xFSAA at 4K, though. What are you, crazy?)
We'd like to think it's a gift someone could give to themselves. The kids won't touch that Tickle-Me-Elmo after January anyway.


