


Keep it cool
It’s summertime, which means that not just you need to stay cool—your PC does, too. If you’re looking into how to chill down your PC, this guide will help get you started. We’ll cover what generates heat and what effects heat has, ways to cool off components that need it, and tidbits of information to consider when setting up your cooling system.
Sources of heat in a system
While all electronics give off some amount of heat, for many of them it is a negligible amount and doesn’t require any special attention. However, there are a few components that give off a significant amount of heat. These are usually:
- Processor
- GPU
- Voltage regulator modules (VRM), these are located around the CPU socket
- Chipset
- High-performance RAM
A general rule of thumb is that the higher the power consumption, the more heat the part will give off. This isn’t always the case, though. For example, a power supply can consume 1000W+ from a wall socket, but it will not generate the same amount of heat that a video card consuming 250W will generate.

Speaking of heat generated, there’s an often cited value called Thermal Design Power, or TDP. A major issue with this value is that there’s no real standard to measure it other than what is reported by the manufacturer of the part. It’s more useful for those who build coolers, as this value represents the amount of heat energy a cooler must dissipate to allow the processor to run significant workloads for extended periods of time. Just to clear up some misconceptions though, here are two things about TDP you can take away:
Lower TDP usually means both lower power consumption and lower heat generated. However, lower TDP does not mean lower operating temperatures. Two parts can run at the same operating temperature, but the cooler for the higher-TDP part will have to work harder to keep the same temperature.
TDP is not the same as power consumption. TDP is for heat energy, not electrical energy. Physics just allows both forms of energy to be measured in watts.
The effects of heat
Over time, high heat accelerates wear and decreases reliability of the components. The reliability loss however, affects how stable the part is at a given performance level. If reliability issues start cropping up (due to, e.g., overclocking a processor very high and constantly running heavy loads), running the part at a lower performance level may eke out a bit more life before the system is no longer reliable.
Another effect that heat has on components is thermal stress. When things get hot, they expand; when they cool off, they contract. Repeated heating/cooling cycles cause mechanical stress that can fatigue the material. At some point, the material cracks and breaks. Thermal stress is much more prominent if the temperature differences are wide.
An interesting characteristic of semiconductor electronics is that it can exhibit thermal runaway. While the resistance of a semiconductor increases, at around 160° C, its resistance decreases. This causes more current to flow through the device, which causes it to get even hotter, until the chip burns up.
Otherwise, heat doesn’t affect anything else to a noticeable degree. Heat may cause performance degradation, but by way of the component throttling itself to prevent it from getting hotter.
Types of cooling
There are several ways to cool off hot components in your rig. Each differ by what kind of physics magic they employ to do so.
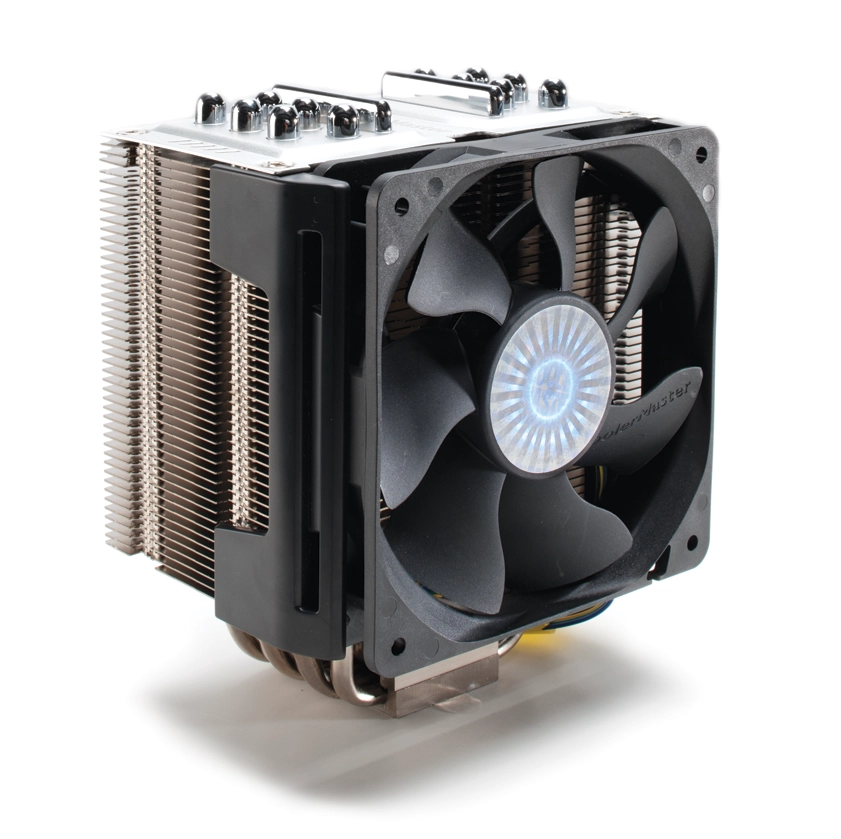
Air Cooling

An air-cooling solution that consists of a heatsink, heat pipes, and a fan.
Air cooling uses the case’s air as the primary cooling medium. Cooler air picks up the heat from a component and either airflow from case fans or natural convection (as heat rises) carries the hot air away.
This is the most basic method of cooling, and costs the least. However, better air-cooling solutions can get bulky and heavy. Air coolers also requires a lot more airflow, which translates to more noise, to achieve the same operating temperature as other cooling methods.
Air cooling components
- Heatsink: A block of finned metal that attaches to a component. This increases the surface area of the component, allowing more air to carry away heat.
- Heat spreader: A metal covering over the component, designed to allow more surface area contact for a heatsink if one is to be attached. Otherwise, it works as a basic heatsink.
- Heat pipe/Vapor chamber: These two components employ a kind of phase change cooling (described below). Inside is a working fluid that boils off from the component end and is cooled off on the other side. This allows a heat sink that uses it to work more efficiently for the same space.
- Fan: A fan causes forced convection over a heatsink, pushing more air through it than natural convection. If a heat sink has a fan, it’s called active cooling. Otherwise, it’s passive cooling.
Liquid Cooling
Liquid cooling uses some kind of coolant, usually distilled water, as the primary cooling medium. Heat is picked up at the component and transferred to a radiator where air cooling takes over and cools off the liquid. An advantage of liquid cooling is that it has a much higher heat capacity than air, meaning it’ll hold a lot more heat energy for a given temperature. This allows a liquid cooler to keep a component at a lower temperature than an air cooler for the same workload.
Liquid cooling components
- Heat block: This attaches to the component and has channels for liquid to flow through. Inside are fins similar to a heat sink to aid in heat transfer.
- Pump: This keeps the liquid flowing throughout the system.
- Radiator:Radiators are a back-and-forth loop of pipe with metal fins between sections. This cools off the liquid rapidly. A fan can be used to aid in cooling the liquid faster.
- Reservoir: This increases the amount of liquid the system can hold, and thus increases the cooling capacity. They can also be used to help bleed air out of the system.
Types of Liquid Cooling
Closed-loop system (aka all-in-one)
This is a self-contained unit that includes the heat block, a pump, and a radiator. These are not user serviceable beyond installation and basic maintenance. That is, you cannot add additional tubing and parts to expand the loop.

An example of a closed loop water cooler unit.
Open-loop systems
These are built piece by piece and are modular and customizable as a result. For example, you can start with a CPU cooling loop, but if you want to add the video card, you can do so down the road. Typical parts in an open loop are the heat block(s), radiator, pump, and reservoir with tubes connecting them all together.

An example of an open-loop system.
Submerged
This dunks most of the hardware into a liquid, usually mineral oil for its inability to conduct electricity. The liquid may still be pumped out to a radiator for cooling.

A submerged computer.
Phase Change Cooling
Phase change cooling works the same way that an air conditioner or refrigerator works: using the vaporization (liquid to gas) action of a working fluid to draw heat away or pump it elsewhere. You can see this work when you tilt a can of compressed air too much and spray on a surface.
Phase change coolers can cool a component below the ambient temperature and often will cool below freezing. The drawback to that is condensation can build up and create an electrical short hazard. It’s also very expensive; you won’t have any use for one unless you’re in overclocking competitions.

An example of a phase change cooler, from LDCooling.
Peltier Cooling
Peltier cooling relies on the thermoelectric principle. When you apply electricity to a Peltier cooling module, one side becomes hot while the other side becomes cold. The cold side is applied to the component that needs cooling. The hot side is cooled off by one of the other methods.
It’s fallen out of use due to requiring another cooling system (usually liquid) anyway, as the hot side can get hot enough to burn out the unit. The cool side can also get cooler than ambient temperature, which creates a condensation hazard.

A bare Peltier element.
Cooling setup considerations
Before thinking about overhauling your cooling setup or assembling components for a new build, here are some considerations to keep in mind.
What kind of cooling?
Air cooling, for the most part, works well enough for most people. Components might get uncomfortably hot if the ambient temperature is very warm, but most computer hardware that needs active cooling have the smarts to prevent themselves from going down in flames if the cooler can’t keep up. If you’re upgrading your air-cooling setup, consider getting beefier heat sinks first, then go tweak with the fans.
Liquid cooling should be considered if you plan on overclocking heavily or if the computer is constantly doing heavy lifting in hot environments. Keep in mind that open-loop systems require a lot of investment and it makes the components being cooled harder to change out, depending on the availability of heat blocks.
Fans
There are two properties of fans to consider: airflow (measured in CFM) and noise (measured in dB). If you’re looking for high airflow with low noise, look for larger fans. As far as noise is concerned, anything below 40dB will be very quiet, but start creeping up to 50dB and it’ll be loud.
Most case fans also have three pins to connect to the motherboard or controller. Some case fans have four pins, which use a different control method to handle how fast the fan spins. You can still plug a 4-pin connector into a 3-pin one, in which case the 4-pin connector will be keyed so that the correct pins are inserted.

Connecting a 4-pin fan to a 3-pin socket.
Case layout
A roomier case allows for more airflow inside and fewer places for air to become obstructed. Smaller cases can be worked with, but components that need airflow (usually the processor and video card) should have vents closeby. If you want to avoid the dust bunnies or fan noise, avoid cases with lots of openings.
There’s a minor debate over fan configuration in cases. The question is how many fans should draw in air (intake) and how many should blow out air (exhaust). This leads to two major configurations:
Negative pressure: There is more air being exhausted than brought in. The idea is that hot air is exhausted quickly while cooler air gets sucked in throughout the holes of the case because the air pressure is lower inside. The problem is that this also allows dust to creep in everywhere in the case. Another point is that hot exhaust air may be drawn back into the case.
Positive pressure: There is more air being brought in than exhausted. The idea is that this creates a clean-room environment in the case. Now dust cannot slip in through the cracks, only through the fans that draw air in. This also prevents any hot exhaust air from being drawn back in.

How positive and negative case pressure works (from SilverStone).
No matter what camp you choose, the important thing is to keep the air flowing.
Your PC needs some cleaning once in a while
If taxes and death are inevitable, then so is dust accumulating in a PC in a typical home. As long as air flows through the computer, dust will follow and build up. Dust is an excellent insulator of heat, which will cause components to get caked with it and become less efficient at cooling.
Your PC should be cleaned of dust at least once a month, more or less often depending how clean your environment is. Compressed air cans can be purchased at most electronics stores, but a better investment if you clean often is to get an electric duster. Do not use a hand duster, especially something like a Swiffer, as these can build up static charges that can damage the hardware.

