How to create SweetFX-style shaders that don't affect the HUD with Durante's GeDoSaTo
Finding a Suitable Shader
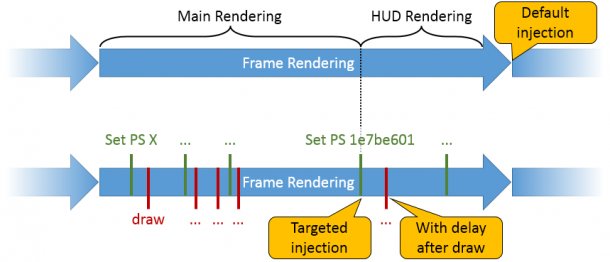
Before coming back to the example, I'll explain how the current post-processing targeting functionality in the generic plugin works. There are two settings related to injection targeting: “injectPSHash” and “injectDelayAfterDraw”. The former specifies a hash code for the pixel shader which marks the point during each frame where we'd like our post-processing to take place, while the latter is a Boolean value which determines whether or not post-processing should be delayed until after the first draw subsequent to using the shader with the specified hash. The following diagram should illustrate the concept more clearly:

In the upper row, the usual injection process employed by e.g. SweetFX—and GeDoSaTo without special configuration—is illustrated. Only once a complete frame is rendered does the injection happen, so obviously it applies to both the main rendered 3D scene and any existing HUD elements. Conversely, the lower row shows what happens in a targeted scenario with GeDoSaTo. During rendering, the game configures the GPU to use various pixel shaders (indicated by green lines), and draws geometry with them (red lines).
GeDoSaTo assigns a unique identifier (its Hash) to each shader. The injectPSHash parameter then specifies that the processing should take place when a pixel shader with the given identifier is used. Optionally, the processing can also be delayed until after the following draw call by setting injectDelayAfterDraw. What this means is that we can find, for example, the shader used when drawing the first UI element—say a health bar—and instruct GeDoSaTo to perform its processing at the point where the game first uses this specific shader. This way, only the actual game content—rendered before the UI—will be affected by our processing.
Searching a Hash for Mass Effect 3
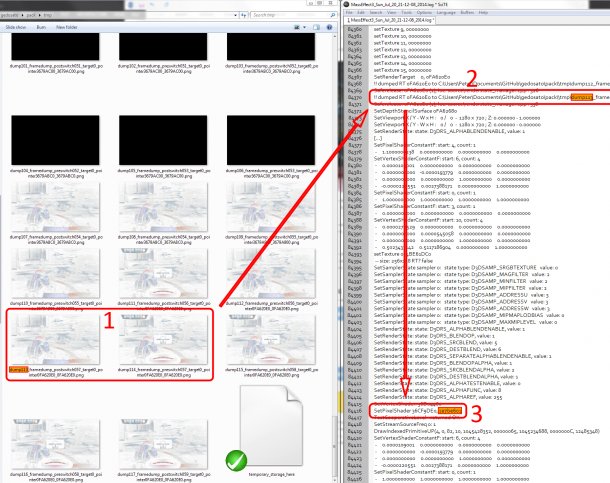
Armed with this knowledge and the dump data generated previously, all we have to do is find a suitable pixel shader hash for Mass Effect 3. Usually, what I do is open up the folder with the dumped buffer images in windows explorer and set it to show the largest icons possible on the left of my screen, while opening the generated log file on the right (don't pay too much attention to the colors, the discoloration is due to how the alpha channel is being dumped):

It is then usually a rather straightforward task to find a suitable hash code by following these steps:
- Find the point in the image dump where the first HUD elements appear. In our case, this happens when going from “dump113” to “dump114”.
- Use text search to find the corresponding line in the log file.
- Continue on downwards to the first call of “SetPixelShader.” The second parameter to this call is the hash code we are looking for.
One complication you might notice is that the HUD is already displayed in “dump111”. This can happen in many games if a framebuffer used in a previous frame is not cleared. A more solid guideline for (1) in such cases would be “find the last point in the frame dump where no HUD elements are visible”, but a bit of experimentation might be required even so.
Keep up to date with the most important stories and the best deals, as picked by the PC Gamer team.
Creating a Game Profile
In order to use our newly gained hash code, all that remains is creating a game profile for Mass Effect 3. This means creating a subdirectory in the “config” path of the GeDoSaTo installation named after the game executable—that is, as we figured out for the whitelist entry in the beginning, “MassEffect3”—and putting a “GeDoSaTo.ini” file into it. We can then use the built-in editor of GeDoSaToTool to edit it and add the hash code, like so:

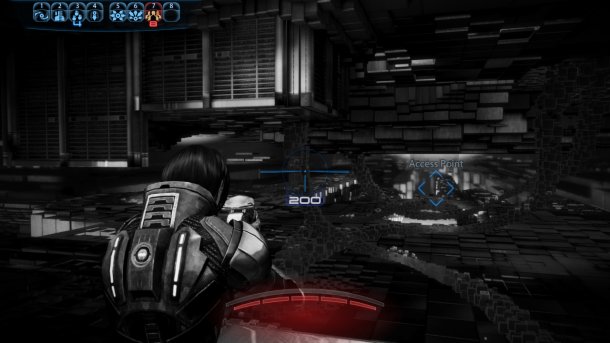
We could also add more settings which we only want to apply for Mass Effect 3. Additionally, by placing a “post.fx” shader file in the same directory we can arbitrarily change the post-processing shader used for the game. As a small demonstration that our targeted injection is working, I created a shader which turns the image into a grayscale rendering:

As you can see, only the 3D rendered parts of the game are affected, while the HUD elements still retain their color. In addition to targeted postprocessing, we can now also use the “takeHUDlessScreenshot” keybinding in Mass Effect 3.
Conclusion
While its main purpose is still high-quality downsampling, the current version of GeDoSaTo can also be used as an alternative to SweetFX for the injection of post-processing effects. It goes beyond the scope of similar tools as, with a bit more effort, it can be tuned to apply only where you really want it to, without affecting HUD or UI elements.
If you find some hashes or create good profiles for games which are not yet supported, please do take a moment to contribute them to the project at Github, so that all users of GeDoSaTo can benefit from your efforts. Github offers an easy to use interface and plenty of documentation for how to set up pull requests , which are the best way to contribute—and of course your contribution will be immortalized in the GeDoSaTo version history!

