How to Build a Kick-Ass MAME Arcade Cabinet from an Old PC
Configuring MAME
To configure MAME the way we want it, we’ll need to edit the mame.ini file. Unfortunately, this file should not yet exist; so we’ll create it. To do so, open a command prompt, navigate to the folder that contains mame.exe and enter the following command:
mame –cc
Now you should see a mame.ini file in the MAME directory. Use your favorite text editor to open the file. All of the settings in the file are pretty self-explanatory, but here’s a couple of useful one:
Under the Core Artwork Options heading, you may want to change the “bezel” setting to 0 to turn it off. Otherwise, MAME will automatically display a virtual bezel around any game for which it has artwork, reducing the screen space that game gets to use.
The Core Rotation Options allows you to make sure that the orientation of the screen is correct for your monitor. To rotate the screen ninety degrees to the right or left, enter a “1” for the “ror” or “rol” settings, respectively. To flip the screen 180 degrees, enter a “1”for both the “flipy” and “flipx” options.
If you’re using an arcade monitor, you should disable automatic screen stretching (necessary to actually get the benefit of an arcade monitor) by changing these options:
#
# WINDOWS VIDEO OPTIONS
#
video ddraw
Keep up to date with the most important stories and the best deals, as picked by the PC Gamer team.
#
# DIRECTDRAW-SPECIFIC OPTIONS
#
hwstretch 0
#
# FULL SCREEN OPTIONS
#
switchres 1
Configuring MaLa
Once MAME is properly installed, setting up MaLa is pretty easy. Just download the MaLa zip file here , and extract it to a folder in your emulation directory. Run mala.exe, and a dialogue box should pop up informing you that this is the first time MaLa has run, and that the configuration tool is going to open.

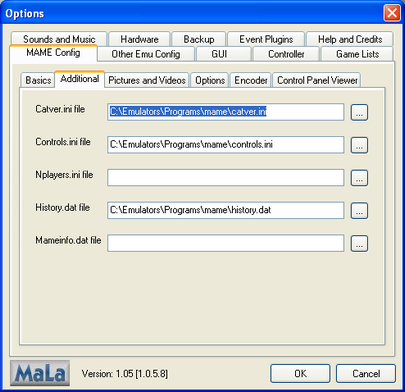
The configuration will open, with the MAME Config -> Basics tab front and center. In the field marked "MAME Executable" press the “ … ” button and select mame.exe from the MAME folder. MaLa should automatically find the catver.ini file and other information files. If it doesn’t, you can manually locate them in the Additional tab. You can also define the fields in the Pictures and Video tab for the location of any additional art resources you’ve downloaded, which will allow MaLa layouts to use this information in your gamelists.
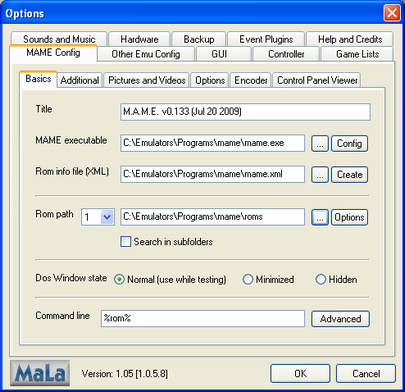
In the Basics tab, tell MaLa where to find the folder with your ROMs in the field marked “Rom path.” Using the dropdown menu, you can define additional locations for MaLa to search for ROMs in, but for our purposes that shouldn’t be necessary. Hit OK . A box will pop up asking you to refresh your game list; click on ok, and when it’s done scanning your ROMs, MaLa will start.
Layouts
But what’s that? MaLa is ugly, you say? Well that’s just because you’re using the default layout, which is pretty lame. Instead, we’ll show you how to find and install a custom layout. First, you need to find a layout—a good source is here . When you download a layout file, it will have a .MLL file, and a set of art files, usually in a folder. Place the .MLL file into the MaLa/layouts directory, as well as the folder of art files. It’s important that the art files be in a folder in the layouts directory, with the exact same name as the .MLL file.
ROM Lists
Finally, we’ll examine how to set up ROMlists, which allow you to sort your games into various lists within MaLa. For instance, you might set up a list of top-down shooters, or a list of games that can be played in “cocktail mode,” with the screen flipping back and forth between two players. You can create and edit game lists within MaLa using the menu (by default, the “2” key), but if you want to quickly work with a lot of games it’s much quicker to use the MalaGamelist.exe program included with MaLa.
In Conclusion
That's it for our MAME guide. There's an almost-infinite number of ways you can continue to tweak and customize a MAME cabinet, but if you follow the steps in this article, you'll have designed and built a powerful, flexible all-in-one arcade machine. We hope you're tempted to try this project for yourself, and if you do build a MAME cabinet, we hope you enjoy it as much as we've been enjoying ours.
