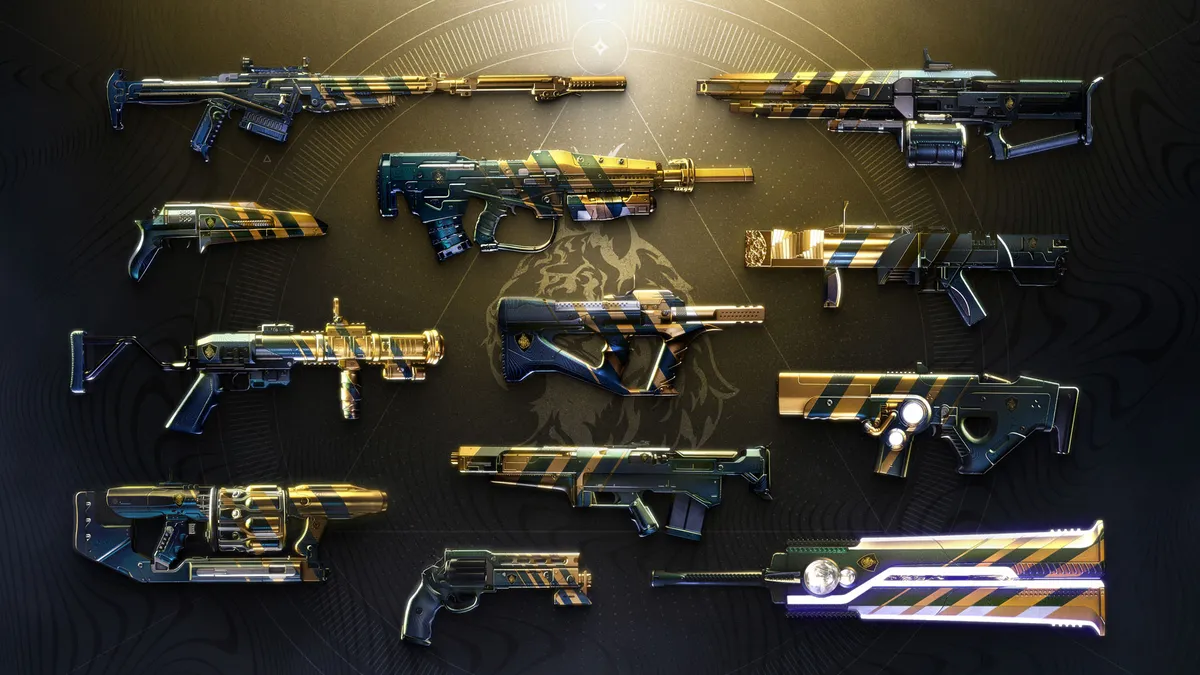
Destiny 2's free Into the Light update has launched with six of the 12 classic weapons that are being reissued with new perks for this release. But not all iconic weapons are created equal. What if you'd rather earn new rolls on the now best-in-slot legendary grenade launcher Edge Transit over, say, the Succession sniper rifle? Is that such an unreasonable request?
While all weapons are available from Onslaught by default, Into the Light introduces a new system called attunement. Once you've attuned to one of the update's Brave weapons, you'll have a +50% chance of earning it as a drop as you play through Onslaught. If you're searching out a specific god roll, you'll want to make sure you've attuned to whatever weapon has caught your eye.
How to unlock Brave weapons for attunement

You can attune for weapons in the Hall of Heroes, the new social space found in the new Into the Light menu in the Director. Unfortunately, attunement isn't available immediately—you'll first need to unlock it for each weapon in turn.

To do so, first start working through the introductory Feats of Bravery quest given out by Shaxx. As part of that quest, you'll be instructed to pick up and complete the Stranger Danger quest from Arcite 99-40. That quest is one of six Brave weapon quests available from Arcite that can be completed for both a curated version of the corresponding weapon—with specific perks chosen by Bungie—and the ability to attune it. Once you've completed Stranger Danger and turned in Feats of Bravery, you're free to grab the other quests at will.
How to farm kills for Brave weapon quests
Each of the Brave quests have two methods for completion. The first is specific types of kills with that weapon type in PvE—either precision or rapid kills depending on what the weapon is designed for. The second is for defeating other Guardians with that weapon type in Crucible.
If you're going the PvE route, the quests mention that playing Onslaught grants bonus progress, but despite that it's still not the fastest way to complete each objective. Fun as the new horde mode is, you'll have two other allies also contributing to kills, significantly slowing down your progress. Instead, if you absolutely need to find the quickest way to complete each quest, simply use one of the handful of farming spots players have been crutching on for years.
The most effective class for farming weapon kill quests is a Void Hunter running the Deadfall super and Orpheus Rig exotic boots. Any damage you apply to an enemy caught by your Deadfall is applied to all other enemies trapped in it, and it all counts as coming from the same source. This makes it an incredibly effective way to get lots of specific weapon kills without much effort.
For mods, you want to prioritise generating super energy for more Deadfall uptime, so run Dynamo in your head slot along with syphons that match the element of the gun you're grinding kills on. With the right setup, you can generate a new super incredibly quickly, making the whole process much faster.
As for where to farm, there are three main locations I recommend.
Shuro Chi

The second encounter of the Last Wish raid is a farming favourite, and for good reason. It's a gauntlet of weak, low-health enemies that are easy to cut through, and, when you're done, you can easily wipe, and—thanks to the rally flag—start over with full ammo and super. And despite being a raid encounter, it's easy to reach solo through one of two methods.
Method #1: Simply go to d2checkpoint.com, copy the name of the bot holding the checkpoint, and enter /join [name] into the in-game chat. If you get a message saying the fireteam is full, just try again until you get in. Once you've loaded into the activity, start the encounter by walking up to the door, wipe, and, once you've respawned, leave the fireteam. Now when you load into the Last Wish raid yourself, you'll spawn back at the start of the encounter.
Method #2: Use the Last Wish's wish wall to directly teleport to the encounter. At the start of the raid, instead of turning into the room with the Kali encounter, go straight and jump around the corner at the edge of the hallways to find a secret route. Follow this, and you'll arrive at the wish wall—a four by five grid of blank icons that you shoot to input a code. This is the code you'll want to create to teleport to the second encounter:

Again, start the encounter, wipe and when you respawn you'll have the checkpoint saved, meaning you can leave and come back at any time until the next Tuesday reset.
The main trick to farming Shuro Chi is knowing what to kill, and when. Once you've dealt with the initial wave of Thrall, more will spawn in alongside a handful of Knights. If you kill all of the Knights immediately, you'll likely only get one additional spawn wave of Thrall. Instead, you only want to kill one Knight per Thrall wave. Do that and you'll maximise the number of Thralls that Shuro Chi will throw your way, making each run much more efficient. Once the Thrall have stopped spawning, simply wipe (standing on the pads surrounding Shuro Chi will do the job), and you'll be ready to go again.
Each Shuro Chi loop takes under two minutes, and I was earning between 15-20% progress on the Recluse Endangerment quest per run.
The Loot Cave

Another popular farming spot, the Grasp of Avarice dungeon is popular because there's no real set-up required. Load into the dungeon, run up to the loot cave, and shoot endless waves of Thrall like it's Destiny 1's launch week. Thanks to the dungeon's main mechanic, you'll also refresh your super and abilities for every 10 Burden of Riches engrams that you pick up. It's pretty good.
The major downside is that there's no rally banner location, so no easy way to fill up on heavy or special ammo if you're looking to complete the Succession, Falling Guillotine or Edge Transit quests. You can run special or heavy ammo finder mods on your helmet, but you'll still have stretches where you'll need to switch back to your primary in order to generate ammo for the weapon kills you're actually trying to farm.
Using this method, I was making about 8-10% progress on the Recluse Endangerment quest every two minutes, making it significantly slower than Shuro Chi.
The Whisper

Shuro Chi and the Loot Cave have become the standard farming spots for weapon levelling, catalyst progress and weapon kill quests, but both of them have a cost attached. The Last Wish raid requires you to own the Forsaken Pack DLC, and Grasp of Avarice is locked behind the 30th Anniversary Pack. But veteran Destiny 2 players may remember another spot for endless Thrall farming, and, wouldn't you know, it's just been added back into the game—and for free, too.
The Whisper exotic mission is not only very good, but also the home to a subterranean lair filled with endlessly spawning Shadow Thrall. You need to progress through the quest until you reach the giant, mossy stone room, and, instead of progressing the normal way, instead fall through one of the cracks into the dark area below. Here you'll be beset by endless spawns of Shadow Thrall.
As with Grasp, there's no rally banner spot here, so it's less useful for special and heavy weapon quests. It's also not got Grasp's Burden of Riches mechanic, so you'll have to generate your super the old fashioned way. The Whisper is also a timed mission, although once you've practised the route a few times you can reach your destination with well over 30 minutes to spare.
There's also no guarantee that this method will survive in the long term. Bungie has nerfed some of the other infinite Shadow Thrall spots—like Shattered Throne's Thrallway—to stop players generating any kill progress from its infinite waves. But I've tested and, for now, The Whisper does still grant quest progress. In fact, I made about 10-12% progress every two minutes on the Recluse Endangerment quest—slightly quicker than Grasp, albeit with an entire jumping puzzle to complete just to reach it.
How to attune to a Brave weapon

Once you've completed the weapon kill step, the game will prompt you to go and attune to that weapon at the Hall of Heroes by visiting the relevant Holo-Shaxx statue. Follow the quest marker to that statue, and you're able to attune to that weapon and finish the quest.
Once a quest is completed, you can attune to that weapon at any time by revisiting its Holo-Shaxx statue. You can only attune one weapon at a time, but it's easy to switch by visiting the relevant Holo-Shaxx and attuning to the one you want. Over the coming weeks, the remaining six weapons will be added to the Onslaught loot pool, and each will also bring a new quest from Arcite to complete—unlocking the Attunement option for those weapons too.