Can we combine compact size, high performance, and loads of storage? We’ll give it a shot
Length of Time: 1–2 Hours | Level of Difficulty: Low
The Mission
If you couldn't tell by now, we’re performance junkies here at Maximum PC. Just last summer, we were crazy enough to build a $30,000 liquid-cooled computer with two PCs inside it. But you can’t drive in the fast lane all of the time. Sometimes it’s better to take a quiet Sunday drive down to the park and have a picnic. That doesn’t mean the meal has to be bland, but we will be shifting gears for a new palate (with a side of mixed metaphors).
For this righ, instead of building for just speed, we’re also building for capacity. But that’s a pretty straightforward challenge; anyone can slap a bunch of hard drives in a case and call it a day. We’re going to up the ante by shoving eight hard drives into a mini-ITX case. At least, that was the original plan before motherboard maladies intruded. Whatever, we like having massive storage options in addition to our turbo-charged gaming PC or A/V production workstation. This way, we can create a library of full-system backups, and stream media to devices, in a discreet and portable form factor.

Rocking Out
If you want to cram a large number of drives into a mini-ITX system, special gear is required. We were originally going to go with the Asrock C2550D4I, which has 12 SATA ports and an integrated lowpower Avoton quad-core CPU, and support for ECC RAM. Unfortunately, we discovered it’s quite finicky about what RAM it will accept, and appears to strictly adhere to modules on the qualifi ed vendor list. After many failed boot attempts and different slot confi gs and half a dozen DIMMs, we had to give up. It’s not just us either, the Internet is rife with people reporting similar problems.
So, we had to switch to Plan B: a conventional Intel Z97 motherboard and Haswell CPU. This cuts our maximum drive count to four, but we could always install a RAID card in the PCIe slot to add more if we wanted. You can also remove a part of the 3.5-inch drive cage to make room for a long card, though this does sacrifi ce one drive tray.
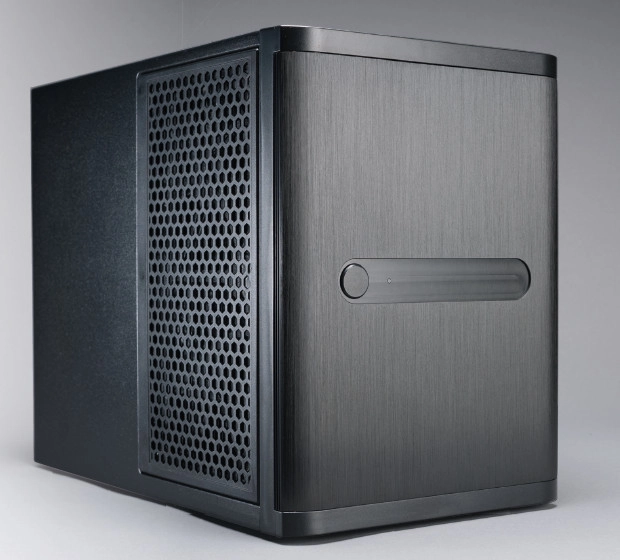
But what kind of mini-ITX case could even hold eight 3.5-inch drives? Enter the SilverStone DS380, whose entire front is a series of drive bays measuring about 11-inches tall. It’s also over 8-inches wide, giving us room for a variety of activities. This case also takes SFF (small form factor) power supplies, and we went with the Silver-Stone ST45SF-G, a bronze-rated unit pumping out up to 450 watts.

1. Step on Board
Our replacement motherboard is the Asus ROG Maximus VII Impact. Compared to Plan A, this one has a full x16 slot, USB 3.0, shielded integrated sound, dualband 802.11ac, and of course, a spot to install a Haswell CPU. (We went with an unlocked model because we didn’t have the locked version handy and this board with a locked CPU would be a crime.) You have to install a couple of modules on the board such as the Wi-Fi.

Our max RAM capacity is reduced to 32GB, and we lose eight SATA ports and one fan header. You can install a RAID card to add more SATA ports, instead of the video card, but we wanted a hybrid build. By way of compromise, we slapped in three 6TB hard drives and one high-powered 1TB solid-state drive.
2. Getting Cagey
This is a compact case, so we need to temporarily remove both drive cages to give the board enough clearance for installation. The main drive cage in the front is secured with four small black screws on the side, and two chromed screws underneath the case. Once those are removed, you can slide the drive cage toward the rear, and lift it right out. Then, the 2.5-inch drive cage at the top of the case comes out.

The motherboard has a vertical extension that holds additional voltage regulators, which is attached via two screws. Remove these, line the board’s four corner holes up with the pre-installed standoffs in the case, and screw in the board.
3. All Wired
With the board installed, we can begin hooking it up. We attach all four SATA cables now, since they’re easy to reach with the drive cage removed. The Impact’s audio comes in though a daughterboard. We plug that in, screw it down, and connect the front-panel audio cable to it. There’s an additional minicard to add two fan headers, and another for Wi-Fi. The I/O shield has perforated holes that you tap out and send the Wi-Fi connectors through.

4. By the Power Supply of Greyskull
Since we have the case open, now is a good t ime to install the power supply. It goes in the top, and there’s an intake grill right there for the PSU to get cool exterior air. We take the flatcable kit and connect the motherboard power, CPU power, SATA power, and Molex. Our hard drives will be getting their power from the PSU’s Molex cables; both of them plug into the drive cage’s backplane and provide all the juice needed there. We’d never find an SFF PSU with eight SATA connectors anyway (this one has two).

The motherboard power cable is a bit tricky to plug into the board because it’s nearly flush with the bottom of the case, but we managed to wiggle it in after a few tries. The CPU cable also has one end specifically for the PSU and another for the mobo.
5. Piecing it Together
With the motherboard hooked up, we can drop the drive cages back in. Note that the backplane of the 3.5-inch cage has two data connectors per drive. One is actually for dualchannel SAS drives, while the other is for SATA or singlechannel SAS. (They’re clearly labeled to avoid confusion).

We take the other ends of those SATA cables we plugged into the motherboard earlier, and we attach them to the SATA side of the backplane, one by one. Then we put the cage’s screws back in and unlock the door, which uses a five-sided bit as a key. With the door open, the drive trays slide out from the front. Since the backplane has integrated SATA/SAS connectors, you just put the drive into the tray, attach a few screws, and slide the tray back in. The drive is now installed.
Although we can’t populate the whole cage with drives, three 6TB units give us 18TB, which is a very good start. Plus there’s the 1TB on the SSD, which we’re using to boot Windows. If only we had 10TB drives!
6. In Plane Sight
Since the SATA ports on the board are close to the backplane, we can tuck most of the SATA cabling behind the cage. All three fans have twist ties pre-attached, so they need minimal adjustment. The rear fan cable is a bit tricky, though. Its cable is not sheathed, so the wires are easily snagged. You can tuck away the wires, as there isn’t a fan header particularly close by. You also want to keep it well clear of the CPU’s heatsink, to keep the wire insulation intact. We ended up just stringing it along the bottom of the case. It’s not pretty, but it gets the job done.

The other cables are mostly hidden by the sheer bulk of the 3.5-inch drive cage (which would weigh over 15 pounds after populating all eight trays). This is not a flashy case with a side window, but you’re unlikely to be fiddling with its innards often, so appearance is not a high priority.

