
See that beautiful fight stick? It's not just a controller: it's a symbol. A symbol of me running out of excuses to git gud (or at least crawl my way out of scrubhood) in Street Fighter 6. Earlier this year I was so excited for the new Street Fighter that I decided to build my own Hit Box, AKA an all-button arcade box without an actual "stick." As with most fighting games I'm excited about, before release I vowed that this would be the one I committed to putting real time into. I'm the first and only fighting game amateur to ever tell himself this lie.
When Street Fighter 6 landed in June, I only had the project half-finished, so I figured I'd wait on diving in for a month or two, just until I could finish things up. Considering I finally hooked up all the wires and screwed the box together on December 19, it's safe to say things didn't go exactly as planned. But 2024? 2024 will be the year I definitely pour some real time into Street Fighter.
Building the controller was a lot of fun all by itself, though, and a process I'd recommend to any fighting game fan who happens to have a lot of woodworking equipment handy (or, like me, a friend with that equipment). Despite watching some YouTube videos and reading about other folks' builds online, I still made a few small mistakes and came away with tips for other first-time builders. Here's how it came together.
The planning steps


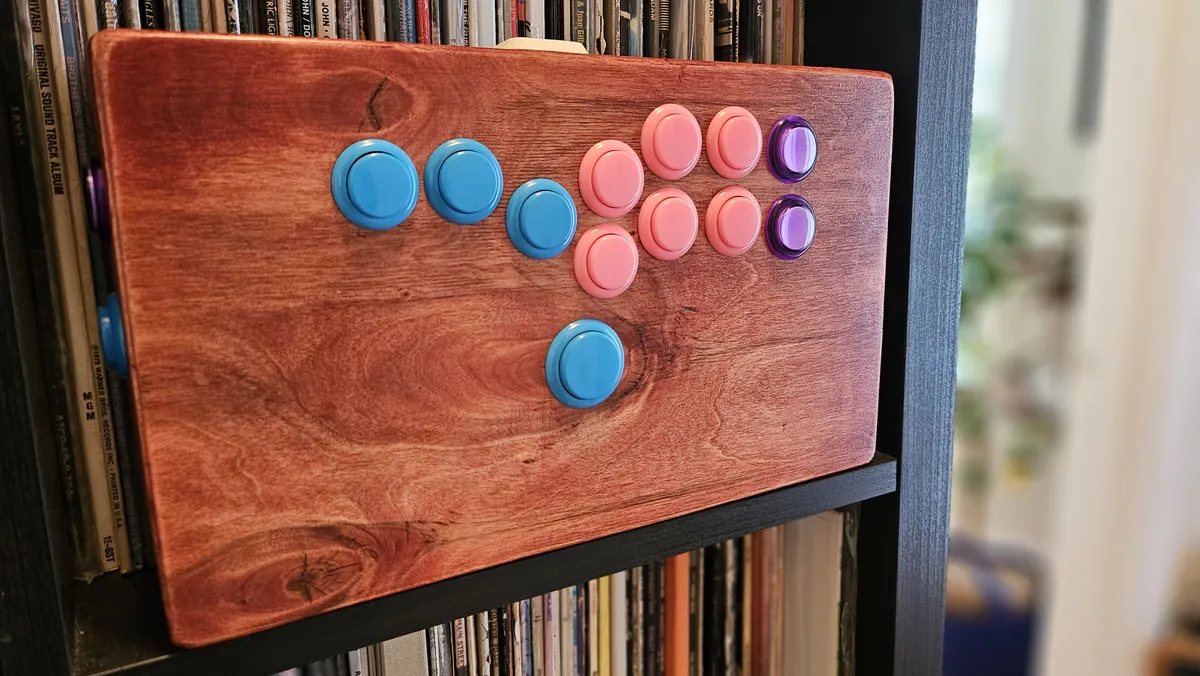
I decided I wanted to make a wooden fight stick, and that I wanted it to be relatively small so that storing it wasn't a huge pain. I bought some sturdy half-inch plywood from a local shop, and while on a vacation trip to Tokyo set out to find an arcade parts store to buy buttons. I figured they'd be a bit cheaper in Japan than online, though I ended up erasing any savings I'd won for myself by panicking about the color combination and buying more buttons than I needed.
For my primary buttons I went with Sanwa's OBSN 24mm, which I'd compare to Cherry MX Reds. They're fast, light touch buttons that you'll find across arcades and in many, many fight sticks. For a touch of color and textural variety I also picked a few Seimitsu PS-14s, which require just a tad more pressure to activate, to serve as the triple punch / kick buttons.
That left the stick's controller board and wiring.
While I'll mostly be playing on PC, I also wanted the stick to work on consoles. There's a budget option in the $25 Brook Zero-Pi, but I asked Brook to send me its $80 Universal Fighting Board as well as a small add-on board for PS5 support. For anyone building a fight stick going forward, though, I'd recommend the new UFB Fusion, which integrates the PS5 add-on; it's the plug-it-into-anything-and-it'll-just-work board to choose now. If you're building a leverless controller like me, you'll also want the fighting board cable and hitbox cable, which make the wiring process really, really easy. Brook offers bundles for buying the cables together and/or with the UFB that knocks quite a bit off the price.
The next steps of planning my build at this point revealed many complexities I hadn't really thought about.
- Even nice quality plywood isn't going to have perfectly squared edges, which makes perfect measurements tough. This can be fairly easily solved, but only if you have the right woodworking equipment.
- The saws you have access to will dictate how you go about building your controller. Because we didn't have a table saw or skilsaw (or a laser cutter, which would be even better), we decided it was going to be tricky to build a box-style controller like in this YouTube video. Instead we went for a "sandwich" approach, cutting the plywood into several pieces and layering it to create the thickness needed to fit all the internal parts. This would let us deal with the not-square edges later with an orbital sander.

- When finding a button template online, make sure the spacing will work for screw buttons (better for thicker boxes) rather than push buttons (built for thin metal/acrylic panels). I used this template that was modified to fit screw buttons, and they just barely fit, so I really needed another couple millimeters of spacing in between. If I'd used one of these official templates, it likely wouldn't have fit my buttons.
- Unless you already have a fully stocked woodworking shop, costs are definitely going to add up—I spent nearly $30 just on the 24mm and 30mm Forstner bits used to drill the button holes, about that much on the wood, and more later on brushes, stain, and polyurethane for the finishing steps.
Drilling button holes and test fitting


Ideally, you'd use a drill press to quickly and cleanly make the button holes using the circular Forstner bits, but a handheld drill actually did the job perfectly fine here. One important tip: use the point of the drill bit to make a small indentation in the wood at your center point to anchor it as you drill, ensuring it doesn't go skittering across the surface.
The benefit of this half-inch piece of plywood is that it's extremely strong and doesn't bend at all, but it comes with a downside: it's too thick for the screw buttons. That meant that on the back side of the top panel I had to use the 30mm bit to drill all the way around each hole, more than doubling the amount of work for this step of the process.
At this point we did a test fitting, and everything fit! But later, when I stained the wood and had to tighten all the buttons to ensure they didn't wiggle, it was an extremely tight squeeze.
Assembling the layers, gluing, and cutting


With the button holes done, we drew a rough diagram on the top panel to figure out how the PCB would fit and where the side buttons (for Start, Select etc.) would fit, as well as where the hole for the USB plug would go. This helped us determine how thick we could make the sides and how much extra wood to leave in the corners to give screws for the bottom panel plenty of security. With all that sketched out, we lined up several more pieces of the plywood and glued them together to serve as the body of the controller.
Our process here was dictated by the kind of saw we had on hand—in this case we used an oscillating multi-tool to cut through the stacked wood vertically. We used a piece of tape on the blade to mark the depth we'd be cutting to, but using some cheap particle board as a backstop made it pretty easy to tell when we'd broken through the harder wood.
The cutting process was surprisingly painless, and once the interior block was gone we could use the Forstner bits again to drill the side button holes and then glue the top panel in place.
Sanding, sanding and more sanding


We have a box! The controller pretty much looks the part at this point, but refining is a lengthy process. At this point I had to use the orbital sander to clean off that overhanging lip on the top panel and begin sanding down the sides, too, which is trickier than it sounds. Some sides would slope towards the top or bottom and/or left or right; others would bulge or dip slightly somewhere in between. Wood looks pretty straight until you scrutinize it from all angles and then it really does not look straight at all.
After an initial hour or two of power sanding to get the sides roughly square, I also did a ton of sanding by hand to round off all the edges, making them much more pleasant for wrists to rest against. As you can see in the finished image, there's a pretty clear inward slope on the right side—I did my best to mimic it on the left, and unless you're really squinting at the final product it looks even. It's definitely not a perfect rectangle, but I'm okay with that: it feels more handmade and doesn't compromise on the usability of the stick at all.
Staining and polyurethane


I wanted a rich reddish brown, so I applied three coats of red chestnut wood stain. I loved how it looked when wet, but naturally when it dried the color was much less vibrant. Multiple coats helped, though, as did the final step: applying a clear semi-gloss polyurethhane. I did an extremely fine grit sanding in between to ensure no particles or bits of stain roughed up the finish. The poly really helps bring out the vibrancy of the wood in nice lighting.
Final steps: Wiring it all up


Securing all the buttons proved to be harder than I expected—during my test fit I hadn't grappled with getting the screws firmly lodged in place against the wood. I had to chip away some extra room with a screwdriver and use needle nose pliers in a few cases where my fingers were too big to get a grip. I also needed the pliers for the left side buttons where we'd kept the wood pretty thick—there was no way my fingers were fitting in there!
Wiring was thankfully an easy step: I just followed a guide for the 20-pin harness showing which colored cable corresponded to each button. Brook also supplies a guide for its hitbox cable. Since the cables are preconfigured with female connectors, they just slide onto the buttons and the job's done. The only "manual" wiring I had to do was for the PS5 add-in board, which required two wires be attached to the right terminals on the Universal Fighting Board and screwed in. With a small Philips screwdriver, that took all of a minute.
I also needed to attach the Neutrik USB feed-through with a couple small screws, so I drilled tiny pilot holes first and then secured it by hand. Since I'd already splurged on this project I bought both Type-C and Type-A cables to be ready for any situation.
The final step was securing the board in place. I had some heavy duty adhesive velcro leftover from another project, so I attached that to the bottom of the UFB and then stuck it to the top panel. I figure this way it'll stay in place but still be fairly easy to remove and reuse if I ever want to swap it out or move it to another stick.
A few more tips and lessons learned for building your own hitbox
After putting this thing together, here are a few takeaways:
- This guide on FocusAttack is a great starting point for determining what parts you need, and what parts you'll want (deciding between button types, for example)
- Getting a perfectly straight edge is a real challenge without the right tools, so if you're an amateur builder like me, having a more experienced friend is invaluable (thanks, John!)
- There's a reason most fight sticks tend to be larger than the one I've built. A deeper box gives you a bit more space to rest your wrists, and a wider one sits more stably on the lap. I don't regret building a more compact box, but if I had it to do over I'd probably go a bit bigger.
- If you're on the fence about building your own, there's definitely a more affordable custom option: an acrylic enclosure from Eternal Rival. These still require you to supply your own buttons and PCB, but give you a case to build in, no sanding required. You can also get custom top panel artwork done for these, which is a lot of fun—take a look at the r/fightsticks subreddit for inspiration from some incredible designs.
- It's always going to be really hard not to call this a "fight stick" every single time even though there's no stick


