The complete guide to beating Destiny 2's Leviathan raid on PC
Everything you need to know in order to beat the Cabal's biggest baddie aboard the planet-eating Leviathan.
How to beat the Gauntlet

The Gauntlet is located through the 'axe' door in the Castellum. In truth, it's more of an obstacle course than a fight. There's an almost game show vibe to it, and it's good fun once you learn the ropes, so let's go over them.
Encounter overview
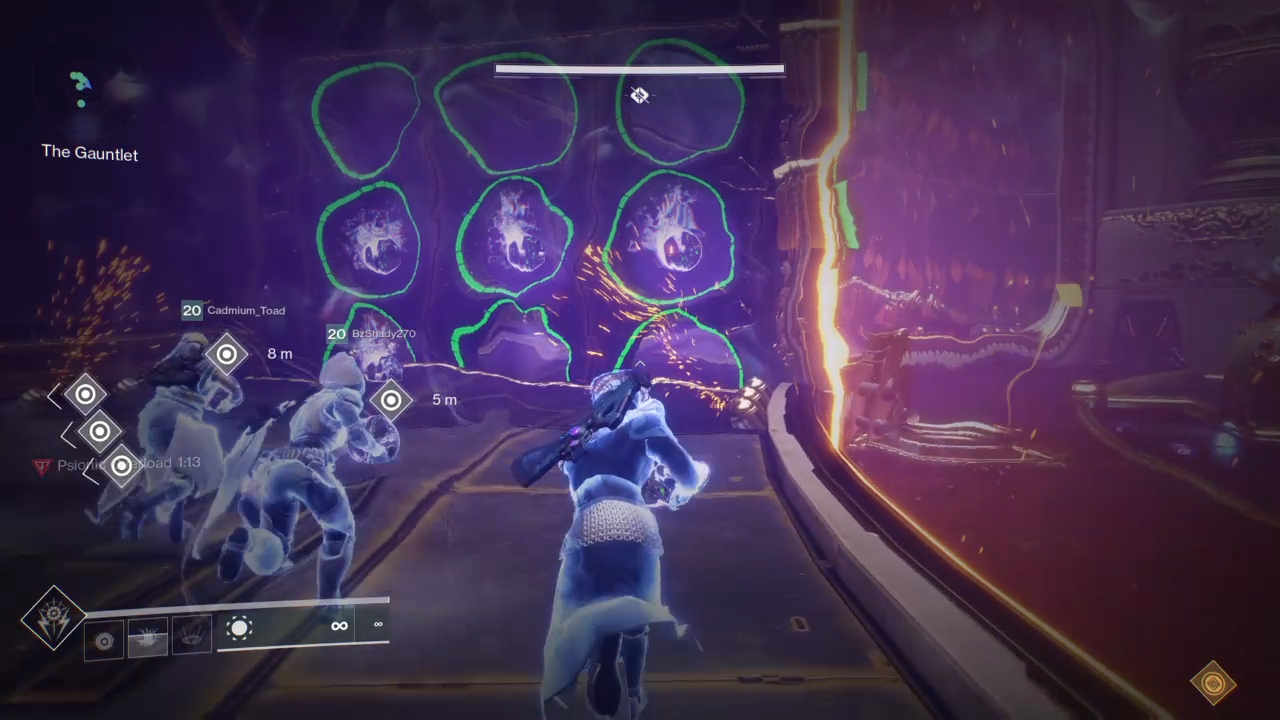
The Gauntlet has an inner and outer ring. The inner ring contains four plates (marked dog, sun, cup and axe again), two psionic charges and a central console. There are also three arrow-shaped buttons in front of each plate. These buttons line up with the 3-by-3 grids of circles located in the outer ring.
Two players, the 'runners,' grab the charges and teleport to the outer ring. They'll then run around the outer ring to reach the finish line at the end, jumping over obstacles and through the aforementioned grids. To prevent their charges from detonating, runners must also collect orbs located in specific grid rings. To do so, they'll need to feed information to the four players in the inner ring, the 'helpers,' who use the plates and buttons to clear the way.
Once the runners collect five orbs and reach the finish line, they'll be teleported back to the inner ring to deposit their charges in the central console. After three successful runs, six charges will spawn around the middle console. At this point, all players grab a charge and everyone runs the outer ring at once in a final sprint.
Your goal is to complete three runs, reach the final sprint, and have enough runners finish it to fully charge the console. In total, nine charges must be deposited to complete the encounter.
Running the charges
Split your team into two groups: two runners and four helpers. Assign each helper to a plate, then assign one runner each to the cup and dog plates. The first charges always spawn at these plates.
Helpers should start the encounter by stepping on their plates, then runners should get into position around their plates. Clear out the enemies that spawn, including one orange-health centurion per plate. Once everyone is ready, the runners will grab the psionic charges in front of their plates and teleport into the outer ring. All four helpers should then get on their plates and prepare to respond to the runners' instructions.
Keep up to date with the most important stories and the best deals, as picked by the PC Gamer team.
The 3-by-3 grids in the outer ring are the key to this encounter. Runners have to call out which grid they're running toward (look above the grid to find the sign) and which row contains a red ring so the helpers can shoot the buttons in the inner ring which correspond to the other two rows.
So, if the runner says the red ring is in the middle row of the cup grid (ie the callout should be: "cup middle"), the helpers watching the cup door would shoot the top and bottom buttons. Each helper is responsible for the plate they're on and one other—in other words, two helpers watch each half of the inner ring. Determine who's watching what plates beforehand and keep up with the runners as they move. You should also determine who will shoot the top and bottom buttons (relative to the row the runner calls out).
Hitting both buttons correctly will spawn an orb in the red ring and remove the shield blocking the runner. You don't have to be perfect, but you do have to be precise. If a runner fails to collect two orbs in a row, their charge will detonate, killing them and ending the run.
Running is self-explanatory, but helpers have a little more to keep up with. Whenever a runner picks up a charge, a 'psion councillor' will spawn in front of that plate, which that plate's helper must melee-kill immediately to prevent a wipe. They always spawn in the same place and their bubble shields make them easy to spot. Drop down, punch them, then jump back onto your plate. Helpers should only leave their plates to punch psions. Use scout rifles to shoot far-off buttons.
Additionally, if a runner misses a charge, a 'psion projection' will spawn somewhere in the inner ring, either above a plate or over one of the blue torches around the area. These are also easy to spot, and like the councillors, must be killed immediately to prevent a wipe, though you can simply shoot the projections.
Once two charges have been deposited, much of the outer ring's floor will fall away, making the run more precarious. Once four charges have been deposited, the plates in the inner ring will begin to shake periodically, making hitting the buttons marginally more difficult. Otherwise, it's smooth sailing until the final charges.
The final sprint
With everyone running at once, the rules are obviously a little different. There are no buttons to shoot, but charges will still detonate if you don't pick up orbs. However, there will only be four orbs in each grid, meaning players have to call out which orb they're targeting (top middle, bottom right, etc.) and trade off with their teammates.
It's also incredibly important that no runners die at the start of the sprint. Their ghosts will spawn in the inner ring, meaning you won't be able to revive them in time and the 'shared fate' timer will wipe your team. One particular hazard to pay attention to is the floor, a section of which will start to move after the team passes the second grid.
At least three runners have to survive the final sprint, so you'll want to share orbs. To keep it simple, split into three groups of two. Two runners will hang back and grab orbs on every grid, and the other groups of two will alternate grabbing orbs. So, group one grabs orbs on all four grids, group two grabs orbs on grids one and three, and group three grabs orbs on grids two and four. Clearly call out which orbs you personally plan to grab (ie "top right" or "mid mid" or "bottom left") to prevent traffic jams.
Make it to the finish line one last time, deposit your charges in the console, and you'll have cleared the Gauntlet. Collect your loot from the chest near the console and proceed to the next encounter.
Next: How to beat Emperor Calus.
Current page: How to beat the Gauntlet
Prev Page How to beat the Pleasure Garden Next Page How to beat final boss Emperor Calus
Austin freelanced for PC Gamer, Eurogamer, IGN, Sports Illustrated, and more while finishing his journalism degree, and has been a full-time writer at PC Gamer's sister publication GamesRadar+ since 2019. They've yet to realize that his position as a staff writer is just a cover-up for his career-spanning Destiny column, and he's kept the ruse going with a focus on news, the occasional feature, and as much Genshin Impact as he can get away with.

