How to build a modern-day PC into a replica of the Commodore 64
The Mission
Many people wax poetic about the polite ’50s, the radical ’60s, or the wild ’70s, but for nerds, the 1980s was the best decade. A full-on war raged in the new category of “personal computer,” no one operating system ruled the world, and, man, you could walk into a Toys “R” Us and buy the world’s all-time bestselling PC: the Commodore 64 .
Whether you want to relive the golden age of PCs or you weren’t alive for it, Commodore USA (no relation to Jack Tramiel’s original Commodore International) offers its Commodore 64x to recreate that 1980s experience.

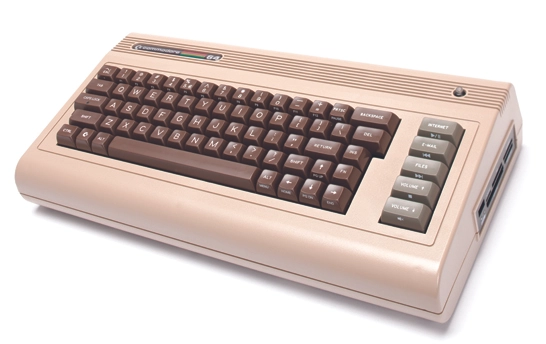
The main difference between the original C64 and this replica is the latter’s ability to take standard PC industry components. Is the Commodore 64x case/keyboard a perfect recreation of the original? No, but it’s damn close. I’m not judging this by my faded memories of the C64 I owned in 1982, either. See how closely the inset shot of the original resembles the new C64x?
What’s Inside the New C64?
I had envisioned using a Core i7-2600K with a notebook GeForce graphics card in the C64x, but I quickly realized that heat would be a serious issue in this thermally constrained PC, which has one puny 4cm fan handling all its airflow. I also considered a mobile Core i7, but the cost and scarcity of parts made me ditch that approach. In the end, I decided that an AMD E-350 Fusion APU would be the most cost-effective and reliable route.
The best candidate for the job? Zotac’s Fusion ION‑ITX T Series. The board features AMD’s E-350 Fusion chip, built-in Wi-Fi, and, best of all, a 90-watt external power brick. Because the C64x doesn’t have much room, running an internal power supply is out of the question. Pico-ITX PSUs are an option for standard boards, but that would require cutting a hole into the chassis to route the wiring. The Fusion ION‑ITX T Series takes care of that in one swoop. Thermals also shouldn’t be an issue with its integrated heat pipe and heatsink. My previous experience has taught me that the E-350 runs super cool for an 18-watt part.
For storage, I opted for Seagate’s Momentus XT hybrid drive. It gives the C64x some SSD-like performance but is cheap enough that I can afford to give the machine 750GB of storage space. A Silverstone slot-fed DVD burner rounds out the package, but we did have to add an NZXT internal USB expansion module and an old-style Molex Y power splitter.
For tools, a standard Philips-head screwdriver and a small jewelers Philips-head screwdriver are required for the build. I also had to round up a set of system screws, as well as a set of screws that are typically used to mount an internal 5.25-inch optical drive.
| | PART | URL | Price |
|---|---|---|---|
| Case | C64x | www.commodoreusa.net | $345 |
| PSU/Mobo/CPU/Cooler/GPU | Zotac Fusion ION‑ITX T Series | www.zotac.com | $199 |
| RAM | Corsair 8GB DDR3/1333 SODIMMs | www.corsair.com | $44 |
| ODD | Silverstone SST-S0-D02 | www.silverstonetek.com | $69 |
| HDD | Seagate Momentus XT 750GB | www.seagate.com | $155 |
| Miscellaneous | NZXT IU01 USB Expansion module | www.nzxt.com | $20 |
| | One Molex Y-power splitters | www.newegg.com | $1 |
| | Zalman Fan Mate 2 | www.zalman.com | $7 |
| Total Cost | | | $840 |
1. OPEN THE CASE
You’ll need to unscrew six screws along the perimeter of the C64x first (image A) . Then carefully remove the keyboard and place it aside. Now, find a cassette tape player and put in your favorite mix tape of Olivia Newton-John, Survivor, Joan Jett, the J. Geils Band, and the Human League. Yes, all the top artists of 1982.

2. REMOVE THE DRIVE TRAY
Unscrew the four screws under the C64x. Note: You will probably have to loosely hold the four nuts inside the case to get them loose. Once the screws are out, remove the tray and mount the 2.5-inch drive (image B) . The drive tray is countersunk to fit countersunk screws. Since Commodore USA doesn’t include these parts (when they say bare-bones, they mean it), we used four fine screws of the type that comes with a 5.25-inch optical drive to hold the drive in place. This will cause the tray to ride a little higher than it should, but don’t worry: The loosey-goosey build quality of the drive opening means the tray should still fit it. Mount the drive tray back in place and screw it into the case using the four screws and nuts.


