9. Shared folders
Finally, our favorite overlooked VirtualBox feature is “Shared Folders.” When we’ve had issues getting drag and drop to work, the easiest way to get files on and off a VM (other than logging into your Google account) is to use this feature. You simply specify a folder on your host system, and this becomes exposed on the guest as a folder, too.
At this point, you should be primed and ready to launch a perfect virtual machine (VM) guest. You just need an OS install ISO file—or do you? It turns out you don’t even have to do any of the work of installing operating systems these days—pre-built VM images are available, just waiting for you to download them.
In the past, we would have had to put in disclaimers about owning Windows licenses, but you don’t have to worry for testing—just head here and download a developer image of Windows. Fancy a more challenging operating system? Then Linux, in its many, many forms, can be snatched from here. Of course, you can still install from scratch, but you don’t really need to do that either, because TurnKeyLinux offers VM and ISO images of every important online service ready to run, from WordPress to OpenVPN.
Are you using Linux regularly on the side, or considering ditching Windows altogether? Check out our guide to playing Windows games in Linux to ensure you still have access to your full library.
Depending on the file, you need to do different things. An OVA file is a portable VM image; you import the “appliance” into VirtualBox via the “File > Import appliance” menu. A VDI file is a hard drive image—create your VM guest setting, and point the hard drive controller at this. Finally, ISO files are mounted as optical discs, and boot the VM ready to install and run.
As the VM guest first powers up, there is indeed a “BIOS”—hit F12 to enter this; really, it only offers boot device options. Depending on the OS and mode, if the VM captures the pointing device, you press right-Ctrl to swap back out. For Windows, MacOS, and Linux operating system guests, VirtualBox offers to install Guest Additions. Once up and running, you might need to select the “Devices > Insert Guest Additions CD” menu, and run this from within the VM guest. This installs extensions to the guest OS to enable extended features, such as shared clipboards, seamless mouse support, and on-the-fly resizing.
VirtualBox includes advanced snapshot controls over its drive images. Open the “Machine Tools” menu, and choose “Snapshots.” This enables you to manage your VM images. “Clone” should be clear enough—it creates a duplicate image of an existing VM. Snapshots, however, create a delta image of an existing state, so you’re able to revert back to the original snapshot at any point. Opening “File > Virtual Media Manager” enables you to see these in more detail, alongside being able to physically move them around your system, if you need to.
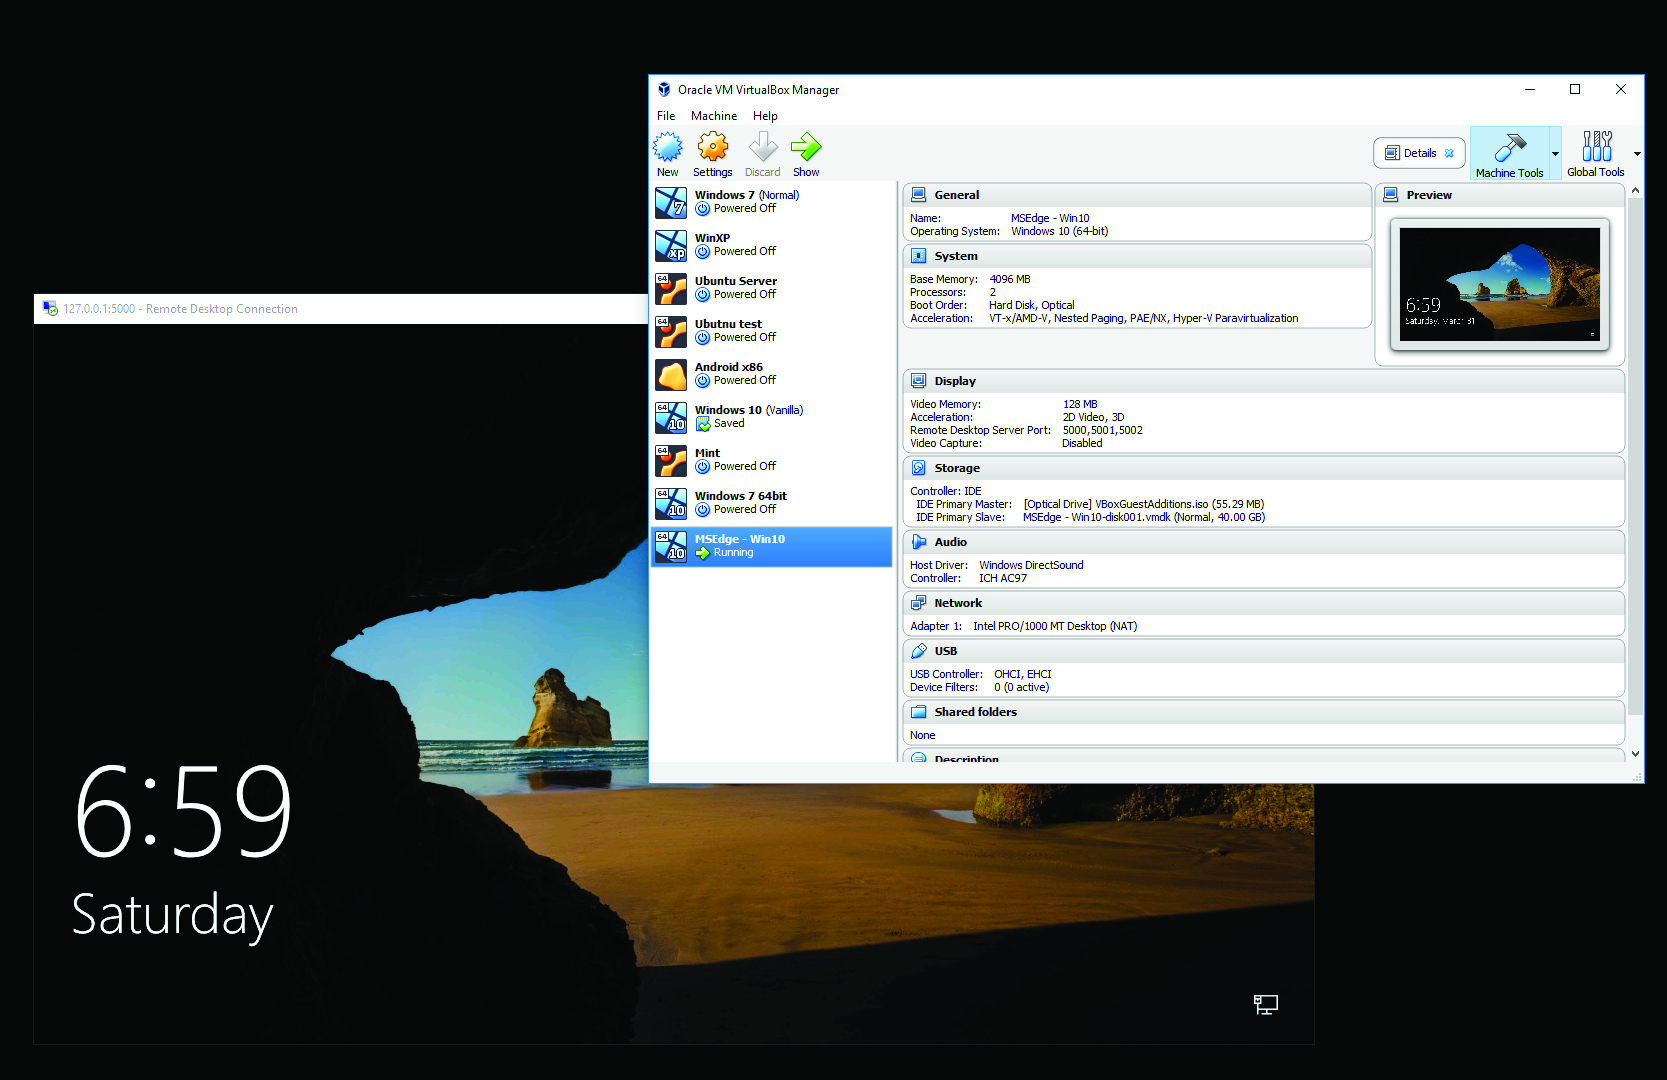
A very useful aspect of VirtualBox is its Remote Display Server—it enables multiple users to remotely log in via a Remote Desktop session, and control the VM—alongside its headless or detachable VM modes. This is a server that runs independently of the guest; you need to know the IP address of the PC VirtualBox is running on. To find this, in “Search” type “cmd” to open a command prompt. Type “ipconfig” and it’s the listed IPv4 address.
Keep up to date with the most important stories and the best deals, as picked by the PC Gamer team.

Hardware acceleration
For x86 processors (other processors, such as ARM, have their own technologies), there is a number of different hardware features that have been added over time to help accelerate virtualization of guests. It’s worth covering these, because they offer an insight into the work the virtual host is having to do.
Virtualization software largely has two options when it comes to running guest software faster: full virtualization or paravirtualization. The full option, as you might guess, requires the host to recreate every aspect of the virtualized hardware from the full instruction Really, these are two sides of the same coin. Emulation is used to describe full-system virtualization, which also includes the guest’s processor and all hardware. A VM created in VirtualBox will largely be using the same hardware as the host, so a lot of optimizations can be made that way.
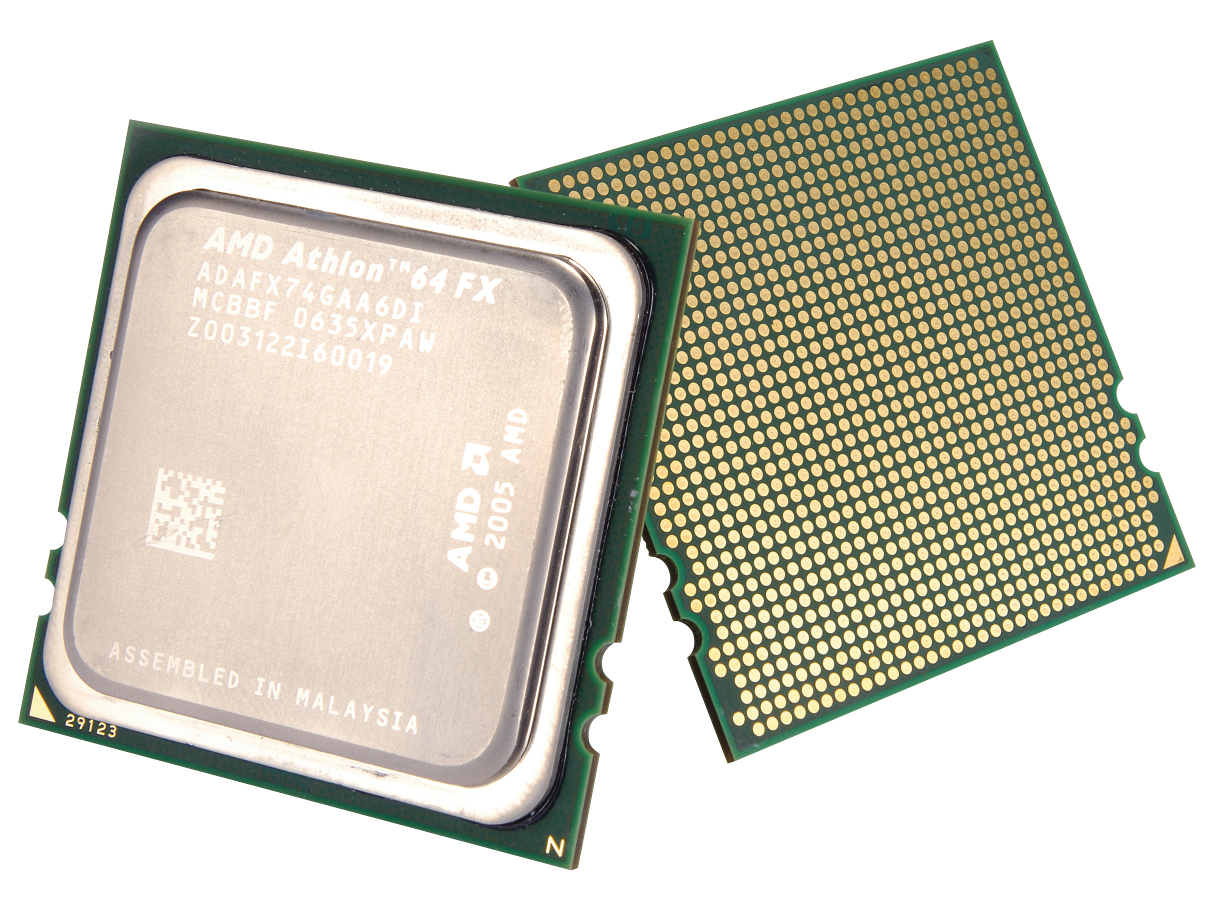
Usually with an emulator, the processor, graphics, and custom hardware controllers all have to be trapped and remapped to IBMPC hardware. Virtualization can also be done in different ways. You might have Making it happen fi rst: the Athlon 64 with its AMD-V hardware support. set, I/O operations/ devices, interrupts, and memory. For x86 code running on an x86 machine, instructions can largely be run directly, but any instructions or I/O access that violate the virtual machine have to be trapped and translated—this slows everything down.
To help speed up virtualization, AMD and Intel introduced a range of processor features. The initial ones, called Intel-x and AMD-V, provide instructions to rapidly switch the guest to a privilege state to run trapped calls. AMD also added Rapid Virtualization Indexing, followed by Intel EPT, that virtualize memory page-tables lookups. Benchmarks show these increase kernellevel performance two to fi ve fold, depending on the workload.
AMD-Vi and Intel VT-d provide an I/O memory management unit, also called PCI passthrough. It enables the guest OS to access real hardware seemingly directly, via a translation table on the host. Both processor and motherboard need to support the feature, and you may need to activate this in the BIOS.
Building on the I/O features, virtual interrupt support was added shortly after IOMMU; AMD, with its AVIC (Advanced Virtual Interrupt Controller), and Intel with its APICv. Both are designed to route virtual interrupts to the correct real CPU.
The latest development is on direct virtual graphics access. Intel has introduced GVT-d/g/s on the Iris Pro, and offers the potential for dedicated or shared VM access.
Virtualization vs. Emulation
Really, these are two sides of the same coin. Emulation is used to describe full-system virtualization, which also includes the guest’s processor and all hardware. A VM created in VirtualBox will largely be using the same hardware as the host, so a lot of optimizations can be made that way. Usually with an emulator, the processor, graphics, and custom hardware controllers all have to be trapped and remapped to IBMPC hardware.
Virtualization can also be done in different ways. You might have noticed (or possibly not) that Microsoft has been sucking up to Linux more and more in recent years. Not only is Microsoft using open source and Linux system internally (and admitting it)—it’s offering Linux in its own store, so you can run it on Windows—but it’s also bundling Linux distros for its Azure cloud service.
Part of the reason is that the Linux kernel has a virtualization system built in called KVM (no, not the monitor-sharing switch boxes). Bought by Linux powerhouse Red Hat years ago, KVM was mainlined into the Linux kernel back in 2007, and gives every release of Linux enterprise-level hypervisor capabilities at the lowest software level possible. Which is nice. It’s supported by every architecture of note, such as ARM, PowerPC, IBM S/390, x86(-64), and Itanium IA-64. Just to highlight its power, Amazon announced it would be switching from the proprietary Xen system to KVM to power its monstrous Amazon Web Services business.
Of course, snobby Linux types can point back to the chroot jail system being in place as far back as 1979 (14 years before Linux was created), but it was in Linux use around 1999. Chroot is a basic system that “CHanges ROOT,” root being the base OS folder. The chroot system enables Linux to run an OS-level application contained in its own software jail.
This system has recently spun out a series of innovations, such as containers and Docker, which build upon this base OS feature and have turned it into commercial applications for sharing, cloning, and reverting development and live environments.

A headless guest
To set up remote display, in the VirtualBox Display settings for the VM, click the “Remote Display” tab, and select “Enable Server.” It’s recommended that you change the default port—the port is how TCP-based programs connect to specific network services. Oracle recommends between 5000 and 5050, so let’s say 5000.
Type “RDP” in “Search” on another Windows PC on the same network, and open Remote Desktop Connection. In the “Computer” box, type “:5000” and click “Connect.” If you’re on the same PC and want to test, use “127.0.0.1:5000”—the local loopback address. From a command prompt, you can type “mstsc -v :5000” and get the same result. Headless mode can be launched from the GUI by clicking the down arrow next to “Start.” It launches the VM without a window, just for remote access.

Dedicated server
A fantastic use for a virtual machine is running a development system. Snapshots enable you to play with a guest VM, and rewind all your changes. As an example, we’ll explain how to run a Turnkey dedicated WordPress server. This enables you to run your own full-fledged local WordPress server, and do whatever you like to it.
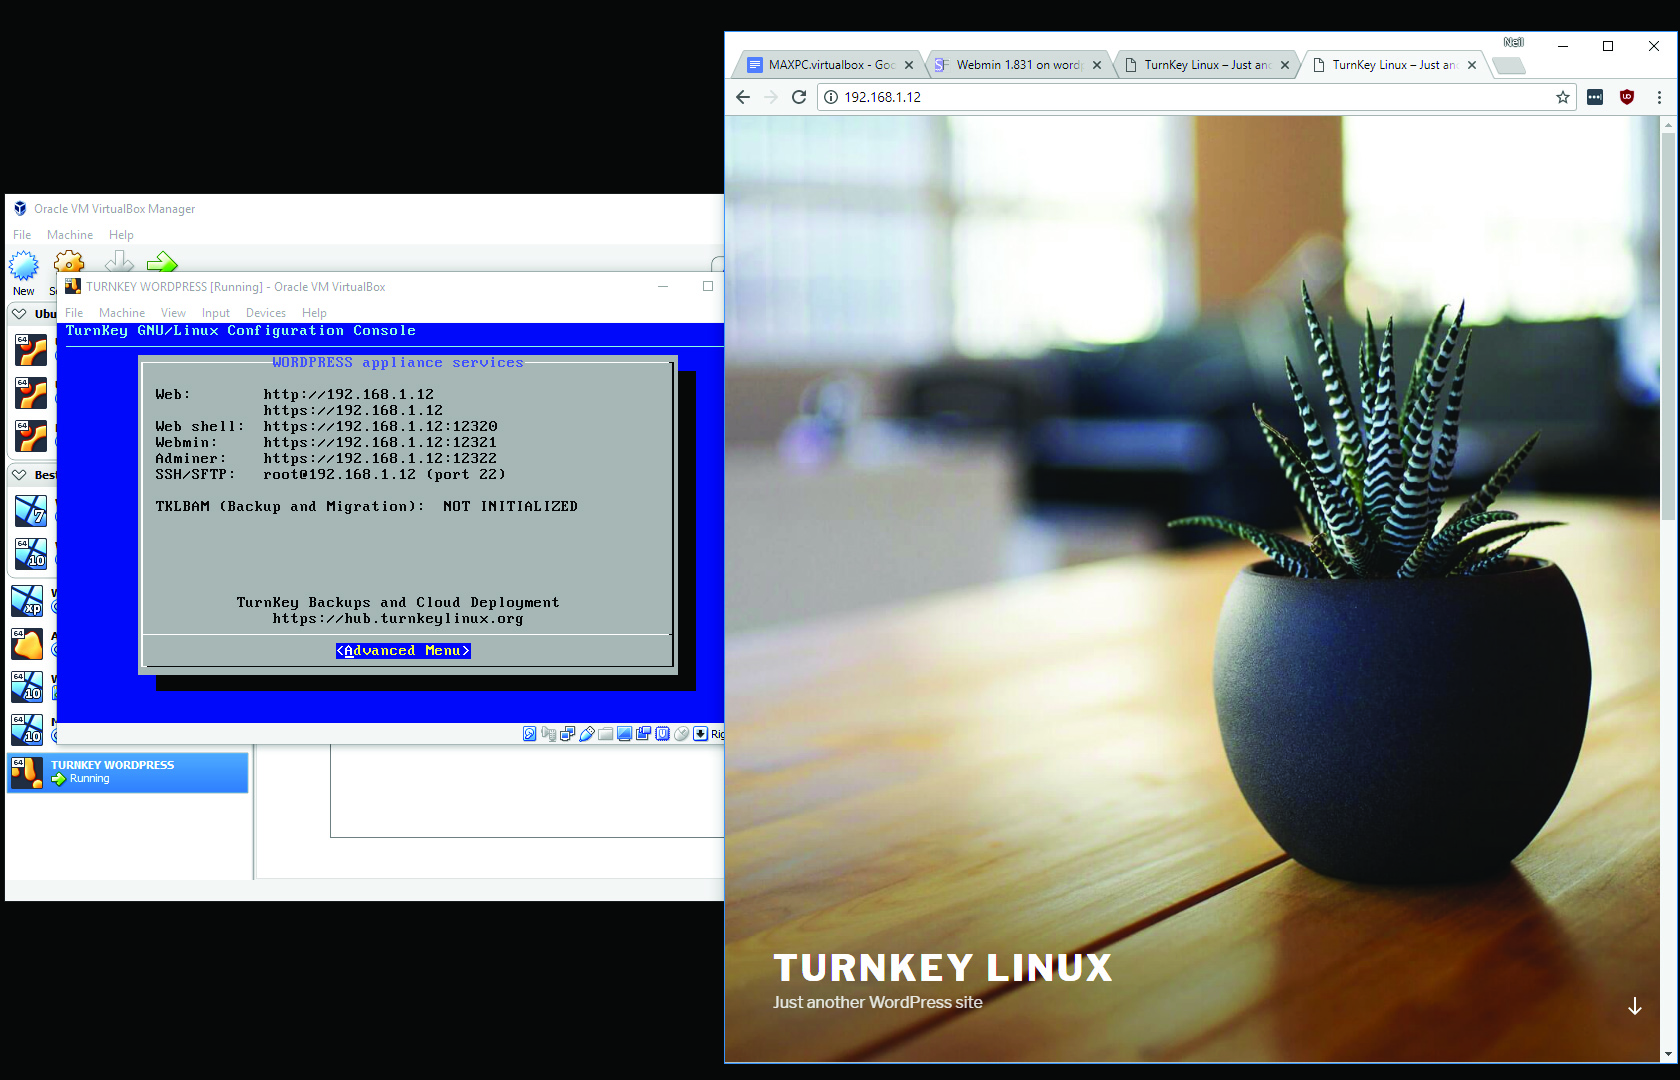
Head here and grab the VM .ova file—it’s a reasonably light 304MB. Use the VirtualBox “File > Import Appliance” menu. Peruse the default settings—they should be fine—and click “Import.” You might want to click “Settings > Network,” and ensure Bridge mode is selected—it should be. Fire up the VM; it asks you to set root, MySQL, and WordPress passwords. As this is just for fun, “Passw0rd!” works well. You may want to skip the next options, as we’re not fussed about security updates, since we’re just running this locally as an example.
Keep an eye on the VirtualBox display, as it will show the local IP address when the WordPress server is up and running. Tap this IP address into your browser’s address bar, and the template Turnkey WordPress website appears. There’s instructions on how to log into the WordPress admin, and you set the password earlier, remember? It’s also worth trying the Webmin interface you’ll need to use: https://:12321. Use root as the admin name, and again the password you set earlier.
Malware machine
A good use of a virtual machine is to test suspect software. A complete setup would include a virtualized network, with any number of victim guest VMs, alongside a virtual gateway VM, enabling it all to be isolated from the real Internet. This would enable you to infect a guest, and get a full analysis of who/what it tries to contact on the real Internet, along with any additional network and local PC activity.
This type of work is beyond this feature, but you could use a VM to download suspect files, run them, and monitor what they get up to locally. Simply wipe the guest VM once you’re done via the snapshot system. Just be aware that certain advanced malware can attack local systems through multiple networked vectors, so isolate the VM during testing by disconnecting its network capabilities.
Be aware that as malware has become more advanced, VMs have become vulnerable to attack. A small number of vulnerabilities have been discovered with VirtualBox that enable an attacker within a guest VM to break out of the hypervisor and attack the host. Such exploits are rare but do happen, so keep your system and VirtualBox up to date. Restrict network access with a properly configured firewall, run VirtualBox as a regular user, and monitor network and system activity.
This article was originally published in Maximum PC's June issue. For more quality articles about all things PC hardware, you can subscribe to Maximum PC now.

