How to set up RAID 1 for Windows and Linux
Drives can die at any time. Protect your data.
Linux: mdadm and Disks
Creating a software RAID 1 array in Linux takes all of two terminal commands. In Linux, the program mdadm (we like to pronounce it "madam"), is what we’ll use to set up the array.
First things first: You need to get the RAID software. You’ll need to download and install mdadm from your software repository. It’s pretty common, and is included in most software repos. In Ubuntu, type the following command:
sudo apt-get install mdadm
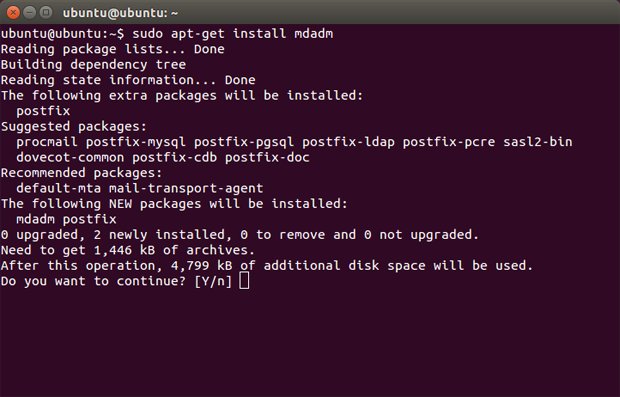
Unless you're planning on running an email server, don't worry about installing all of the extras for Postfix.
The command will install mdadm for you, along with a dependency called Postfix. Postfix is a SMTP service that sends email. Postfix is included so that if a drive fails or something else happens to your array, the system can alert you with an email. That’s great for IT administrators, but Postfix can be a bit of a bear to set up, so you can just set the program to use no configuration if you like.
Once mdadm is all set up, all you need to do is use the following command:
sudo mdadm --create /dev/md X --level=1 --raid-devices=[ number of drives ] [ drive name ] [ drive name ] [ etc ]
Keep up to date with the most important stories and the best deals, as picked by the PC Gamer team.
The above command will vary based on the size of your array, and how you’d like to name it. RAID devices are generally named /dev/mdX where X is the index of the array. If you only have one array, it's a good idea to use 0 or 1 . Drive names can be any valid Linux device path. Common examples use /dev/sda or /dev/disk/by-uuid/[UUID] . Once you create your array, you’ll have to wait while the drives synchronize, which may take several minutes.
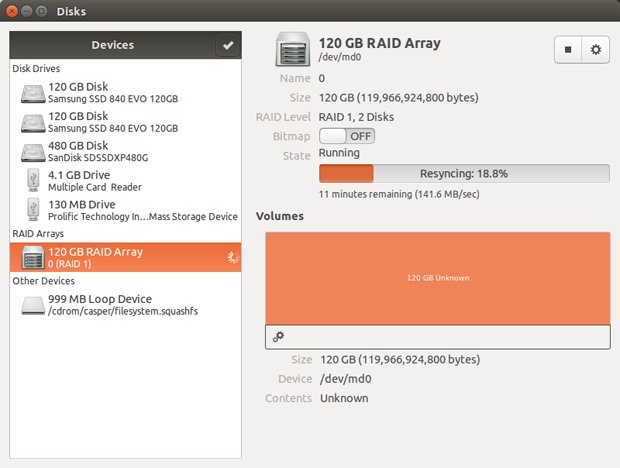
GNOME's Disks application (gnome-disk-utility) will display information about your RIAD array once it's created.
If you’re not sure how Linux has identified your drives, you can use lsblk to identify them:
lsblk -o name,model,mountpoint,size

The command lsblk will show you the drives and storage devices you have connected to your system, and what device names Linux has assigned to them. The drives we used for our RAID array are outlined in red.
You can also create RAID arrays in Linux using the GNOME disk utility. In Ubuntu, search for "Disks" and open the utility. On the left side of the window, click the checkbox above the list of drives. Then, select the drives you want to use to create an array and click Create RAID .
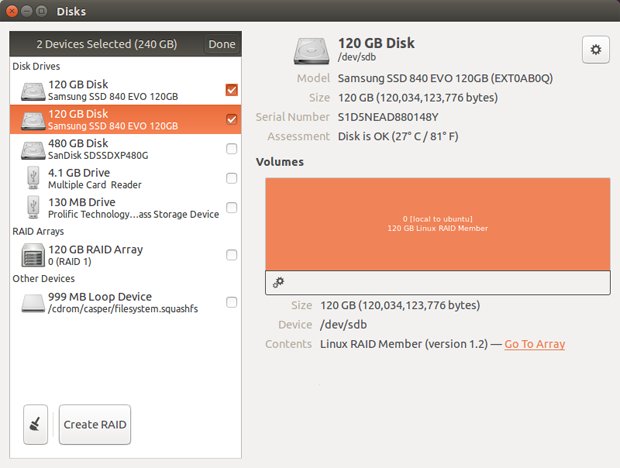
While it's faster to create a RAID array from the terminal, you can create RAID arrays from GNOME's Disks application as well.
Software RAID 1 offers an advantage to Linux users who set up an array with mdadm : If you read more than one file at once, each drive can fetch a separate file, giving a net boost to read operations. The caveat is that this boost will only really show up in multi-threaded applications like web servers, and won’t apply to most desktop use cases. Still, it’s a nice perk for Linux users.
Using onboard FakeRAID
Onboard FakeRAID is harder to set up, but is your only real choice if you want your RAID array to be accessible to both Windows and Linux. You can also install an OS on top of a FakeRAID array. However, if you're only planning on using the RAID array from one OS, you're better off using the OS-based software solutions described above.
Once your drives are physically installed, boot into your BIOS by tapping the key prompted on startup. The message will say "Press DEL to enter Setup…" or something similar.
Once you’re in your BIOS, look for an option called "SATA mode." This option is in different places for each motherboard manufacturer, so refer to your user manual if you can’t find it. Once you’ve found the setting, change the setting from AHCI to RAID. This will let your onboard RAID software know that there are possible RAID devices to be started. When you’re done, save and reboot.
If you're trying to enable FakeRAID with Windows already installed, Windows won't like that the SATA mode has changed. The OS will get grumpy and prompt you to reinstall Windows. You can, however, get around Windows' termpermental nature with a few steps. If you already changed the mode from AHCI to RAID and got the error, boot into the BIOS and change it back to AHCI. From inside Windows, open a command line using cmd and type in the following:
bcdedit /set {current} safeboot minimal
Then, reboot back into the BIOS and make the change. Once you've booted back into Windows, open up a command line again and type the following:
bcdedit /deletevalue {current} safeboot
Reboot once again, and Windows should be satiated.
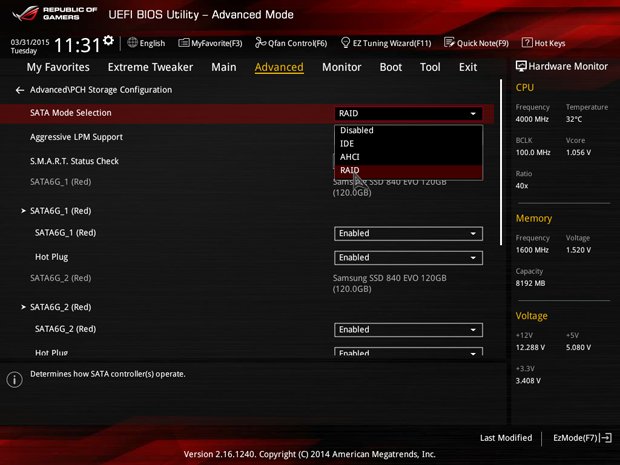
In your BIOS, change the SATA mode from AHCI to RAID. Every BIOS is different, so the option may not appear as it does here.
On the next boot, you have to get into the RAID software to set up your arrays. If you have an Intel RAID controller, you should be prompted to hit CTRL+I to start the Intel Rapid Storage Technology (RST) RAID software. The software varies by vendor, so consult your motherboard manual on entering the RAID utility.
In Intel’s RST menu, you should see some options and a list of hard drives on your system. Select "Create RAID Volume."
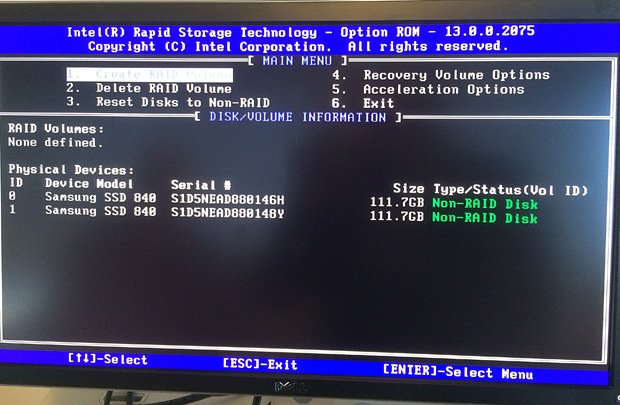
When you first start Intel RST, you disks will all be Non-RAID Disks.
On the next screen, give the RAID array a name and hit Enter. In the next field, use the up and down arrow keys to select the RAID level labeled "RAID 1 (Mirror)" and hit Enter again.
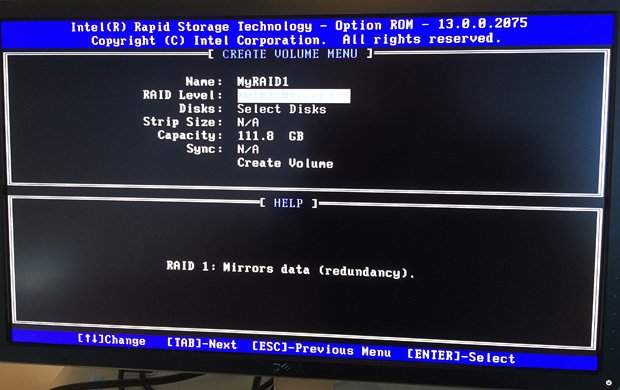
When creating your array, select "RAID1 (Mirror)."
Hit Enter again to create the volume. Confirm that you’re OK with wiping everything off the disks in your array by typing Y .
Back on the home screen, you'll see a RAID volume, with the status of the disks used in the array changed from "Non-RAID disk" to "Member Disk." Use the down arrow to select Exit to save and exit the software.
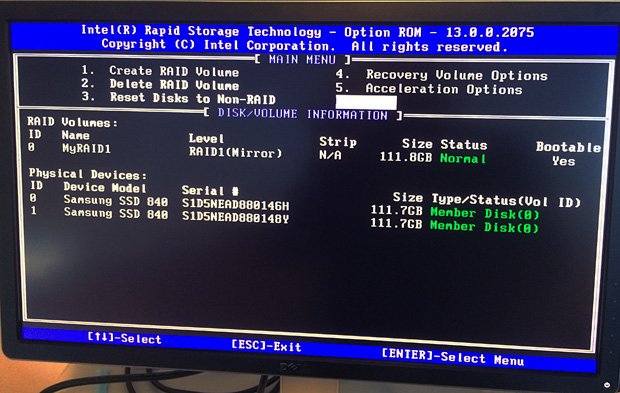
After creating your array, you'll see the array name and the disks listed as "Member."
On the next boot, your FakeRAID array will appear as a single disk to the operating system. Additionally, RST will display the status of your RAID disks during the boot process, before the operating system loads.
While RAID 1 isn’t a replacement for a backup, it is an excellent addition to any data resilience strategy.

