How To Set Up a RAID 5 Array in Windows 8 and Linux
Linux: mdadm and disks
Creating a software RAID 5 array in Linux takes only two terminal commands. In Linux, the program mdadm (we like to pronounce it “madam”) is what we’ll use to set up the array.
First things first, you need to get the RAID software. You’ll need to download and install mdadm from your software repository. It’s pretty common, and is included in most software repos. In Ubuntu, type the following command:
sudo apt-get install mdadm
The command will install mdadm for you, along with a dependency called Postfix. Postfix is an SMTP service that sends emails. The reason it’s included is because if a drive fails or something else happens to your array, the system can alert you with an email. That’s great for IT administrators, but Postfix is a PITA to administer. In many cases, you can just set the program to use no configuration if you like. If you do take the time to set it up, it can give you early warning when drives fail.
Once mdadm is all set up, all you need to do is use the following command:
sudo mdadm --create /dev/mdX --level=5 --raid-devices=[number of drives (3 or more)] [drive name] [drive name] [drive name] [etc]
The above command will vary based on the size of your array, and how you’d like to name it. RAID devices are generally named /dev/md X where X is the index of the array. Drive names can be any valid Linux device path, e.g., /dev/sda or /dev/disk/by-uuid/[UUID] .
The biggest gaming news, reviews and hardware deals
Keep up to date with the most important stories and the best deals, as picked by the PC Gamer team.
If you’re not sure how Linux has identified your drives, you can use lsblk to identify them:
lsblk -o name,model,mountpoint,size
Once you create your array, you’ll have to wait while the drives synchronize, which may take several minutes.

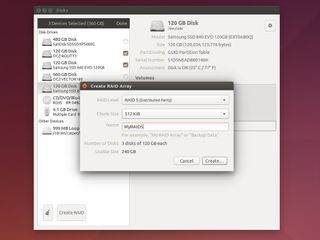
The Disks utility is an easy-to-use GUI that allows you to create RAID arrays out of disks and partitions.
You can also create RAID arrays in Linux using the GNOME disk utility. In Ubuntu, search for “Disks” and open the utility. On the left side of the window, click the checkbox above the list of drives. Then, select the drives you want to use to create an array and click Create RAID .
Using onboard FakeRAID
Onboard FakeRAID is harder to set up, but is your only real choice if you want your RAID array to be accessible to both Windows and Linux. You can also install an OS on top of a FakeRAID array.
Once your drives are physically installed, boot into your BIOS by tapping the key prompted on startup. The message will say “Press DEL to enter Setup…” or something similar.
Once you’re in your BIOS, look for an option called “SATA mode.” This option is in different places for each motherboard manufacturer, so refer to your user manual if you can’t find it. Once you’ve found the setting, change it from AHCI to RAID. This will let your onboard RAID software know that there are possible RAID devices to be started. When you’re done, save and reboot.
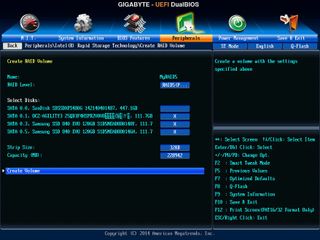
On the next boot, you have to get into the RAID software to set up your arrays. If you have an Intel RAID controller, you may be prompted to hit CTRL+I to start the Intel Rapid Storage Technology (RST) RAID software. The software varies by vendor, so consult your motherboard manual on entering the RAID utility. In this example, Gigabyte's implementation let us use the RST tools from inside the UEFI BIOS utility.
In Intel’s RST menu, you should see some options and a list of hard drives on your system. Select “Create RAID Volume.” Give your volume a name and select "RAID5 (Parity)" as the RAID level.

The Gigabyte motherboard we used allowed us to access Intel RST from inside the UEFI BIOS utility. Each motherboard manufacturer will do things differently. Consult your user manual to figure out how to access Intel RST.
Next, select the drives you want to include in your array. Other RST implementations may have you select drives first. Make sure that the drives you select are the correct ones; you'll lose any data saved on the drives that you use in a FakeRAID array.
On the next boot, your FakeRAID array will appear as a single disk to the operating system. Additionally, RST may display the status of your RAID disks during the boot process, before the operating system loads.
RAID 5 is a bit different and a little more complex than RAID 1 or 0, but it offers a compromise between the two extremes. This special RAID level will give you some wiggle room, just be sure not to ignore a drive failure. If all the drives are identical and one goes down, others may soon follow.
UPDATE: We got in contact with a software enginer who writes drivers for storage devices. He told us RAID 5 can wear out SSDs faster than normal, so we added the section "A note about RAID 5 and SSDs" with an explanation why.
Most Popular


