We’ve all had friends or been the friend that switches realms for one reason or another—raiding, joining or fleeing now-bygone PvP realms, and the like. The ability to do cross-realm content has helped players stay connected for years, but group planning relied on external sources for communication and planning. Communities, one of the highlighted features debuted in the Battle for Azeroth pre-patch, blends the familiar functionality of in-game Guilds and the Blizzard Groups feature found on the Blizzard Battle.net Desktop Application.
Creating a Community
Open the Guilds and Communities dashboard (default J) At the top you will see the guild your character is in. Warcraft communities will appear below the guild tab and have a gold border around the icon. You can also access Blizzard Groups from within the game. They will have a light blue border around the channel icon. Blizzard Groups allow you to connect to players from other Blizzard or Activision titles available on the Blizzard Battle.net Desktop Application.
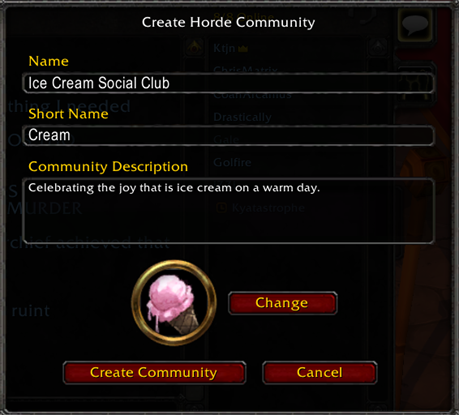
At the bottom is a big green plus sign, inviting you to join or create a new community. Clicking that will bring up the option to create a World of Warcraft Community or Blizzard Group. Enter the desired name of the Community, pick a short name that will appear in the main chat window, which can be up to six letters in length, followed by adding a description of what the community is about—raiding, mythic plus, pet battling, achievement runs, etc.
Joining a Community
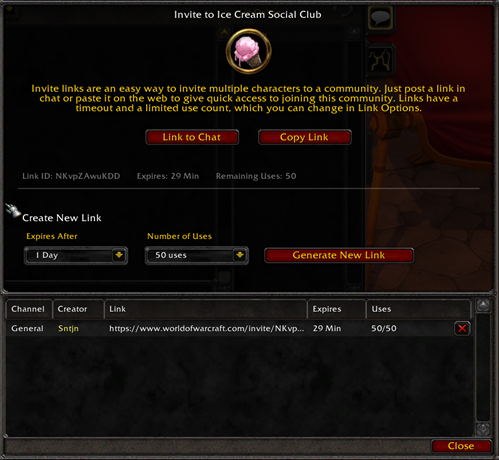
There are a few ways to be invited to a community. You can be invited directly by character name from someone in the Community. Alternatively, you can copy and paste the invitation code from the unique website link created for the group. These links can be made to expire after 1 use or 1 day up to unlimited uses and never expiring. You can also join a community by clicking on a direct link in chat. Warcraft communities are character and faction specific—you must add each character you want to be in that community individually.
Creating channels
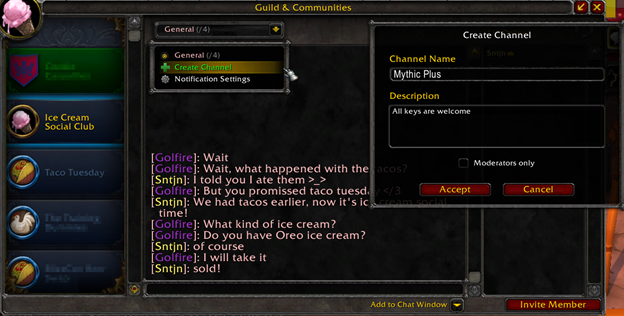
One major improvement to guild and thus community functionality is the ability to create multiple channels for specific use. Click the dropdown above the General chat pane, click Create Channel, enter the name and an optional description of the channel. Notifications for each channel can be managed separately. You can also add each channel to the main chat window or any additional window you may have in use. Chat persists after you log out, so you won’t miss a beat when you return.
Integrated voice chat
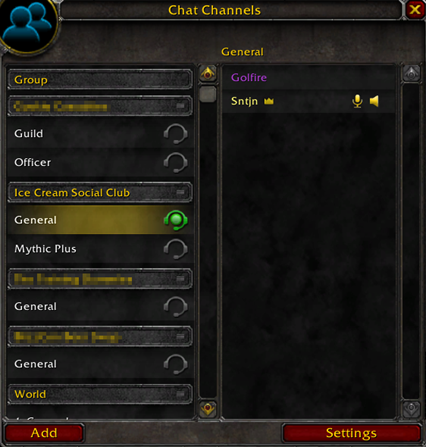
Communities have the ability to use voice communications within the game. Before, it was required to create/enter voice chat though the desktop application. Open the Chat Channels dashboard (default T) Click Setting to set up your preferred speakers and microphone. Once your settings are in order, simply click the grey headset icon on the Chat Channels screen. Once connected, the headset icon will turn green. You can also mute and deafen voice chat from this screen. Each channel in the community will also have separate voice channels, so multiple groups can use voice channels simultaneously.
Keep up to date with the most important stories and the best deals, as picked by the PC Gamer team.
