Build It: Caged Power
Step 1 – Hot Stuff
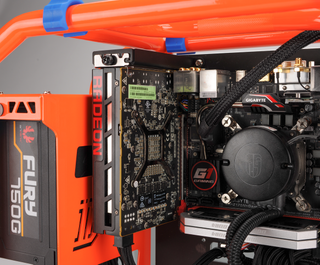
The Radeon R9 Nano a quite the powerful GPU, given its tiny form factor. However, we noticed that this card got pretty toasty when we ran our graphics benchmarks. While normal closed cases could solve this by channeling a lot of air through the case, we were low on options because there was no way to effectively push extra air over the card. The air coming from our CPU radiator was nice and cool, but the slight offset of the motherboard meant that the Nano wouldn’t get any of those cool breezes. Placing the “front” glass panel on the case helped a little bit, but at the end of the day, the Nano breathes best with a little extra air flow from a case fan.
If we were to redesign the case, we’d like to see an extra removable bracket for a case fan, just below the GPU mount. This would allow extra-toasty GPUs that would usually have more forced air to stay a bit cooler under load.
Step 2 – Side Mounted
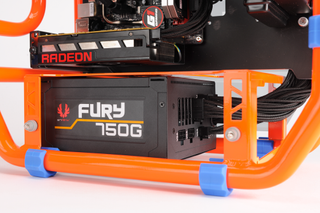
The PSU is the heaviest component in nearly any build, so mounting it on the side of the case might seem counter-intuitive. Not so, with the D-Frame. The PSU happily occupies a bracket on the side of the cage, but doesn’t make the cage feel off-balance. Since mini-ITX builds will rarely see high-wattage PSUs, extra support for a potential 1600W monster wasn’t warranted here. In this photo, we show the cage positioned with the PSU on the bottom.
To make things a little neater, we went with individually sheathed cables, which are easier to manipulate. These cables can also be used with cable combs for an ultra-clean look, though we just went with trusty zip ties. Routing the cables was a bit tricky with a smooth aluminum plate instead of a motherboard tray rife with cable-management tie loops. Luckily, the cage came with a few accessories that helped out with wrangling the cables.
Like we’d recommend for most mini-ITX builds, we used a modular power supply, so there’s no need to stash unused cables. That’s a big deal in a case where there are no hiding places for your cabling. The glass on this cage is tinted, so black cables don't exactly advertise their presence on the back side. If you prefer white or other bright-colored cables, be prepared to get creative to keep them neat. The tinting only hides so much.
Step 3 – USB 3.0 Woes
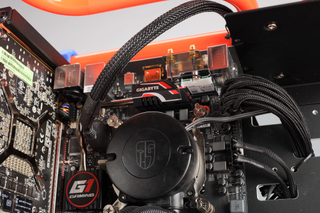
If there was one beef we had with this motherboard, it was the positioning of the USB 3.0 front panel connection. At first glance, it didn’t look so bad, but after you figure in the presence of a GPU, it became clear that there was no sexy, clean way to attach the cable.
To the left, you have the R9 Nano, and routing under the GPU between the PCIe slot and the “back” panel was too tight of a squeeze. If we came from below, we’d have to let the cable cross over both the memory and CPU. That just wouldn’t do. We decided to run the cable over the “top,” which routes it over a pair of USB ports and the Wi-Fi antenna connectors. The result was the best of a bunch of less-than-ideal options. There really wasn’t an attractive way to do this.
PC Gamer Newsletter
Sign up to get the best content of the week, and great gaming deals, as picked by the editors.
If there’s an upside to this, it’s that the USB cable is braided, which makes it at least look good, even if it is in the way.
Then again, some may like the appearance of a cable or two jutting out of the mobo, giving it a bit of a cybernetic look. We won’t judge.
Step 4 – Silent Storage
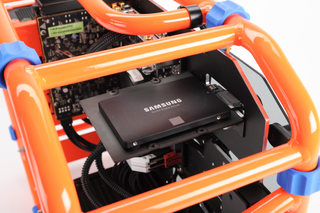
With the recent release of the 2TB Samsung 850 EVO, we thought that it would be the perfect storage solution for a mini-ITX build. Having two whole terabytes available on an SSD is pricey (even at $620, this SSD is still a luxury item), but it has its advantages: It eliminates the need for having a small HDD for Steam games or media files, and it means that there’s one less moving part to fail from frequent moves to and from LAN parties or events.
It also means that the machine will be a little quieter.
In a cage-type case, it’s easy to forget that an enclosed case muffles sounds of fans, and hard drives searching for, reading, and writing data. The high-speed clicks of the hard drive disappear when using an SSD, leaving only the CPU cooler and GPU as noise sources.
Another thing we noticed was the black finish on the 850 EVO is very similar to the finish of the aluminum mount of the D-Frame. This makes the slim little SSD seem to disappear, until you look from the top and see the Samsung label on its face. The one downside to this mount was that the drive is just a little too far from the edge of the plate (about two or three millimeters), which made it a little hairy when we tried using an L-shaped SATA cable.
Step 5 – Dominating the Cage
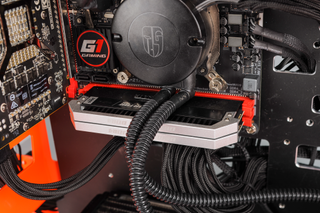
When we went looking for memory to put in the build, we wanted to go big on the capacity. As we looked, we noticed that most of our DDR4 kits come are 16GB, but in 4x4GB kits. Bummer.
As we searched and searched, we remembered: We had a machine sitting in our lab that could donate a few sticks for our purposes. We grabbed two 8GB stick of Corsair Dominator RAM from our 2015 Dream Machine, and pressed them into service in this build.
The 2,666MHz sticks are plenty fast, and didn’t give us any problems at boot. However, just as with most X99 systems, our Z170 board from Gigabyte defaulted to setting the RAM clocks at 2,133MHz. The problem was quickly solved by upping the multiplier for the RAM clock, granting us our desired 2,666MHz.
Leaving the RAM at 2,133MHz wouldn’t have hurt performance much since RAM clocks are rarely a bottleneck these days. In other mini-ITX builds, going with 2,133MHz DDR4 RAM modules would be just fine in most cases, and you’ll save a little coin by forgoing higher RAM clocks.
Step 6 – One Cool Cage
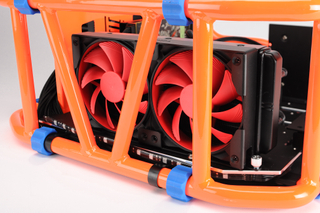
One of the neat things about this build was the way the cage accommodated our cooling solution. The cage comes with a bracket for a 240mm closed-loop cooler, which sits out of the way at the “bottom” of the cage.
We were able to get our Deepcool Maelstrom 240 snugly situated in the bracket, with nary a screw to secure it in place. Other coolers might not simply stay put with friction alone, so the eight screw holes can be used to secure fans to the bracket for a more secure fit.
The Deepcool cooler was our backup choice in this build, though. We tried using another, bigger cooler, but for some reason it wouldn’t have good enough contact with our CPU, which resulted in some problems booting. The larger cooler did fit on—not in—the bracket when we flipped it upside down, though.
The one main gripe we had about using a 240mm cooler with this mobo was the lack of PWN pinouts. The motherboard offers two pinouts: CPU and a case fan. Both pinouts are four-pin, but the lack of a CPU_OPT or second case fan pinout meant that we had to do something to get three PWM connectors (two fans and one pump) fit on two pinouts.
Most Popular


