20 Essential Tricks and Skills Every BitTorrent User Should Know
Open Up Access Through Your Router and Firewall
Don't despair if you can't seem to connect to any seeders or peers, or if your downloads always trudge along at a snail's pace even when there are a ton of seeders. You probably just need to configure port forwarding for your uTorrent client, or whatever BitTorrent client you're using.
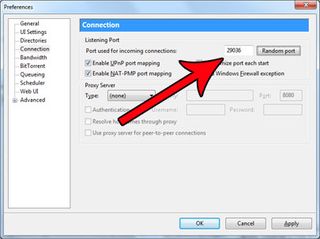
In a nutshell, port forwarding is a way for your router to forward IP addresses from an external location -- in this case, seeders and peers -- to an internal address, which is your PC. To find out which port uTorrent is trying to use, click on Options>Preferences>Connection. Make sure that both the 'Enable UPnP port mapping' and 'Enable NAT-PMP port mapping' checkboxes are marked. While you're in there, you can also check 'Add Windows firewall exception,' or we can do this manually later. Take note of the number next to the 'Random Port' button.
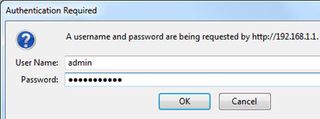
Now that you know the port number, it's time to configure your router. Access your router's administrative controls by firing up your Web browser and typing 192.167.1.1 into the address bar and hit enter.You'll be prompted for your username and password, which will vary depending on your router make and model. Try typing admin in both fields, or leaving the password field blank. If that doesn't work, you'll need to consult your router's manual or online support site for specific instructions.
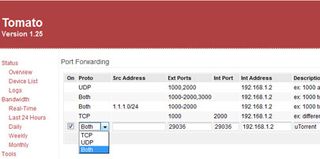
You should now be in your router's control panel. We're using the customized Tomato firmware for our Linksys router, so yours will probably look different than our screen grab above. If you're using a Linksys router, click on Applications & Gaming>Port Range Forward (once again, if you're using a different router, consult your documentation on how to find the port forwarding section). Choose a blank row and type uTorrent in the Application field. Type the port number number you recorded earlier in both the Start and End fields. Change the protocol to Both (TCP and UDP), and be sure to check the Enable box. Save and exit.
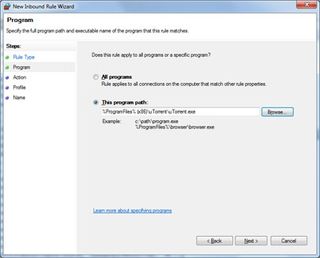
Slow or non-existent connections could also mean your firewall is blocking access. To manually create an exception for uTorrent, click on the Start menu and type in Firewall. Click on Action and select New Rule, which will bring up the New Rule Wizard. Select Program as the Rule Type and hit Next, then click the Browse button to find and enter the path to your uTorrent client ( C:\Program Files (x86)\uTorrent \uTorrent.exe by default). Keep the default settings as you click through the Wizard.
Set Bandwidth Limits and Maintain a Reasonable Ratio
Left unchecked, uTorrent and every other BitTorrent client will consume all the bandwidth it can and bog down your Internet connection in the process. That's okay if you're heading off to bed, but during the day, you'll feel as though you traveled back in time to the days of dial-up.To prevent this happening, we need to set bandwidth limits.
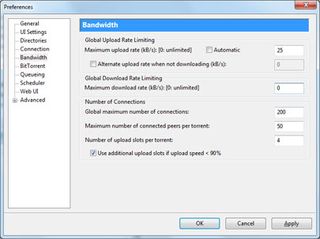
Select Preferences from the Options menu, or press CTRL+P, and then click on Bandwidth. Everything is laid out pretty logically, so it's just a matter of filling in the blanks. Uploads and downloads are measured in kilobytes per second (kB/s), and if you want to leave these at unlimited, choose 0. Otherwise, set limits that work for your Internet connection.
PC Gamer Newsletter
Sign up to get the best content of the week, and great gaming deals, as picked by the editors.

To help take into account overhead, we recommend measuring your real-world broadband speed at SpeedTest.net. Use your SpeedTest results to help determine how much bandwidth you want to fork over to BitTorrent.
You may be tempted to allocate very little upload bandwidth to BitTorrent, but this isn't necessarily a good idea. Remember how your mother always told you it's better to give than it is to receive? The same concept applies to BitTorrent, at least in part. The whole concept of BitTorrent is built around the idea that everyone shares and you should strive to upload as much as you download.
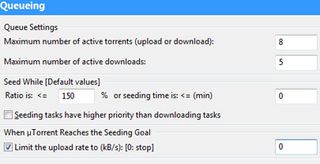
Rather than constantly keep an eye on your share ratio, you can configure uTorrent to automatically adjust the amount of bandwidth to allocate to a file once a set ratio has been met. To do this, go back into Preferences and click on Queuing. In the Seed While section, set whatever ratio you're comfortable with. Check the 'Limit the upload rate to' box and choose 0 if you want to stop seeding once you've reached your goal.
Most Popular

