Backing up is the single most boring subject on the face of the planet. Think watching paint dry crossed with 24 hours of Canadian curling in slow motion. Keep reading, though, because it’s also quite possibly the single most important task you can do on your PC (well, right behind ensuring all your passwords are robust).
So, how can we make backing up more appealing? The usual answer would be to add a little gamification, but as we’re not app writers, that’s not going to happen. Our next best answer is to make it easy, quick, and as close to being invisible as possible.
Part of the problem is that there’s no immediate pay-off for using your valuable time to set up a backup regime. It’s like dealing with climate change, the national debt, or car insurance: It’s someone else’s problem, isn’t it? Until you total your automobile, or China wants its yuan back, or you’re up to your ankles in flood water, or are having trouble finding somewhere to go skiing.
With a tiny bit of planning, backups can be made super-easy today. High-speed wireless, abundant storage, and access to free cloud storage options ensure you’re able to back up your data in smart ways that protect your vital personal finances, documents, photos, and whatever else you’d like.
So, take 15 minutes out of your day and see how easy it can be. We’ll offer up solutions from Microsoft, the best open-source options, and expand our search to full-system images, along with wider cloud options that can help you back up all types of media, often for free, and usually with little work involved.

Backing up basics
What is best in life? Obviously to crush your enemies and see them driven before you. That’s nice and all, but Conan never experienced the sweet, sweet feeling of restoring a lost file from a well-planned backup.
There’s a key adjective in there: planned. If you want to do backup well, it’s best to plan a little, and there are two main areas you need to concentrate on: the source and the destination.
PC Gamer Newsletter
Sign up to get the best content of the week, and great gaming deals, as picked by the editors.
Let’s start with the source. What on your computer is important to you? If your PC spontaneously combusted and melted into a pool of expensive steel and plastic, which files on there would be irreplaceable? You should probably plan to have these backed up. There are two main approaches: a brute-force entire-drive system image, or a more nuanced selective backup.
We’re going to steer you away from system imaging, though we’ll cover it later for completeness. The way we use operating systems, alongside changes in technology, have made system images less useful for personal backup. It’s partly to do with deciding what is essential to back up. System software isn’t essential, because it can be replaced. General software, too. Your Steam collection doesn’t count either, because it can be downloaded again. See how it works?
Photos of your newborn child, your financial documents, that video of Zak taking a tumble off his mountain bike, and anything you’d classify as work will likely be on your hit list of irreplaceable files.
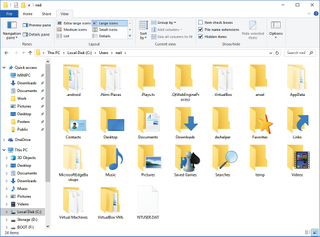
Before you can back these up in any sensible way, though, you need to know where they’re all stored. That’s why, way back, Microsoft introduced the (My) Documents folder to store everything, and continued to expand this with relevant sibling folders, such as Pictures, Music, and so on. The idea being that everything that’s important to you can be found in one of just a few folders.

The dirty reality is that all of these default system folders are stored in the user’s main system folder, typically under C:/Users/, alongside the Desktop contents, temp folder, any random program folders, and additional program settings under the hidden AppData folder. Typically, any default backup regime will save the entire folder for an individual user. If you’re storing files elsewhere, you’ll need to manually add these to your backup. Speaking of which…
Windows 8 (and onward) Backup uses the File History system, which is pretty neat, but isn’t the smartest-looking thing to set up. It requires an external drive or network share to function—we’ll get on to destination options shortly. Open the Start menu, type “Backup,” and select “Backup Settings.”
If it’s not configured, there will be a “+” symbol asking you to add a drive; once a drive has been added, this changes to a simple on/off toggle. The grown-up settings can be found in the traditional “Control Panel > System and Security > File History.” If you want to add a network share, do it through “System and Security > File History > Select Drive > Add Network Location.”
With a drive added, click “More Options.” You can instigate a backup immediately here, and choose how often to perform the backup, and how long to keep it. Plus, you’re able to remove any unwanted folders—as discussed, these are largely the contents of C:/Users/. Do you really want to include Downloads or everything that’s on your Desktop?
The neat trick with File History is that once it’s up and running, you’re able to right-click any file, select “Properties > Previous Versions,” and restore past versions that have been backed up. It’s like System Restore, but for files. To do mass restores or rollbacks, open the Start menu, type “Restore your files,” and open the Control Panel setting. Just select the folder or files you’d like to restore, and off you go!

Alternate options
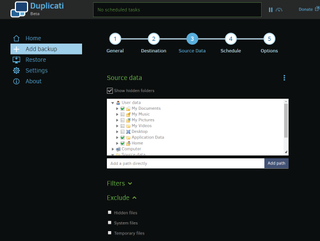
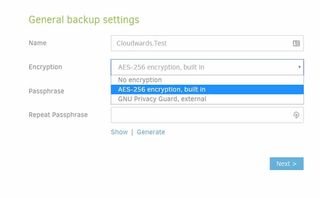
Of course, if you find the default Windows system too basic or unappealing in general, the world of software has a host of other options you can choose from. We’re going to suggest two worth your time. The first is Duplicati. This is a fine upstanding LGPL-licensed open source, cross-platform straight backup application, which supports a wide range of local and cloud targets. If you have to deal with other systems, it’s handy to know that your backup client can deal with Windows (64 and 32-bit), MacOS, and Linux (Deb and RPM packages), plus there’s a Synology NAS build, too.
By default, Duplicati offers a serviceable browser-based interface—thankfully with a Dark theme option—giving away its more powerful features. There is a command-line version, too, for those who fancy weaving it into their PowerShell scripts.
What’s of real interest with Duplicati is the wide range of supported backup targets and protocols. There’s traditional (S)FTP/SSH and WebDAV, and then, more useful for a newer generation, a bunch of common cloud services, including Amazon S3, Microsoft Azure, Box, Dropbox, Google Drive, Mega, and so on.
If you’re wondering why Windows network shares aren’t specifically listed here, fear not: When choosing the destination with “Local Folder or Drive” selected, click the “Manually Type Path” option. You need to enter the server name and path to the networked backup folder, plus add any required login details in the username/password boxes below this. The standard format is “\\\.” If you’re not sure, open up File Explorer, browse to the remote server folder, then click in the address bar—Windows then helpfully displays the raw address, which you can copy and paste into the box. Ensure you use the “Test Connection” button before moving on.

That’s the basics of this powerful little tool, but don’t overlook the little extras, such as bandwidth throttling in the top-right, plus additional settings to filter files based on size and system attributes.
We should mention another backup tool: the worthy SyncBackFree, part the SyncBack range by 2BrightSparks. The SyncBack range is immensely powerful, and even the free version—limited to FTP and local networks—can become overwhelming with its available options. What SyncBack offers over Duplicati, alongside standard backup, are Sync and Mirror modes. Synchronization isn’t true backup in the technical sense—we’re not going to get into that here—but if you’re after a solution with more flexibility, SyncBack is worth a look.
If you want to implement a quality local backup system, you need a reliable way to store your files. You could just plug in any old USB drive, and use that as a backup— there’s nothing explicitly wrong with that, and it’s certainly better than nothing. The chances of both your desktop and the USB drive failing are slim, unless there’s a fire, flood, or other act of god. An external device with RAID 1 would be our next favorite; there’s a wide range of desktop drives that offer dual-drive support with mirroring—this enhances your backup with redundancy, and should service most home users. The next step up would be an entry-level NAS box, which has the advantage of always being available, and supports additional services, such as being a cloud-based offsite uploader. It also makes its location more flexible, because Ethernet runs can easily be up to 300 feet, so you could stash it elsewhere in your home.
On the next page, we take to the cloud.
Most Popular


