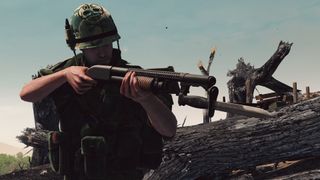
The fantasized version of the Vietnam conflict seen in both silver and silicon screen would have one believe everyone fought with an M16 in one hand, a glowing cigar in the other, and a whole pile of sweaty bandanas back at base. The realities of the war brought many weapons representing a substantial range of military technology, including the growing importance of air power and the need for reliable durability against rough terrain. In Rising Storm 2: Vietnam, you’ll equip over 30 weapons underscoring the closer adherence to reality over theatrics, and you’ll experience how the weaponry of both the Viet Cong and American forces influenced warfare and tactics from screaming jets raining napalm strikes to the quiet deadliness of a tripwired grenade in a coffee can.
Check out our list below for a detailed look at some of the guns and equipment available for both the North and South Vietnamese forces. Also, be sure to read up on what makes Rising Storm 2: Vietnam a deserving addition to your gaming library. If you’re all set to be welcomed into the jungle, head to Steam for the Digital Deluxe Edition which is 25% off its $30/£23 price until its May 30 release. You’ll nab some sweet bonus swag for your soldier’s appearance, including camouflaged boonie hats for both factions, a headscarf and camouflaged ushanka for the VC, and a camouflaged lowland ERDL and Darkhorse pilot helmet for the US. Plus, you get the soundtrack. (Creedence!)
The guns of Viet Cong:
AK-47
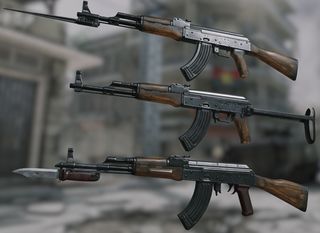
The VC adopted one of warfare’s most iconic weapons as a workhorse rifle capable of withstanding the sweltering climate and rugged conditions of the thick Vietnamese jungle, and it shows in the faded wood construction of its stock and handguard. Its powerful 7.62x39mm caliber translates in-game into superior damage at further ranges than its American counterpart and a higher consistency for lethal shots over wounding grazes especially when penetrating walls or pieces of cover. It boasts a roomy 30-round magazine, a huge advantage for keeping heads down and applying steady pressure to help with closing distances. Up close, an affixed or foldable bayonet can quickly cut down a surprised foe.
The AK-47 comes in three variants: the Russian AKM and two Chinese versions, the Type 56 and 56-1. The AKM provides slightly lower recoil per shot thanks to its slant-shaped muzzle break, but it’ll send out bullets at a slower speed than the more rigid 56. Both the 56 and AKM include bayonets. The 56-1 comes with a folding stock that boosts hipfire performance and superior handling at a penalty to aimed fire.
Best uses: Control and rhythm best pair with the AK-47. Reserve full auto for interior or trench-to-trench encounters—don’t expect to hit anything past 50 meters if you go rock and roll on the trigger. The AKM and Type 56 are superb for large, open maps, and you’ll want to tap-fire at your target’s chest area to ensure a good surface area for your bullets to land on. (With practice, you can time your rifle’s kick so it swings upward into your target’s head.) Switch to the 56-1 for smaller modes or areas you expect close-range encounters, as its foldable stock lets you spray down enemies before they can shoulder their weapons.

SVD
As the magazine-fed rifle on offer for the VC’s Sniper class, the SVD rewards skilled marksmen with the ability to put down multiple targets in succession with its 10-round capacity. Its large cartridge, a punchy 7.62x54mm, delivers death with a single well-placed shot. The PSO-1 scope provides a fixed 4x zoom, a factor of reduced versatility compared to the US’ rival M21 and its variable 9x scope. On the upside, it bestows the largest scope picture out of all available sniper rifles, a significant boon for placing your next shot or eyeballing troop movement.
Best uses: As a sniper, your responsibilities entail relaying enemy positions to your team and capitalizing on your long-range efficiency to pick off important targets such as squad leaders and commanders. Keep crouched or prone—you’ll steady your breathing, brace your rifle for more accurate shots, and enable the VC’s camouflage bonus against overhead recon planes. Note your breathing rate and scope sway, as they’ll both amplify your inaccuracy should you get eager on the trigger.
PC Gamer Newsletter
Sign up to get the best content of the week, and great gaming deals, as picked by the editors.
Baikal IZH-58
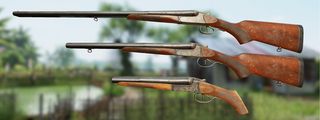
Not to be outdone by the longstanding pedigree of the US M37 shotgun, the Baikal IZH-58 is a boomstick best brought out for clearing chokepoints and orchestrating quick ambushes around blind corners, trenches, and tunnels. Close-range maps such as Hue City and Cu Chi are the ideal playgrounds for the Baikal to shine. Stay on top of its double-barrel action—each shell packs a wallop, but you can only fire twice before needing to go through a lengthy reload sequence.
Best uses: The Baikal’s three variants shorten or lengthen your effective kill range depending on preferred barrel length. Pick the Hunting or Coach version for a mobile skirmisher gameplay style, as you’ll be able to down enemies at a good mix between close and medium range, especially if you choose to bring along slug rounds in addition to your buckshot. The sawn-off variant, apart from scoring obligatory style points, is great for a stealthier flanking approach and blasting enemies from behind with hit-and-run tactics.
RPG-7
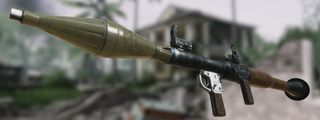
The RPG sits right alongside the AK-47 as a recognizably ubiquitous weapon, and it’s the VC’s premiere Huey-swatter portable enough for a single soldier to lug around. Its straightforward purpose for sending an explosive “hi, there!” into pesky helicopters sees further application for sending enemy soldiers scrambling with its vision-jarring boom and effective splash damage. Keep aware of your periphery after unleashing your rocket—the RPG’s reload is quite long and leaves you vulnerable to retaliation from singed opponents.
Best uses: Harry those helicopters! Hueys and scout choppers are a constant nuisance for the VC team, and a good RPG user can mitigate the aerial aggravation by slugging some rockets skyward to make those pilots buzz off. If you’re beading on a ground target, be aware of the RPG’s backblast, which can lead to some hilarious collateral damage if you aren’t careful.
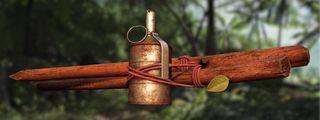
Tripwire Trap
As far as aesthetics go, the Tripwire Trap probably wouldn’t look out of place in some post-apocalyptic warrior’s armory. Some sticks, a coffee can, a grenade, and bungee cord are the only components MacGyvering this explosive together, but its rustic simplicity only helps to blend it in with the foliage. Its set-and-forget trip string means you won’t have to babysit its detonation like the Claymore, but it’ll need comparably extra setup space and a slightly longer arming time to function properly.
Best uses: Though you can’t choose the precise moment to detonate your Tripwire Trap, you can benefit from the additional flexibility of stringing it across chokepoints, doorways, and objective zones while moving on to other areas. It’s a great defensive tool, as well—place it behind your team on an entrenched defense to protect your flank and funnel troops into your squad’s line of fire.
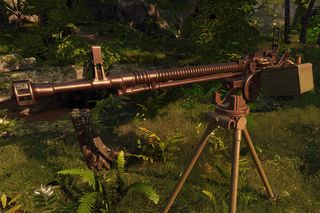
DShK
Say this ten times fast: “Degtyaryova-Shpagina Krupnokalibernyy Pulemyot.” No, that wasn’t some sort of Old God incantation, but it is the full name of the DShK, the heavy machinegun bruiser for the VC. As an emplaced bullet-belcher, it’ll spit enough metal downrange to discourage anyone foolish enough to poke their head above cover. You’ll spot its huge barrel regularly cranked to the sky, as it’s fantastic for peppering incoming airpower with steady damage and injuring pilots and passengers.
Best uses: The DShK is a fantastic force multiplier, and it’s best used when subtlety needs a kick out of the window and into a napalm strike. It’s loud—you’ll attract plenty attention with the deep, staccato cracks of its full-auto fire, so avoid lingering too long for danger of taking a sniper’s bullet. Its aforementioned deadliness against US air vehicles is hampered only by its fixed immobility, so you’ll need your teammates to watch your back as you swivel about for a good angle.
The guns of United States:
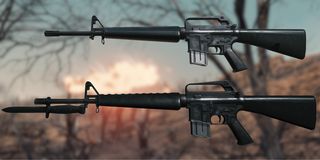
M16
The fully automatic M16 entered Vietnam’s overgrowth with a rocky start owed to frequent jams, sensitivity to climate, and multitude of parts to service. Luckily, the M16 in Rising Storm 2: Vietnam works like a dream, sending accurate fire to roughly 100 meters with more forgiving recoil than the AK-47—a plus for finishing off wounded foes with rapid follow-up finishers. Resort to full-auto sparingly, as the M16 carries a meager 20 rounds in its magazine before clicking dry. Still, its versatility easily matches the AK-47’s sheer stopping power, and you’ll enjoy its adaptability for methodical plinking, rapid bursting, or close-range mag-dumps as needed.
Best uses: Stick the M16’s strengths as a mid-range all-rounder—you can go toe-to-toe with the AK-47 further out, but the Russian rifle’s larger caliber and superior muzzle velocity will often outpace in damage. Use two- to three-round bursts when possible to drop a target and quickly acquire your next one, but make sure to utilize Rising Storm 2: Vietnam’s mag-check feature to stay abreast of your ammo. If you need to get close, don’t forget to attach the included bayonet.
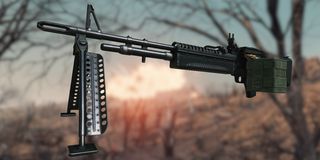
M60
Yes, it’s the Rambo gun. No, you shouldn’t fire it like Rambo. Those metal struts on the front of the barrel is called a “bipod”—a magical wonder that amplifies your accuracy with a simple forward swivel. It’s easy to fall into temptation and hipfire this beast to garnish your best Stallone grimace, but you’ll better serve your team as a mobile gunner with an eye for picking ideal overwatch positions to cover your team’s movements. It excels at narrow turns and as a rear defense of captured objectives with its huge box ammo, but too much prolonged fire can overheat and warp the barrel for a severe accuracy penalty.
Best uses: The M60 favors the supportive teammate who doesn’t let the aggressive reputation of The Pig get to his head. Brace up against cover or deploy the bipod for carpets of effective cover fire—your job isn’t to rack up kills but to cause enough noise and ruckus to prevent the bad guys from scoring kills themselves.
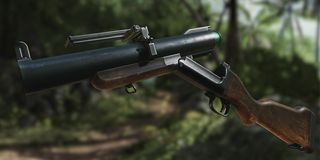
M79
The affectionately named Thumper proves its moniker with the handy ability to lob grenades and other utilitarian shells with a familiar thunk from its tube. The RPG-7 wins in speed, but the M79 responds in equal viability with its versatility in swapping ammo types—HE, smoke, and buckshot—for different scenarios and its ability to arc its fire to keep its user safely behind cover.
Best uses: Choose the M79 for a great tool to indirectly soften up targets from afar with multiple grenade splashes. Consider packing along some smoke grenades, as they’re indispensable for providing an impromptu wall for your squad and team to move around. Its buckshot ammo variant is particularly wicked for clearing enclosed spaces such as VC tunnels and captured buildings.

M37 Shotgun
Soldiers have enjoyed the short-range firepower and modularity of the pump-action shotgun since the muddy trenches of World War I, and the M37 doesn’t deviate from the established formula of point-pow-pump effective for rearranging a room into Swiss cheese. The M37 strives for quantity with its 6-shell capacity and high fire rate, and you can down clustered groups of enemies in mere seconds.
Best uses: Take on a point-man gunplay style if you go for the M37. The shotgun works wonders for its relaxed aiming requirement and high ammo capacity—just point in the general direction of the VC and shoot. You’ll be instrumental in leading charges and pushing the line with far more stopping power compared to rifles and SMGs. Make sure to attach its bayonet for additional close-range deadliness. If you need to cover a wider area, go for the duckbill variant which flattens the shot spread to a more predictable pattern.
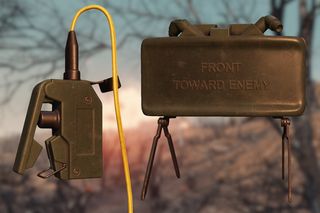
Claymore
With its friendly single-sentence manual of “FRONT TOWARD ENEMY,” the Claymore is a great directional burst of explosive surprise useful for preventing counterattacks and defending objectives. Unlike the VC’s Tripwire Trap, the Claymore needs a tap on the handheld detonator to trigger, but its outward-facing blast helpfully prevents friendly fire mishaps. It sports sturdier construction than the VC’s trap, as it won’t blow up when fired upon, but you’ll need to stick within around 50 meters for your detonation clacker to work.
Best uses: The Claymore works best as a preventative tool for hampering incoming threats and covering additional angles not being watched by your teammates. Grab a squaddie to report when someone gets close in order to correctly time your Claymore’s detonation. With a smaller ground presence than the Tripwire Trap, the Claymore can be placed in tighter corners and below structures and vehicles to keep your trap unpredictable. (Remember to look down at the ground if you need to arm or disarm the Claymore!)
Sponsored by Tripwire
Most Popular

