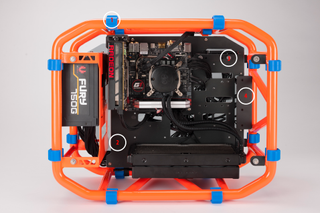
Build It: Caged Power

- The blue rubber bumpers on the D-Frame Mini allow you to position the cage in any orientation you like. They’ll also keep the case from sliding around in your car’s trunk on the way to a LAN party.
- The extra room below the PCIe slot allows for full-length video cards. In our build, the Nano leaves this area sparse and clear.
- Thumb screws allow for the attachment and removal of hard drive and cooler brackets, for tons of modularity.
- The “front panel” is a bit of a misnomer in this cage, where there is no clear front, back, up, or down.
Breaking Out
Throwing all of these parts together in a cage was a lot of fun and was quite a different building experience. Such a build requires you to think more about the aesthetics of the build’s entirety, since there’s no hiding of cables or extraneous accessories here.
Like we said earlier, though, an open-air case build is not without its challenges. One of those major challenges was the cooling system. We started off with a larger cooler that ended up not maintaining good contact with our CPU for some reason, so we had to go with the Deepcool we had on standby. Once we had the radiator and pump in place, we had three PWM connectors to plug in, but only two pinouts to work with. Problems.
We solved this in a roundabout way. First, we plugged the two fans for the radiator into the CPU and case fan pinouts. We then connected the pump to a two-pin Molex-to-PWM adapter. This had two consequences, which we weren’t exactly fond of. First, the two fans ran at different speeds, since each PWM pinout runs as a function of a different temperature sensor. The CPU fan is a function of CPU temps, as you’d expect, but the case fan takes temps from the motherboard itself. While we stayed at acceptably cool temperatures due to the large radiator, we wouldn’t do this when overclocking, as the fan plugged into the case fan connector wouldn't rev up as temps increase. Not good.
The other bad side effect was that the water pump runs at full speed while connected to the two-pin adapter. Normally, you’d connect the pump to a four-pin pinout for much of the same reason you’d attach the radiator fans to them. However, we just needed the pump to work, so we put up with this while we ran our benchmarks.
We wouldn’t recommend attaching fans and pumps this way, and ideally, we’d use a PWM two- or three-way splitter and attach the single side to the CPU PWM connector. But sometimes, you just gotta make things work.
Speaking of benchmarks, our caged rig did pretty well in some aspects, while relatively poorly—compared to our three-way SLI zero-point—in others. In the single-threaded CPU benchmarks, the i7-6700K Skylake performed well, outpacing the i7-5960X in our zero-point. With a 240mm cooling setup, we believe this CPU could score even higher with a little bit of overclocking. When we reviewed the CPU, we found that the 6700K can get a 17 percent performance boost from overclocking. Not bad at all.
When it came to the 3D application benchmarks, the little R9 Nano put up a good fight. Considering our beefy zero-point machine has three GTX 980s in SLI, a single GPU can hardly expect to beat it in raw frames per second.
PC Gamer Newsletter
Sign up to get the best content of the week, and great gaming deals, as picked by the editors.
Despite having less than half the 3DMark score in Fire Strike Ultra, the Nano delivered playable framerates in Tomb Raider and Shadow of Mordor at 4K. Remember that these benchmarks are stress tests, so turning off or reducing antialiasing will render much better framerates at 4K, without a big difference in video quality. In Batman: Arkham City at 1440p, the 92fps means that there’s plenty of power there to keep a FreeSync 1440p monitor synced and happy at 60Hz.
In the multithreaded test, x.264, the octa-core 5960X still reigns supreme, with double the cores that Skylake has to offer. While that seems damning on its surface, the majority of applications people interact with on a daily basis don’t take full advantage of multithreading anyway.
For most gamers and enthusiasts who don’t encode video all day, this build would perform nicely. And with its small, portable, and unique form factor, this PC can be quite the conversation starter at a LAN party.
| Row 0 - Cell 0 | Zero-Point | Our Build | Percent Difference |
| Stitch.Efx 2.0 (sec) | 806 | 781 | +3.1% |
| ProShow Producer 5.0 (sec) | 1,472 | 1,442 | +2% |
| x264 HD 5.0 (fps) | 33.8 | 19.54 | -42.9% |
| Batman: Arkham City 1440p (fps) | 204 | 92 | -54.9% |
| Tomb Raider 2160p (fps) | 87.5 | 36.6 | -58.2% |
| Shadow of Mordor 2160p (fps) | 70.1 | 40.2 | -42.7% |
| 3DMark Fire Strike Ultra | 8,016 | 3,362 | -58.1% |
Our desktop zero point PC uses a 5960X CPU, three GTX 980s, and 16GB of RAM. Arkham City tested at 2560x1440 max settings with PhysX off. Tomb Raider at Ultimate settings. Shadow of Mordor at Max settings.
Most Popular


