8 Practical Uses for Your Old Laptop
This holiday, you pull the wraps off a brand new laptop and open the lid to your shiny new mobile companion. The first thought you might have is to consider which apps you should install first and what's the fastest way to load the up the hard disk with music and movies. Of course, you inevitably have to think about your old laptop, and what price you can sell it for on Craigslist. But before you dump an old laptop or retire it to the den of forgotten gadgets, here are eight practical ideas on how you can extend its life.

1. Run a Home Server for File-Sharing
One sensible use for a last year’s netbook is to turn it into a network-attached storage server. This allows you to store files on the hard drive, assign user groups, and access the drive over your home network. Most of the popular NAS applications -- such as Openfiler and Nexenta -- provide a few options for how you install the NAS software. You can load it up as a distro that actually takes over the laptop or as a client that runs in Linux or Windows. These open-source tools are similar to Microsoft Home Server and many offer a Web-based console to control the NAS from a remote computer, so once you set up the NAS on your netbook, you can leave it to sit idly next to your router and never have to even open the lid.
You’re getting the most out of the processor, RAM, and internal storage while using a new laptop for other purposes. Another advantage to using a netbook is that, because of the architecture of the Atom processor, the disk speed access is more than adequate for a NAS. Additionally, power consumption is a trickle on the Atom compared to a full-blown desktop processor, so you are getting good performance and low power use. The caveat is that netbooks and notebooks aren’t designed to run 24/7 like a dedicated server, so you run the risk of your netbook running out of steam and burning out.

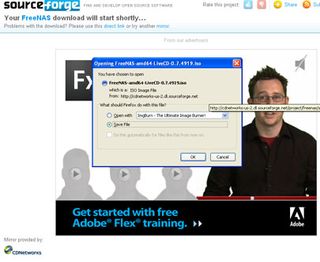
FreeNAS might not have the most extensive feature-set; it is by no means a replacement for Windows Server in a business setting. But it does provide the basics you need for a file server and supports many of the latest protocols including iSCSI, a common standard for business users, and FTP for setting up a remote session for file transfers. The best way to get started is to download the ISO file available at www.freenas.org . Use the Windows 7 built-in ISO burner or IMGBurn -- just double-click the file, insert a blank CD, and burn the disk image. We used a Lenovo S12 netbook for this. You'll need an external CD drive for any netbook; we used a Plextor PX-610U drive. (You can also use an IMG file and write the file to a USB key but when we tried this it did not work with the Lenovo S12.) On the netbook, load the CD and press the boot options key when you first turn on the computer -- with the S12, the key is F12. Select the USB drive and follow the options to install FreeNAS. Here, you can choose to add FreeNAS to a partition as an embedded install or you can just use the entire disk (which uses FreeBSD for the OS).

Burn the FreeNAS ISO file to a blank CD, boot your laptop, and install the server.
We used the embedded install for our project. Once installed, you will see a simple menu where you can assign an interface and set the IP address. Once you know the IP address, you can move over to a remote computer -- connected through the same router -- and type in that IP address to access a Web setup for the NAS. (You may need to assign that port on your router.) Use the login "admin" and password "freenas" to access the NAS initially and change as needed. We won't walk through all of the steps required to turn your laptop into a NAS -- follow this guide for more details .
Your NAS is now ready for access form any computer, and you can make drives as needed, use the assigned disk space for file storage, set up an iTunes streaming server, configure media sharing for video game consoles, set up BitTorrent, add an FTP server, and configure additional disks such as external hard drives or even multiple USB keys in free USB slots.
PC Gamer Newsletter
Sign up to get the best content of the week, and great gaming deals, as picked by the editors.

FreeNAS is simple to set up and install, and once it's working, you can remote-connect over the Web.
Most Popular

